Magnesium ™ User’s Guide Powerful, Lightweight & Durable Upright Vacuum Important! Read this manual carefully, and keep for future reference.
E Enjoy N G L I S H Thank you for purchasing the Oreck Magnesium™ upright vacuum cleaner. The Oreck Magnesium™ features a 7-year warranty along with an HEPA Odor Fighting Inner Bag. The inner bag is already installed. Simply install the handle and you are ready to enjoy your new Oreck Magnesium Upright Vacuum Cleaner. Welcome to our Call. Click. customer service program. To speak with an Oreck representative call or click using the information below.
E Safety N G L I S H General Warnings IMPORTANT SAFETY INSTRUCTIONS! When using an electrical appliance, basic precautions should always be followed, including the following: READ ALL INSTRUCTIONS BEFORE USING THIS VACUUM CLEANER WARNING!: To reduce the risk of fire, electric shock, or injury: • Do not leave appliance unattended when plugged in. Unplug from outlet when not in use and before servicing. • Do not use outdoors or on wet surfaces.
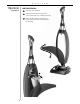
E Operation N G L I S H Parts List 1 Handle with soft comfort grip 2 On/Off Switch 3 Cord Dump 4 Magnesium Handle 5 Deflector 6 Bag Dock 7 Carry Handle 8 Zipper 9 Main Bumper 10 Power Cord 11 Lower Tube 12 Fan Housing 13 Rear Wheels 14 Cover 15 Outer Bag 16 Power Head 17 HEPA Odor Fighting Inner Bag 1 4 5 6 17 8 2 14 3 9 10 16 15 7 11 12 4 13
E Operation N G L I S H Assembling the Handle continued 1 Align the four connector tabs at the bottom of the magnesium handle with the four receiving ports at the top of the outer bag and insert until a “snap” is heard. 2 Snap cord assembly into the cord clip located on the back of the magnesium handle. Leave excess cord at the power head to allow movement. 1 2 Cord Clip 3 Operating the Oreck Magnesium™ Make sure the disposable inner bag is in place.
E Operation N G L I S H INNER BAG REMOVAL: continued 1 Unzip outer bag completely. 2 Pull tab on bag to release bag dock from connector. Bag dock door will hinge downward. 3 Gently pull bag cardboard collar outward from bag dock. Saniseal® dust seal will close automatically.
E Operation N G L I S H INNER BAG INSTALLATION: continued 4 Slide the cardboard collar completely onto bag dock door. 5 Firmly push bag dock door with both thumbs on indication point until it snaps. 5 4 The performance of your new vacuum greatly depends upon care and maintenance. The instructions in this manual will guide you in performing basic care and maintenance. To obtain the most satisfying years of service read the instructions and keep them handy for future reference.
E General Use & Maintenance N G L I S H Simple Operating Tips: You’ll love the way your Oreck cleans under things, and is SO lightweight and easy to use. The following are a few simple suggestions regarding its operation: • When inserting a new disposable inner bag, first puff out and OPEN the bag. • When the disposable inner bag is full, replace it. • Check the disposable inner bag at least once a month. continued • Do not run the vacuum over the cord.
E General Use & Maintenance N G L I S H Stuffing or Blockage IMPORTANT: On plush and new carpets, stuffing may occur inside the intake tube and the lower tube assembly. This is due to excessive fuzz and loose cuttings in the carpet. Stuffing could occur for the first few cleanings until all the loose material is removed. Due to the high efficiency of the vacuum, many older carpets will cause stuffing when the vacuum is first used on them.
E General Use & Maintenance N G L I S H 4 Insert tube and push down until the tube is seated. Make sure O-ring is in place against fan housing opening. 5 To finish reassembly, replace and tighten collar clockwise until collar locking tabs are locked in place. Note: Many times blockage occurs due to a full disposable inner bag causing dirt to back down the air flow system.
E Troubleshooting N Problem Vacuum will not run. Service problems that appear to be major can often be solved easily. You can be your own troubleshooter by reviewing this guide. Vacuum does not pick up. All other servicing should be done by an Oreck authorized service center. Vacuum still does not operate properly. Parts G L I S H Check What to do • Not plugged in properly. • No electricity in wall outlet. • The Brushroll is blocked.
E Warranty N G L I S H ORECK MANUFACTURING COMPANY: (Oreck Manufacturing Company gives you the following limited warranty for this product only if it was originally purchased for residential use, not resale, from Oreck or an Oreck Authorized Retail Dealer.) Oreck will repair or replace, free of charge, to the original purchaser, any part that is found to be defective in material or workmanship within seven (7) years of the date of purchase. This limited warranty applies to normal domestic use.
E S P A N O L © 2011 Oreck Holdings, LLC. All rights reserved. All marks, text, logo’s, product configurations and registered trademarks are owned and used under the authority of Oreck Holdings, LLC. This product may be manufactured under one or more of the following patents: US6,539,575; CA2,585,436; MX268228; US6,033,451 A; USRE38,842 E; CA2,335,860; GB1,091,680; EP1,091,680 B1; US7,024,724 B2; US7,258,709 B2; CA2,498,103; MX253069 And include the pending patents also language.