53439-01 REV A ™ STEAM-IT All Purpose Steam Wand STEAM100 User’s Guide Important! Read all instructions carefully, and keep for future reference.
E N G L I S H Contents Safety . . . . . . . . . . . . . . . . . . . . . . . . . . . . . . . . . . . . . . . . . . . . 3 Parts . . . . . . . . . . . . . . . . . . . . . . . . . . . . . . . . . . . . . . . . . . . . . 5 Product Components & Accessories . . . . . . . . . . . . . . . 5 Operation . . . . . . . . . . . . . . . . . . . . . . . . . . . . . . . . . . . . . . . . . 6 Operating Instructions . . . . . . . . . . . . . . . . . . . . . . . . . . . 6 Using the Steam-It™ . . . . . . . . . . . . . .
E N G L I S H General Warnings Safety IMPORTANT SAFETY INSTRUCTIONS! When using an electrical appliance, basic precautions should always be followed, including the following: READ ALL INSTRUCTIONS BEFORE USING THIS STEAM CLEANER WARNING! To reduce the risk of fire, electric shock, or injury: • Do not leave the steam cleaner unattended when plugged in. Unplug it from the socket when not in use. • To prevent electric shock do not use outdoors. • Not to be used as a toy.
E N G L I S H General Warnings Safety IMPORTANT SAFETY INSTRUCTIONS! • Do not touch any hot areas on the steam cleaner. It is normal for the steam cleaner to heat up during operation. • Do not use the steam cleaner to treat any item of clothing while being worn on the body. • The force and heat of the steam may have an adverse effect on some materials. Always test the steamer on a small concealed area to determine if it is suitable for treatment with the steam cleaner.
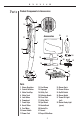
E Parts N G L I S H Product Components & Accessories 25 26 27 28 1 2 12 3 16 Accessories 11 17 4 10 9 18 15 13 20 21 14 19 22 5 6 8 7 23 24 Parts 1 2 3 4 5 6 7 8 9 10 11 Steam Regulator Control Switches Water Tank Cap Water Tank Lock Button Powerhead Towel Grips Brush Slides Cord Wrap Lower Handle Power Cord 12 Cord Dump 13 Squeegee 14 Utility Tool 15 Deflector Nozzle 16 Floor Cloth 17 Utility Cloth 18 Spot Brush 19 Nozzle Brush 20 Nozzle Pin 21 Funnel 22 Carpet Glide Base 5
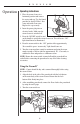
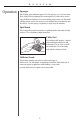
E Operation N G L I S H Operating Instructions 1. Place the steam cleaner in a horizontal position and remove the water tank cap. Use the funnel provided to slowly fill the 1 liter water tank with clean water. Replace the cap securely. 2. Insert the power plug into an electrical outlet. Make sure the steam cleaner is switched off. 3. Press the ON/OFF switch located on the handle to switch the steam cleaner on. The red heater “ON” light should now be illuminated. 4.
E Operation N G L I S H Cleaning Surface/Steam Setting Reference Cleaning Surface Steam Regulator Setting Carpet & Rugs Maximum (High) Glass & Mirrors Minimum (Low) Grout on Hard Surfaces Medium to High Tiled Surfaces, Cabinets & Countertops in Kitchens & Bathrooms Low to Medium Sealed Hardwood Low Carpet Cleaning When cleaning carpets and rugs, leave the steam regulator control set to “maximum.
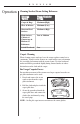
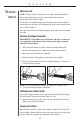
E Operation N G L I S H Stubborn Stains For removing stubborn stains or embedded grime on hard surfaces, fold and attach the cloth leaving the brushes underneath the powerhead visible. Move the brush sliders so that the brushes appear underneath the powerhead. Move the brushes backwards and forwards over the selected area. NOTE: Do not use the brushes for routine carpet and hard floor cleaning as unnecessary scrubbing may cause damage.
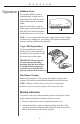
E Operation N G L I S H Squeegee For cleaning glass and mirror panels. Use the squeegee at a very low steam flow. Achieve this by adjusting the steam regulator. A cloth can be used to wipe the blade and remove excess water during usage when cool. For small window panels, remove the squeegee tool and spray the steam directly onto the surface. Use the squeegee separately to wipe away the moisture. Spot Brush For cleaning the grout between tiles or stubborn marks and stains on hard surfaces.
E Maintenance N G L I S H After Each Use NOTE: When you have finished steam cleaning, ensure that both the power switch and steam switch are turned off and that the plug is removed from the electrical outlet. Let the unit cool and then empty any remaining water from the tank by unscrewing the water tank cap and turning the steam cleaner upside down over a sink or outdoors. Store the steam cleaner by using the hanging strap at the top of the handle if needed.
E Troubleshooting N G L I S H If the following troubleshooting tips do not resolve the problem please contact Oreck Customer Service. U.S.: 1-800-989-3535 Canada: 1-888-676-7325 IMPORTANT! Always unplug and allow the steam cleaner to cool down before conducting any troubleshooting. See safety warnings. Problem Cause Solution Steam cleaner is not properly plugged into an electrical outlet or is not switched on. Insert the plug into an electrical outlet and switch the steam cleaner on.
E Warranty N G L I S H ORECK MANUFACTURING COMPANY: (Oreck gives you the following limited warranty for this product only if it was originally purchased for use, not resale, from Oreck or an Oreck Authorized Retail Dealer.) Oreck will repair or replace, free of charge, to the original purchaser, any part which is found to be defective in material or workmanship within one (1) year of the date of purchase. This limited warranty applies to normal domestic use.