
Operation Manual


EN
10
TIP
NOTE
NOTE
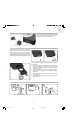
1. Detach the speaker stand from its support housing using the allen key (provided).
2. Pull out the light / dark gray speaker wire from the speaker wire terminals.
3. Untie the speaker wire knot.
4. Pull the wire out from the speaker stand.
5. Insert the speaker wire through the wall-mount hole and re-attach to the corresponding color speaker terminals.
6. Screw the flat wall-mount to the back of the speaker.
7. Screw the wall-mount bracket into the wall. Be sure to screw into a solid surface.
8. Attach the speaker to the wall mount bracket.
Each speaker should ideally be mounted approx. 0.9 meters (3 feet) above ear level to achieve an optimum listening
experience.
ADDITIONAL CONNECTIONS (OPTIONAL)
AUXILIARY
At the back of the unit are Aux (Auxiliary) in / Audio out jacks, allowing for connections to additional audio systems or speakers.
Simply connect the appropriate cable wires to the jacks of the audio system. Press the remote control aux button. "AUX"
appears on the VFD. Operate the unit and additional devices as normal.
Aux feature can be controlled from the remote control only, not from the unit itself.
EARPHONES
Similarly, while the slim speakers and subwoofer provide crystal clear audio playback, you may optionally connect earphones to
the earphone jack at the back of the unit and listen to audio at your own convenience and without disturbing others.
BASIC OPERATIONS
References to "CD" or "disc" includes both audio CDs and MP3 / WMA CDs unless otherwise noted.
SETTING THE CLOCK
1. To adjust the system clock, power off the unit so that it is in standby mode.
2. Press the
/
button on the unit. The clock minutes will flash on the unit's VFD. Press the - / + button on the unit to
adjust the minutes by 1-minute increments. Press and hold to adjust more quickly.
3. Press the
/
button on the unit again. The clock hours will flash on the VFD. Press the - / + button on the unit to adjust
the minutes by 1-hour increments. Press and hold to adjust more quickly.
4. Press the
/
button to confirm the desired clock setting.
+06(QJ5B1RYB 11/10/2005, 08:13 PM10