Model: MP303 User Manual Manuale d'uso Manuel d'utilisation MP303 Eng Cover r10 1 9/15/04, 4:58 PM
EN DIGITAL MP3 PLAYER (MP303) USER MANUAL TABLE OF CONTENTS Introduction ................................................................................. 1 Product Overview ....................................................................... 2 Front / Back View ................................................................... 2 Attaching Earphones / Neck Strap ......................................... 3 LCD Display ...........................................................................
EN Equalizer .............................................................................. 18 Play Mode (Normal, Repeat Track, Random Play) ................... 19 Contrast ................................................................................ 19 Auto Dimmer ........................................................................ 19 Power Savings ..................................................................... 20 Record Settings ...............................................................
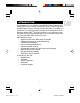
EN INTRODUCTION Congratulations on your selection of the MP303.This full-featured MP3 music player offers a variety of features including multi-format data storage support, and you can also transfer files easily via a USB2.0TM connection. Your player supports multiple audio standards such as Windows Media AudioTM and MP3 formats, and combines various playback and audio enhancing features into a compact design that you can comfortably wear around your neck. Main features include: • Support for MP3 and .
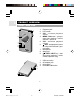
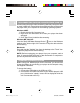
EN PRODUCT OVERVIEW FRONT / BACK VIEW 1 1. 2. 3. 7 8 9 4. 2 5. 3 4 5 6 6. 7. 8. 9. 1. 2. 3. 4.
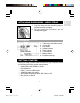
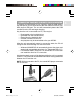
1. Loop the strap around the MP3 player's loophole and secure tightly. 2. Plug the earphone connector into its corresponding jack. LCD DISPLAY 1. 2. 3. 4. 5. 6. 7. 8. Track name and album name Volume bar Play status Playback mode Track number Time elapsed Battery status Equalizer settings GETTING STARTED Before you begin, please check to make sure your computer meets the following minimum system requirements: • • • • • • Intel® Pentium® 133MHz or faster CD-ROM drive USB 1.1 port or USB2.
EN THE RESET ON / OFF SWITCH Please note the following important instructions about the Reset On / Off switch: IMPORTANT: Do not switch off the "Reset On / Off" switch when the device is running. By doing so you risk file corruption of the hard disk, which may mean that the hard disk will need to be reformatted. The Reset On / Off switch is designed for use when you are not using the MP3 player.
Any time the unit is connected to a PC, files may be: • • • • • Downloaded to the hard disk drive; Uploaded from the hard disk drive; Erased from the hard disk drive; Created or deleted on the unit; And playlists may be downloaded to the your MP303. After the unit automatically enters its connection state, the PC will recognize the unit and assign it a disk drive name. • Windows 2000/ME/XP will automatically detect the player and assign it with next available drive letter. (i.e.
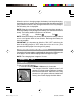
EN DISCONNECTING YOUR MP3 PLAYER FROM YOUR PC Disconnecting the player while transferring data may corrupt the data or result in data loss. Please follow the procedures below to disconnect the player from your computer for the following operating systems. Windows 98SE: 1. Double click the My Computer icon. 2. Right click the removable drive letter your player has been assigned. 3. Click "Eject" from list before disconnecting.
NOTE: Charging only begins after the computer has been turned on. When the battery is fully charged, the battery icon shows and will blink slowly. The battery status indicators are as follows: Low Full Medium NOTE: When the battery icon shows, this indicates the battery is about to run out of power within a few minutes. Recharge the battery as soon as possible. IMPORTANT: It is important to slide the "ON / OFF" switch on the back of the MP3 player to "OFF" when the unit is not in use.
EN NOTE: Once your MP3 player is turned on, a power-saving feature will cause your MP3 player to automatically shut off if no key is pressed for 1 minute. POWER OFF In any operation/mode, press and hold the / OFF button until the unit powers off. IMPORTANT: It is important to slide the ON / OFF switch on the back of the MP3 player to "OFF" when the unit is not in use. (This prevents the MP3 player from using all it's power).
Press and hold the MENU / ON key to return to the previous screen. NOTE: If no button is pressed within 2 seconds, the player returns to the previous screen. FILE TRANSFER After connecting your MP3 player to the computer, the computer will detect and identify the device as a removable storage drive, allowing you to drag and drop files between your computer and your player.
EN 3. Drag and drop the file(s) you wish to copy from your computer onto your player. NOTE: Your MP3 player is equipped for mass data storage support. This means that it can also be used as a portable hard drive to store and transport all forms of computer data files. You will not be able to view or play any of the stored data unless it is one of the supported audio formats.
To stop the playback of the file, press the / OFF button. button. To pause the playback of the file, press the To resume playback of a paused file, press the button. To restart the playback of the file from the beginning, push the button in the down / rewind position. The file will return to the starting position and resume playback. To skip / fast forward / rewind a file: 1. Press the key up or down to forward or rewind within a file.
EN During playback: • The elapsed time of playback and total time of playback would be displayed. • If there is not enough space to display the ID3 name of selected file (track), the name will scroll from the right to left during playback. NOTE: Under Normal / Repeat One / Repeat All play mode, if the current playback is the last track, the next track means the first track in the playlist. Under Random or Repeat Random play mode, the next track means next random track.
Once the play mode setting has been selected, the user will be returned to the Settings menu. From this menu, press and hold the or MENU / ON button to return to the original display from which you started. FOR RADIO FILES Selecting the FM folder presents you with the files that have been recorded by the player. There are no sub-folders available in this folder. (If the FM folder is deleted, the player software will automatically recreate it the next time FM Radio is recorded). FM files also use the icon.
EN To initiate playback for Voice Files: 1. From the Main Menu, selecting the "Browser" option will take you to the Root Menu. To select the "Browser" option, use the button to highlight "Browser" and then press the or MENU / ON button. 2. At the Root Menu, select the "Voice" folder and then press the or MENU / ON button. 3. Use the button to scroll down to the desired file or folder, and then press the or MENU / ON button to select. 4. Press the button to begin playback.
RADIO MODE In the Radio screen, you can either scan for radio stations automatically or manually. When scanning for a station automatically, your MP3 player will scan frequencies and stop scanning when a signal strong enough to listen to is detected. IMPORTANT: The headphone cord must be inserted into your MP3 player because it serves as the antenna for the radio. To get to the Radio mode: From the Main Menu, selecting the "Radio" option will take you to the FM folder.
EN To tune a channel: 1. In the "Radio" mode, press the / OFF button to set the screen in the "Tune" mode. (If the screen says "Preset" then you will need to press the key twice). 2. Then use the button to move up or down. (The FM band number will increase or decrease as you move the key. Simply tune until you find a clear channel you want to listen to). NOTE: FM scanning reception may vary in different areas. To exit the Radio mode: or MENU / ON button. (You will return to the Main Simply press the Menu).
. 5. After the microphone source and data rate have been verified, press and hold down the or MENU / ON button to return to the previous menu. To get to the Record mode: From the Main Menu, selecting the "Voice" option will take you to the FM folder. To voice record: 1. Following the establishment of the settings for voice recording, return to the Main Menu by pressing and holding the MENU / ON button for 2 seconds or more. 2.
EN NOTE: During recording, elapsed time is displayed, and the total amount of available recording time is displayed. THE SETTINGS MENU Selecting the Settings option at the Main Menu takes you to the Settings menu where user configurable settings are selected. The Settings menu consists of two screens. The first menu provides the following options: "Equalizer", "Play Mode", "Contrast", and "Auto Dimmer".
PLAY MODE (NORMAL, REPEAT TRACK, RANDOM PLAY) The various play modes include: Normal Repeat Track Repeat All Shuffle Shuffle Repeat. Please see PLAY MODE in the PLAYBACK OPERATION section in this manual for more details. CONTRAST For LED displays, the Contrast sub-menu provides the user with the option of modifying the default level of the display intensity. The contrast is normally set to 50% for readability and power management. To increase or decrease the contrast setting: 1.
EN When a command is entered (a button or key is pushed), the display will return to its normal level of brightness (intensity) and remain that way until the 5 seconds passes without another command to the player To increase or decrease the contrast setting: key to scroll down to select "Settings." 1. On the Main Menu, use the 2. Press the or MENU / ON button. 3. On the "Settings" Menu, use the key to scroll down to select "Auto Dimmer." 4. Press the or MENU / ON button. 5.
4. Once "Power savings" has been highlighted, press the or MENU / ON button. 5. Move the key up (or down) to select "Disable", "1 min", "2 mins", "5 mins" or "10 mins." 6. When the desired setting has been reached, press the or MENU / ON button to return to the "Settings" Menu, or press and hold the or MENU / ON button to return to the Main Menu. RECORD SETTINGS The Record Settings sub-menu is used to: • Determine the source of a recording (either the internal microphone or the internal FM radio).
EN NOTE: The higher the data rate for recording, the higher the quality of the recorded content, and the larger the size of the data file. LANGUAGE SETTINGS The following languages are supported: European languages: • English (Default language) • French • German • Italian • Portuguese • Spanish Asian languages • Simplified Chinese • Traditional Chinese To select a language: key to scroll down to select 1. On the Main Menu, use the "Settings," then press the or MENU / ON button. 2.
EN DELETING FILES AND FOLDERS When viewing a list of files or folders in the MP3 Music Jukebox, you can delete a file or folder by scrolling with the key to highlight the file or folder you would like to delete. To delete a file or folder: 1. Use the key to scroll down to select any "Music", "Voice", "Radio" or "Data" file or folder. 2. Once a selection is highlighted, press the / OFF button. 3. The menu (below) is displayed to confirm whether or not you would like to delete the selected file or folder. 4.
EN COPYRIGHT Users are also asked to note that the transfer of memory containing data or MP3 files protected under copyright laws are only permissible within the restrictions imposed. SAFETY AND CARE This product is designed to give you years of service if handled properly. Observe the following guidelines: • Clean the unit with a damp cloth and mild detergent. • Avoid dropping the unit or placing it in a high-traffic location. • Never immerse the unit in water.
The buttons do not work. The "hold" feature may be on. See section "THE HOLD SWITCH" section above for more information. No sound is coming out of the headphones. Check to make sure they are plugged in correctly and the volume is turned up. Your computer does not locate your player. Check to make sure the USB cable is connected properly. If you are using Win98SE, make sure you have installed the driver software. Cannot store any more files on the player. The memory may be full.
EN TECHNICAL SPECIFICATIONS Hard disk memory: Dimensions: Weight: LED dimension: FM radio frequency: Radio preset channels: Earphone out: Frequency range: Signal to noise ratio: Battery: Battery life*: MP3 to PC connection: Supported playback formats: Player firmware: 1.5 GB 88mm (L) x 52mm (W) x 18mm (T) 110 grams 27mm (L) x 25mm (W), 112 x 64 pixels 87.5 ~ 108MHz 15 preset channels max. 20mW 20Hz ~ 20000Hz 90dB Built-in rechargeable Li-ion battery Approx.
EN ABOUT OREGON SCIENTIFIC Visit our website (www.oregonscientific.com) to learn more about Oregon Scientific products such as digital cameras; MP3 players; children's electronic learning products and games; projection clocks; health and fitness gear; weather stations; and digital and conference phones. The website also includes contact information for our customer care department in case you need to reach us, as well as frequently asked questions and customer downloads.
EN This equipment generates, uses and can radiate radio frequency energy and, if not installed and used in accordance with the instructions, may cause harmful interference to radio communications. However, there is no guarantee that interference will not occur in a particular installation.
© 2004 Oregon Scientific. All rights reserved.