CORDLESS TELEPHONE WD338 USER’S GUIDE WD338 COVER.
Contents 1. STANDARD FEATURES .......................................................... 4 1.1 KEY OPERATIONS .......................................................................... 4 1.2 THE BASE UNIT .............................................................................. 5 1.3 THE BASE DISPLAY ....................................................................... 7 1.4 INSTALLATION ................................................................................. 8 1.
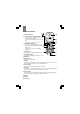
4. WEATHER FEATURES ........................................................... 3 4 4.1 WEATHER FORECASTING ON THE HANDSET ........................... 34 4.2 TEMPERATURE ON THE HANDSET ............................................. 34 4.3 WEATHER FORECASTING ON THE BASE UNIT ........................ 35 4.4 OUTDOOR TEMPERATURE SENSORS ON THE BASE UNIT .... 35 4.5 INDOOR TEMPERATURE SENSOR IN THE BASE UNIT ........... 36 4.6 REMOTE TEMPERATURE AND HUMIDITY ALARM SETTING ... 36 5. GAMES ............
1 STANDARD FEATURES 1.1 Key operations 1 Clear button / Phonebook button / Mute - Press this to go to the previous menu or to clear last entered digit. - Press this to mute the microphone during call. - Press this to view the phonebook. 2 Down button / Caller ID - Press this to move through the menu or to decrease earpiece/speakerphone volume during a call. - Press this to review the caller display information. 3 Phone button Press this to begin and end a telephone call.
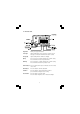
1.2 The base unit Page button Allows you to page the handset. In use light Lights steadily when a call is in progress or flashes if new messages or new caller ID numbers have been received. Charge light Lights steadily when the handset is charging. Up Key Press to increase or change the date, time or alarm setting. Press and hold to increase in speedset mode. Down Key Press to decrease or change the date, time or alarm setting. Press and hold to decrease in speedset mode.
Care of the weather phone * Do not clean any part of your weather phone with benzene, thinner or other solvent chemicals - this may cause permanent damage that is not covered by the guarantee. When necessary, clean it with a damp cloth. * Keep your weather phone away from hot, humid conditions or strong sunlight. * Every effort has been made to ensure the highest standards of reliability for your weather phone.
1.3 The base display Symbol What this means when it appears 1. Weather forecast 5 forecast symbols: Sunny, Cloudy, Partially Cloudy, Rainy & Snowy 2. Remote temperature Temperature from remote sensors with high /low alarms 3. Remote channel Channel 1 remote sensor unit Channel 2 remote sensor unit Channel 3 remote sensor unit It means that at least one channel has been found It means the channel searching function is in progress It means that there is no sensor found. 4.
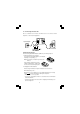
1.4 Installation Choosing a site for the base unit The base unit should be installed where: * the mains adapter plug will reach a 240Vac switched mains supply socket NEVER try to lengthen the mains power cable. * the telephone cable will reach your telephone line socket (you can install an extension socket if necessary). * it is not close to another telephone - this can cause radio interference. * it is not close to a sink, bath or shower, or anywhere else where it might get wet.
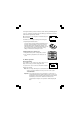
1.5 Connecting the base unit Choose a suitable site for the base unit. Make sure it is not near to another telephone, or other electrical equipment. To phone wall jack To AC wall outlet Installing Handset batteries The two rechargeable Ni-MH Batteries (AAA size) come with your phone. 1. Fitting the batteries in the handset Insert the two rechargeable batteries as indicated, matching correct polarity (+,-) Note: Reversing the orientation may damage the handset.
To charge the handset, put it back in the base cradle. The base [CHARGE] light will come on to indicate the charging of handset. Always put the handset in the base cradle with the keypad facing outwards. When the battery is fully charged, the handset battery icon . will look like this Your handset is now ready for making and receiving calls. 3. Replacing the handset batteries If you have been using your handset and find that you can no longer recharge the batteries, they may need to be replaced.
Electrical safety * Do not install the base unit near a sink, bath or shower, or anywhere else where it could get wet. Electrical equipment can cause serious injury if used while you are wet or standing in water. * If the base unit ever falls into water, Do not retrieve it until you have unplugged the power lead from the mains and the telephone line plug from the telephone socket; then pull it out by the unplugged cables.
To answer a call The handset will ring when there is an external call. The icon [EXT] will flash regularly on the handset display. * Press OR * Press When you have answered a call, the display shows the call duration after about 15 seconds. To end a telephone call * Press . To redial the last number * First press and then press .
1.8 Phone book The weather phone has 50 memories for storing telephone numbers up to 20 digits. The name of the phone number can be stored with a maximum of 8 characters To store a number in the memory 1. Press the button to select “Phonebook” 2. Press 3. Press 4. Select “Add Entry” 5. Press 6. The handset display shows “Name” 7. Enter the name (see key guide below) 8. Press 9. The handset display shows “Number” 10. Enter the number using the keypad 11. Press 12.
To make a call to a stored number 1. Press 2. Press number. 3. Press or and select the required entry. Press to begin a call. To clear a number from the memory 1. Press 2. Press to select “Phonebook” 3. Press 4. Press to select “Delete Entry” 5. Press 6. Press or and select the required entry 7. Press 8. The corresponding number is shown on the display 9. Press to confirm 10. The handset display shows “deleted” To modify a number from the memory 1. Press 2. Press to select “Phonebook” 3.
1.9 Caller display If you have subscribed to this service from your phone network operator, the caller’s phone number will be shown on the handset display when there is an incoming call. The phone can store the caller ID’s of up to 10 different call numbers. Note: If the caller’s phone number was stored in the phone book, the associated name will be displayed with the phone number.
You can make a phone call to the number by pressing at any time during the number display. If no number is received from the caller, then ------------ is shown on the handset. To clear the call information * Repeat steps 1 to 4 of the above * Press again * Press once * Select the message “Delete?” * Press to clear the caller information (or press the caller information) if you don’t want to delete 1.
1.11 Tone and volume You can adjust the tone you hear from your weather phone to suit your own preferences. Key tone on/off Each time you press a key on your handset, you will hear a tone. To turn this off: * Press * Press * Press key or repeatedly to select the “Handset Menu” * Select the “Warning Tones” * Press * Select the “Key Press” * Press * Press * Press or and select “off” or “on” to confirm To return to standby mode, press and hold .
Out of range warning tone When the handset is moving out of the range from the base unit, you will hear the out of range warning tone. To turn this tone off: * Press * Press * * Press Select “Warning Tones” and select “Handset Menu” * Press * Press * Press * Press or * Press to confirm and select “Out of Range” and select key tone “off” or “on” Press and hold the button to return to standby mode. Handset ring tone You have a choice of five ring tones for external incoming calls.
Handset ring volume You have a choice of five ring volumes, or turning the ringer off. To choose one of these options: * Press * Press and select “Handset Menu” * Press * Press * Press * Press or to select the desired handset ring volume To turn off the handset ringer, select “Volume Off” * Press once and select “Ring Volume” to confirm Press and hold to return to standby mode. Handset ring priority Ring priority allows you to set one handset to ring before others start.
1.12 Paging the handset from the base unit This feature is very useful if you can’t remember where you put your handset. Make the lost handset ring for a fixed time of 30 seconds by pressing [PAGE] on the base unit. Note: You cannot have an intercom conversation between the handset and base unit.
2 MULTI-HANDSET USE 2.1 To register a new handset Your original handset is already registered to your base unit. You can register up to four more handsets to make and answer calls via the same base unit. Additional handsets are supplied with a charge adapter for recharging their batteries. You can also register your handset to up to three more base units.
To check the the Base ID on your handset 1. Press 2. Press and select “Setup” 3. Press 4. Press and select “BaseID” 5. Press 6. The BaseID will show The new handset is now registered to the base. To de-register a handset You may need to do this in order to replace a handset. 1. Press 2. Press and select “Setup” 3. Press 4. Press and select “Remove HS” 5. Press 6. Enter the PIN code and press 7. Press 8.
5. Press The display shows the numbers of the handsets registered with the current base 6. Press or to make your selection Either * Select the base number that has the tick against it. This means your handset has been registered to this base before OR * Select “Automatic” so the handset will automatically link up to the first base unit within range. 7. Press to confirm 2.2 Multi-handset use Up to 5 handsets can be registered to one base.
To change the ring tone of an intercom call: 1. Press 2. Press and select “Handset Menu” 3. Press 4. Press and select “Internal Melody” 5. Press 6. Press 7. Press or to select a melody. to confirm 8. Press and hold to go back to standby mode Call waiting If an external call comes in during an intercom conversation, you will hear a “Call waiting” tone. 1. To terminate an intercom call, press 2. The external line will ring. Press answer the external call.
2.3 Conference call You can have a conference conversation with an external call party and two internal calling parties.
3 CUSTOMISING THE HANDSET AND BASE 3.1 Your handset name The user name of your handset can be changed. To change this: 1. Press 2. Press and select “Handset Menu” 3. Press 4. Press and select “Handset Name” 5. Press 6. Change the name to your new selection (Maximum of 8 characters- pls refer to 1.7 on how to use the keys) 7. Press to confirm 8. Press and hold to return to standby mode 3.
3.3 Handset display language The default language for the handset display is English . You can also change the handset display language to French, Spanish, Italian and German. To change to other language 1. Press 2. Press and select “Handset Menu” 3. Press 4. Press and select “Language” 5. Press 6. Press 7. Press or and select your preferred language to confirm 8. Press and hold to return to standby mode 3.
3.5 Dial out restrictor (Baby call) With this option, users cannot use the weather phone to make any external calls, except to the pre-programmed baby call number. Important: When baby call is turned on, pressing any key on the handset will dial the pre-programmed Baby call number automatically. No other calls are allowed, including Emergency calls, unless you program the baby call number as the emergency call number 1. Press 2. Press and select “Babycall” 3. Press 4. Press and select “Number” 5.
3.6 Dial mode In order to provide compatibility with other telephone systems, your phone can be set to either pulse-dialing (same as rotary dial phones), or tone dialing (DTMF). To set the dial mode 1. Press 2. Press and select “Setup” 3. Press 4. Press and select ‘Dialling mode” 5. Press 6. Press 7. Press or and select “Pulse” mode or “DTMF mode” to confirm 3.7 PABX features It is possible to use your telephone with a PABX or a local telephone network.
3.9 Handset clock The user can change the handset time and the display format To change the handset time format (12 or 24 hour display): 1. Press 2. Press and select “Setup” 3. Press 4. Select “Clock Setting” 5. Press 6. Select “Hour format” 7. Press 8. Select hour format in 12 or 24 hours 9. Press to confirm 10.Press and hold to return to Standby mode To change the handset date format 1. Press 2. Press and select “Setup” 3. Press 4. Select “Clock Setting” 5. Press 6. Press 7.
6. Press to select “Time Settings” 7. Press to enter Date setting mode 8. Press the keypad 0-9 to input the DDMM (Date / Month) 9. Press to confirm and enter Time setting mode 10.Press the keypad 0-9 to input the HHMM (Hour / Minute) 11.Press to confirm 3.10 Handset alarm The weather handset has two independent alarms that you can turn on or off and change the settings on. 1. Press 2. Press and select “Setup” 3. Press 4. Press and select “Alarms” 5. Press 6.
3.11 Base Unit Time and Date Normally, the clock will be automatically updated each time it receives an incoming caller ID. However, the user can set the clock manually with the following procedure. Clock setting mode * Press and hold [ SET ] for 2 seconds to enter the Set Clock Mode. * Press [ * Press [ SET ] to save setting and toggle to the Minute setting. * Press [ ] or [ ] to increment or decrement the minute counter.
3.12 Base Unit Alarm The weather phone has two independent alarms. Alarm management on the base unit In Calendar display mode, pressing [ Alarm ] key will display Alarm 1. Pressing [ Alarm ] key again will display Alarm 2. Pressing [ Alarm ] again will go back to the Calendar display mode. Alarm setting mode * Press [ ] or [ ] to increment or decrement the minute counter, pressing and holding the [ ] or [ ] buttons for 2 seconds will enter the speed adjustment mode.
4 WEATHER FEATURES The weather base unit displays the weather forecast as well as the outdoor and indoor temperature and relative humidity. You may also set the alarm to activate, indicating when a certain temperature or humidity has been reached. 4.1 Weather forecasting on the handset To display the weather forecasting symbols on the handset: 1. Press 2. Press to select “Weather” 3. Press to select “Forecast” 4. Press to confirm 5.
4.3 Weather forecasting on the base unit The weather forecast display is the first line of the LCD display on the base unit. There are five weather forecasting symbols to represent the weather: 4.4 Outdoor temperature sensors on the base unit The outdoor temperature is shown on the second line of the LCD display. It has a icon on the left to represent the temperature recorded by the external sensor on channel 1, as well as the humidity shown on the right of the Note: icon.
4.5 Indoor temperature sensor in the base unit The indoor temperature shows on the third line of the LCD display. icon on the left, represents the temperature on the built-in sensor, and also shows the local humidity reading on the right of the icon . 4.6 Remote temperature and humidity alarm setting The remote temperature and humidity alarms are only linked to the remote sensor on Channel 1. There is no alarm option available on Channel 2, 3 or built-in sensors. Temperature and humidity alarm setting 1.
5 GAMES The weather phone handset contains two games 5.1 Snake game * Press * Press and select “Games” * Press and select “Snake” * Press or to select the game level (game levels are from 1 - 5, where 1 = beginner and 5 = expert) * Press to start game Game Control Using the keypad, press as follows to direct the snake Key Direction 2 6 8 4 Note: When the snake is moving , you only need to turn the snake to the left or right. There is no need to move the snake forward.
How to play When the game starts, you will see a snake moving along the screen. To win the game, you will have to direct the snake to the eggs without hitting the wall or letting the snake hit itself. * When the game starts, the snake is moving in the direction of the arrow. * When the snake reaches the same row as the egg, press “4” key to turn the snake toward the egg. * The snake turns left and is now moving toward the egg. * After the snake reaches the egg, it will appear in a different position.
5.
How to play When the game starts, you are the one driving the car from right to left, and you will see there is a computer car driving from left to right. The computer car will try to crash into your car. In order to win the game you will have to drive your car, clear all the dots and avoid crashing into the computer car. * You are moving to the left and the computer is moving to the right.
6 RESETTING YOUR SYSTEM Important: If you need to reset your system you will lose any information that you have stored and all settings will return to their default settings There are two levels of reset procedures: 6.1 Resetting the DECT phone Level 1: With your PIN code * Press * Press and select “Setup” * Press * Press and select “Default” * Press * Enter PIN code and press * Confirmation melody will come from handset Then both handset and base will start the reset sequences.
7 PROBLEMS If your weather phone is not working correctly, check the points here before returning it for repair. Whatever your problem, you should first check that: * You have installed the base unit correctly, and it is plugged into the telephone line and the mains power socket. * Mains power is switched on at the socket * You have installed the batteries into the handset If the problem persists please contact our help line on 01628 580154.
* You may need to change the dial type setting to Pulse dialing if your local telephone exchange does not support Tone dialing. “My call was cut off when I went out of range of the base unit. Now I cannot use my handset.” * Please move the handset closer to the base unit. “I hear a tone while I am using my handset, and the battery symbol on the display is “empty”.” * The battery needs to be recharged. Put the handset into the charging cradle of the base unit; it will take up to 15 hours to be fully charged.
Multi-handset use “I’m having problems registering a new handset.” * Unplug and plug in again the mains power cord of the base unit to activate the registration procedure. * Make sure you have selected a base number that is not already assigned, and ensure you choose from the base numbers that are not flashing. * The base unit may have already registered all 5 handsets. You need to deregister (delete) one of them before registering a new handset.
8 TECHNICAL DETAILS Standard Digital Enhanced Cordless Telecommunications (DECT) Frequency range 1.88 to 1.9 GHz (band width = 20 MHz) Channel band width 1.
NOTES