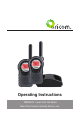
Operating Instructions PMR3000 1 watt UHF CB Radio Read this manual carefully before use.
TM
Table of contents Safety Information and Warnings.................................... 4 Information on Safe Operation........................................ 6 Your Oricom PMR3000 radio controls.............................. 9 Your Oricom PMR3000 radio display............................. 10 Getting Started............................................................. 11 Operation...................................................................... 13 UHF channels and frequencies............................
Safety Information and Warnings Safety Information and Warnings CAUTION WARNING 4 Damaged Antenna Do not use any radio that has a damaged antenna. If a damaged antenna comes in contact with the skin, a minor burn may result. Batteries All batteries can cause property damage and/ or bodily injury such as burns if conductive material such as jewellery keys, or beaded chains touches exposed terminals. The material may complete an electrical circuit (short circuit) and become quite hot.
Safety Information and Warnings WARNING Batteries Do not replace or charge batteries in a potentially explosive atmosphere. Contact sparking may occur while installing or removing batteries and cause an explosion. Blasting Caps and Areas To avoid possible interference with blasting operations, turn your radio OFF near electrical blasting caps or in a “blasting area” or in areas posted: “Turn off the two way radio.” Obey all signs and instructions.
Information on Safe Operation Read This Information Before Using Your Oricom Radio. Transmit and Receive Procedure Your two-way radio contains a transmitter and a receiver. To control your exposure and ensure compliance with the general population/ uncontrolled environment exposure limits, always adhere to the following procedure: •• Transmit no more than 50% of the time. •• To receive calls, release the PTT button. •• To transmit (talk), press the Push to Talk (PTT) button.
Information on Safe Operation Radiocommunications (Citizen Band Radio Stations) Class Licence 2002 No licence is required to own or operate this radio in Australia and New Zealand. The Radiocommunications (Citizen Band Radio Stations) Class Licence 2002 contains the technical parameters, operating requirements, conditions of licence and relevant standards for Citizen Band (CB) radios. CB radios must comply with the class licence for their use to be authorised under the class licence.
Information on Safe Operation •• Use the ear opposite the pacemaker to minimize the potential for interference. •• Turn the radio OFF immediately if there is any reason to suspect that interference is taking place. Medical Devices - Hearing Aids Some digital wireless radios may interfere with some hearing aids. In the event of such interference, you may want to consult your hearing aid manufacturer to discuss alternatives.
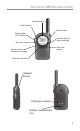
Your Oricom PMR3000 radio controls Indicator light On/off button Menu button Push to talk (PTT) button Volume up and menu settings Key lock Call tone button Volume down and menu settings Scan and monitor Headset socket Charging contacts Battery compartment clip 9
Your Oricom PMR3000 radio display RX icon TX icon Baby monitor VOX Battery level Key tone Scan/dual scan CTCSS code Channel Call tone Stopwatch Squelech Volume Keypad lock 10 Automatic power save mode Roger Beep
Getting Started This pack contains •• •• •• •• •• •• 2 UHF radios 2 belt clips 2 PTT headsets 2 Ni-Mh rechargeable battery packs 1 twin desk top charger 1 AC adaptor Installing the batteries Each radio uses a Ni-Mh rechargeable battery pack (supplied). Or for added convenience you can choose to use 3 AAA alkaline batteries in each radio (not supplied). Warnings •• Do not mix old and new batteries. •• Do not charge alkaline or non rechargeable batteries as they could explode and cause injury.
Getting Started 4. Plug one end of the AC power adaptor into the charging pod and then the AC adaptor into the power socket. 5. Slide the radios into the charging pod ensuring the charging contacts line up. The red lights on the charge pod glow when radios are properly inserted. 6. The batteries will be fully charged within 14 hours. IMPORTANT NOTE 1. When moving between hot/cold environments do not charge the battery until the battery temperature acclimates (usually about 20 minutes). 2.
Operation Turning your radio on and off Press and hold for three seconds to turn your radio on. The radio chirps and the display will show all feature icons for a brief period. Press and hold button for three seconds to turn off your radio. Adjusting the volume level When turned on, simply press or volume to a comfortable listening level. button to adjust the Selecting the channel 1. Press the button, the currently selected channel number will begin to blink. or button to select a channel. 2.
Operation Press and hold the button to check for channel activity. If you hear static, the channel is clear for use. Your radio has 40 channels. If you are in a group and you wish to talk to each other, all radios must be set to the same channel and interference eliminator code (CTCSS). If you experience interference and need to change channel, ensure that you change the channel and code of all radios in your group. 1. For maximum clarity, hold radio 5 to 7cm’s from mouth. 2.
Operation Channel scan By scanning, you can monitor channels and codes for transmissions and lock in on the one that interests you. More importantly, you can find someone in your group who has accidentally changed channels and is talking during your scan. button. 1. To start scanning, briefly press and release the 2. If you activate scan while the CTCSS code is set to 0, then the radio will check for any activity on each channel, regardless of the CTCSS code in use on that channel. 3.
Operation To restore the channel to the scan list, turn the radio off and then on. You cannot remove your home channel from the scan list (your home channel is the channel your radio was set to when you activated scan). Keypad lock Press and hold the button for three seconds to lock or unlock the keypad. When the radio is locked, the icon will show in the display. and buttons. It also The keypad lock disables the , disables the scan function, but allows you to use the button to monitor the channel.
Operation Time-out timer The time-out timer feature helps extend battery life by preventing accidental transmission. The radio will emit a continuous warning tone if the button is pressed for more than 60 continuous seconds and will stop transmitting. The battery level meter The battery level meter located in the display indicates how much battery power you have remaining to protect the rechargeable battery.
Operation To set dual channel and code 1. Press until display. or button will increase or decrease the 2. Pressing the dual channel. again and then press or button to increase 3. Press or decrease the dual code number. 4. Press to exit the menu and save the dual channel and code combination. When the Dual Channel Monitor function is activated, the PMR will switch sequentially between the standby channel + CTCSS and the Dual Channel + CTCSS.
Operation Hands-free use (IVOX) This feature allows you to transmit “hands-free” by talking into the radio microphone without using the headset. How to use the IVOX feature 1. Press button until VOX appears. or button to “ ” to disable the IVOX or enable 2. Press IVOX by select level 1, 2 or 3. 3. Press button to confirm your setting. 4. At standby mode, when IVOX function activated, to transmit, speak into the radio microphone. To receive, stop talking. 5. Press will disable IVOX operation.
Operation Monitor function This feature allows you to listen for weak signals on the current channel. allows you to monitor your channel 1. Pressing and holding for activity. Note: I t is good radio etiquette to monitor the channel for activity before you transmit, to ensure that you do not interrupt other users already on the channel. Baby monitor function One of the units can be set as Baby monitor. The radio will transmit a signal when it is activated by the crying baby or another sound in the room.
Operation Setting squelch level The adjustable Squelch allows you to optimize the radios sensitivity. It also allows you to increase the sensitivity and receive weaker signals. There are 4 decreasing levels of sensitivity. button until SQL appears. 1. Press or button to adjust the squelch levels. 2. Press 3. Press to confirm. Note: L evel 1 (SQL and one bar icon display) is the most sensitive level, which means the radio can receive very weak signal.
Operation Stopwatch The PMR3000 has a stopwatch function (mm:ss). button until appears. 1. Press button to start the stopwatch. 2. Press button to stop 3. When the stopwatch is running, press counting and display the lap time, the counter will continue in the background. Press to proceed counting. button to reset the 4. When the counter is stops, press counter.
UHF channels and frequencies UHF channels and frequencies IMPORTANT NOTE: The operation of your PMR3000 radio in Australia and New Zealand is subject to conditions in the following licenses: In Australia the ACMA Radio communications (Citizen Band Radio Stations) and in New Zealand the General User Radio License for Citizen Band Radio. UHF Repeater operation is used when long distance communication is required, unless specifically needed use of the repeater channels is to be avoided.
UHF channels and frequencies 24 14 476.750 Simplex 15 476.775 Simplex 16 476.800 Simplex 17 476.825 Simplex 18 476.850 Simplex 19 476.875 Simplex 20 476.900 Simplex 21 476.925 Simplex 22 476.950 No Use 23 476.975 No Use 24 477.000 Simplex 25 477.025 Simplex 26 477.050 Simplex 27 477.075 Simplex 28 477.100 Simplex 29 477.125 Simplex 30 477.150 Simplex 31 477.175 Duplex TX/Simplex 32 477.200 Duplex TX/Simplex 33 477.225 Duplex TX/Simplex 34 477.
Warranty information (Australia) Oricom makes no other warranties or conditions, express or implied, including as to merchantability and fitness for a particular purpose, except as stated in this Warranty. Any implied warranties that may be imposed by law are limited in duration to the Warranty Period. Oricom warrants that the product is free from defects in materials or workmanship during the Warranty Period.
Warranty information (Australia) repair the defective product. All component parts removed under this Warranty become the property of Oricom. In the unlikely event that your Oricom product has a recurring failure, Oricom, at its discretion, may elect to provide you with a replacement product of its choosing that is at least equivalent to your product in performance. Oricom does not warrant that the operation of the product will be uninterrupted or error free.
TM
Customer Support If you suspect your product is not functioning to specification, before making a warranty claim please use the following resources. - Troubleshooting Guide in this user guide - Online Frequently Asked Questions - www.oricom.com.au - Email our customer support team on support@oricom.com.au - Contact Oricom Customer Support team on 1300 889 785 or 02 4574 8888 (Monday to Friday 9am to 5pm EST) Please retain your purchase receipt and attach to the back page of this user guide. Visit www.