Telephone Clock Radio TCR10 User guide Please Keep for future reference
-Table of contents1 General Information ................................................. 3 2 Operating Functions ................................................. 4 3 Installation ............................................................. 5 3.1 Safety information ................................................ 5 3.2 Check contents of pack ......................................... 5 3.3 Connecting the telephone handset .......................... 5 3.4 Insert batteries ..............................
1 General Information NOTES FOR OPERATION IN NEW ZEALAND The grant of a Telepermit for any item of terminal equipment indicates only that Telecom has accepted that the item complies with the minimum conditions for connection to its network. It indicates no endorsement of the product by Telecom, nor does it provide any sort of warranty.
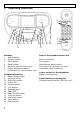
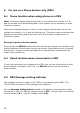
2 Operating Functions 6 5 8 9 10 12 13 14 15 11 16 18 19 20 1 2 3 4 17 7 Handset 1 Redial button 2 Memory button 3 Store button 4 Recall button 5 Earpiece volume level control 6 Ringer adjustment switch 7 Connection for curly handset cord Telephone base unit 8 Radio FM/AM button 9 Up/Hour button 10 Down/Min button 11 Power LED 12 Snooze button 13 LCD display 14 Message lamp 15 Radio LED 16 Radio On/Off button 17 Time Set button 18 Alarm Set button 19 Hook switch 20 Radio volume 4 Rear of
3 Installation 3.1 Safety information NOTE! Before installation, it is essential that you read the general information at the beginning of this user guide. 3.2 Check contents of pack The following items are supplied in this pack: One telephone base One telephone handset One telephone line cord One curly cord One power adaptor 2 AAA batteries This user guide One warranty card 3.3 Connecting the telephone handset After unpacking your telephone, connect the telephone handset to the base unit.
3.6 Connecting to the telephone socket Connect the telephone cable supplied to the telephone wall socket and to the socket marked with a “PHONE LINE” symbol on the rear of the base unit. 3.7 Recall button You will use the Recall button when using your network operator’s services such as call waiting etc. If this feature is not working check the position of the Recall switch on the side of the phone. In Australia it should be set at 100ms and in New Zealand 600ms 3.
4.2 Setting the alarm To turn on the alarm, press the ALARM SET button. The icon and the current alarm time will be flashing and the time of alarm will be shown. After 5 seconds elapse, the icon comes on to indicate that the clock alarm is on. To turn off the alarm, press the ALARM SET button again. The 4.3 icon will be off. Using the Snooze button When the clock alarm sounds, you can use the SNOOZE button to temporarily turn off alarm. The alarm will come on again after 10 minutes.
4.5 Using the telephone The TCR10 telephone is used like any conventional telephone and works with all modern telephone exchanges using the tone dialling system. 1. Lift the handset and wait until you hear dial tone. The keypad will illuminate. 2. Dial the required telephone number. 3. If the handset volume is too quiet or too loud, you can adjust this to suit your requirements. The volume can be adjusted with the + and - volume buttons on the handset. 4. To end the call, replace the handset.
5.2 Making a call using the speed dial buttons 1. Lift the handset. 2. Press the MEM button 3. Now press the required storage location between 0 and 9 on the keypad. The stored number will be dialled automatically. 4. To end the call, replace the handset. Tip! You can make calling via multiple telephone network providers considerably easier. Save their access numbers and the telephone numbers separately in different storage locations.
6 6.1 For use on a Phone System only (PBX) Pause function when using phone on a PBX Note! Inserting a pause between the code for the outside line (usually 0 or 9) and the number to be dialled described in this chapter is only necessary on older telephone systems. With some telephone systems, there is a short pause between the code for the outside line (usually 0 or 9) and the dialling tone.
7 7.1 Important Information Troubleshooting If you feel this product is not working correctly please consult the user guide and ensure that you are using the product in accordance with the instructions. Remove all extra telephone equipment and connect only this telephone directly to the telephone socket. If the fault is still present, connect another telephone (if available) to the telephone socket. The results will show you whether the fault lies with this unit or with the telephone line.
7.3 Warranty Information This product is covered by a 12 month warranty against defective workmanship or parts, effective from the date of purchase. NOTE: The warranty does not extend to damage caused by misuse, negligence, excessive voltage, faults on the telephone line or lightning. This guarantee in no way affects your statutory rights. Full details of the warranty are contained in the enclosed warranty card. In the unlikely event of a fault during this period, please contact us for assistance.