1 General Information Warnings It is very important that you read the User Guide carefully as it contains detailed information on installation, programming and operational issues which you will need to be aware of to ensure the Care Phone operates properly. If you are not clear about how to install the phone or have any queries on any issue, please contact our Australian Customer Support Service on 1300 889 785.
• • • The earpiece of the handset may attract small metal objects such as staples and pins. Care should be taken when placing the handset near these items. Setting the receiver volume to maximum may, under some situations cause ear damage. We suggest returning the handset volume control to the “0” position after each call. Do not install in damp locations such as a bathroom or laundry, do not expose the unit to direct sunlight.
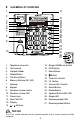
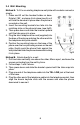
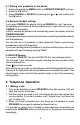
2 Location of controls 1 11 2 12 13 14 15 16 17 18 19 20 21 22 3 4 5 6 7 8 9 OK 3 4 5 23 24 25 26 27 10 1. 2. 3. 4. 5. 6. 7. 8. 9. 10. 11. 12. 13. 14. Telephone Line Jack Hook switch Handset Holder Delete Button Call Back Button Memory Buttons (M1, M2) Speaker Keypad Receiver volume control Receiver volume LED Power Jack New Call LED Display / Buttons 15. 16. 17. 18. 19. 20. 21. 22. 23. 24. 25. 26. 27.
3 Installation 3.1 Installing batteries (supplied) in the phone Warnings You must install 4 AA Alkaline batteries in the phone base. The battery back up system will then be able to power the unit for up to 12 hours if there is a mains power failure. If your mains power has been turned off for an extended period or the power supply to the phone has been unplugged from mains power you should replace the batteries with 4 new high quality AA Alkaline batteries.
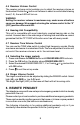
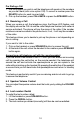
3.4 Wall Mounting Method A. To fit to an existing telephone wall plate with modular connector simply, 1. Press and lift out the handset holder on base. Rotate it 180°, and snap it into place (see A) so it will hold the handset in place when the phone is mounted on the wall. 2. Insert the mounting bracket’s two tabs into the matching slots on the phone’s base. (see fig B) fig A 3. Then press down and slide the bracket upward until the tabs snap into place. 4.
4 Setting Up 4.1 Setting the contrast 1. Press the MENU button. The display shows “LCD CONTRAST”. 2. Press the OK button. The display shows the current contrast setting with values between 1 and 5. 3. Press or to select the contrast level and confirm with OK button. 4. The display now shows to “TIME/DATE”, you can refer to next section to CID set the time and date or press button to exit the set-up mode. 4.2 Setting the TIME and DATE 1. Press and release the MENU button until “TIME/DATE” is shown. 2.
4.5 Receiver Volume Control The receiver volume control enables you to adjust the receiver volume on the handset. Rotate the button on the base to select a comfortable listening level (1-9), the red LED will turn on. WARNING Setting the receiver volume to maximum may, under some situations cause ear damage. We suggest returning the volume control to the “0” (OFF) position after each call. 4.6 Hearing Aid Compatibility This unit is compatible with most inductively coupled hearing aids on the market.
5.1 Pairing new pendants to the phone 1. Press and release the MENU button until REMOTE PENDANT is shown. 2. Press the OK button, 3. Select PAIRING or DELETE by pressing the or , and confirm with the OK button. 5.2 Remote Pendant setting: If you select PARING, the display will show PAIRING for only 3 seconds. Immediately press and hold down pendant key for 3 seconds until you see “PAIRED” on the display. If after 2 seconds no pendant was successfully paired, the display will show “PAIRING FAILURE”.
Pre Dialing a Call 1. Dial the number you wish to call the telephone will speak out the numbers as you dial them (with voice option ON). To correct a number press the DELETE button for each incorrect digit. 2. Pick up the handset, press CALL BACK or press the SPEAKER button. 6.2 Receiving a Call When you receive a call, the telephone rings, the Ringer LED flashes, and the display shows the CALL# and the caller telephone number (with caller id service activated).
6.5 Call waiting (Recall button) You can use the recall function to answer a second call while you are on the phone. However this service will need to be turned on. For example to turn on Telstra’s Call Waiting service: 1. Lift the handset or press SPEAKER button. 2. Wait for dial tone then Press *43# 3. You will hear a service announcement then hang up.
To dial the numbers in the emergency MEMORY Buttons, simply pick up the handset or press SPEAKER button and press M1 or M2. Note: the numbers stored in M1 and M2 memory buttons are for manual dialing only and are not dialled in the emergency call function. 7. The Phone Book 7.1 Storing numbers in the phone book You can enter up to 30 names and numbers into the Phone book and choose which of those numbers will be dailled when the Emergency call function is activated and in which order they will be dialled.
WARNING Selecting the correct location is very important as this feature determines the sequence in which the emergency telephone numbers are dialled. Location 1 will be dialled first, then 2, then 3 etc. WARNING: If you choose to overwrite a location, the previously stored number will be erased. The unit announces “Name Recording for phone book” and the “SOS” symbol is shown. That means the phone number is stored for a general phone and emergency’s call dial out.
7.2 To review the Phone Book Memory CID 1. Press and release button until the phone symbol is shown. 2. Review the stored phone number by pressing or , or enter the first letter of the name of the person you wish to call. After a short time, the display will display the first stored telephone number and say the name if it was recorded. You can now search for further numbers under this letter by pressing . Notes: • If no telephone numbers are stored, the display will show EMPTY.
7.5 To Edit Phone Book Memories CID 1. Press and release button until phone book symbol is shown. 2. Select the required location by pressing or . 3. Press and hold MENU button for two seconds. The display will show EDIT?. 4. Press OK button, the first digit of the selected phone number will flash. 5. You can move the cursor to the required position by pressing or . To delete the digit, press DELETE button, or press any numeric key to replace the digit, confirm with OK button.
8 Emergency Call feature THE EMERGENCY CALL FUNCTION WILL NOT OPERATE UNLESS ALL THE PROCEDURES IN THE USER GUIDE HAVE BEEN COMPLIED WITH. This feature allows you to summon assistance from the people in emergency phone list. 8.1 Emergency Message Two options are provided for your emergency message: A. A pre-record message "This is an emergency call, to accept this call press 0". This message will be played unless you decide to record your own message. B. Your own recording (max. recording time 20 secs).
8.5 To activate the Emergency Call function: 1. Press and hold the button on the pendant or the SOS emergency button on the telephone for three seconds. The telephone will beep loudly for 15 seconds. (If during this time the emergency SOS button on the phone, or the button on the pendant is pressed for more than three seconds, the emergency call will be cancelled. If the key is not pressed, the telephone will dial out the emergency numbers automatically in speakerphone mode. 2.
9. Caller ID Important: To use Caller ID functions the CLIP symbol must be on. If the CID CLIP symbol is not visible on the display, press the button once. 9.1 Receiving a Call (Can be stored up to 64 calls) • If an incorrect, invalid or incomplete Caller ID signal is received, the display shows -ERROR-. • If only the caller's phone number is received, the display shows the caller's phone number with the time and date it was received. The NEW symbol turns on and NEW CALL LED blinks. Notes: 1.
9.3 Deleting Numbers from the Caller ID Memory 1. Select the required Caller ID memory location by using the or button. 2. To delete single memory, press DELETE button once. The display will show the DELETE?. Press DELETE button for 2 seconds. The data for that call will be erased, and the CALL# and Caller ID information will be updated. To delete all entire memory, press and hold DELETE button until the display shows DELETE ALL?. Press DELETE for 2 seconds until NO CALLS appears on the display.
10. Important Information 10.1Periodic testing Remote Pendant We recommend you check and test the remote pendant and SOS button function every month. To ensure that it is working correctly. The remote pendant battery should last for up to 2 years but we recommend changing it every 12 months or sooner if the red light on the pendant becomes dim or the operating range reduces. Replacement batteries for the pendant can be obtained from most supermarkets. Testing the remote pendant battery 1.
10.3 Consumer Support and Troubleshooting If you feel this product is not working correctly please consult this user guide and ensure that you are using the product in accordance with the instructions. Remove all extra telephone equipment and connect only this telephone directly to the telephone socket. If the fault is still present, connect another telephone to the telephone socket. The results will show you whether the fault lies with this unit or with the telephone line.
(ii) negligence on your part or misuse by you of the product; (iii) any un-controlled external cause to the phone not functioning including but not limited to electricity failure, lighting, over voltage; (iv)non adherence by you to the warnings in the User Guide and the User Guide generally; and (v) modification to the product or services carried out to the product by anyone other than Oricom or on Oricom’s behalf.
2LMC70YY