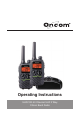
Operating Instructions UHF2100 40 Channel UHF 2 Way Citizen Band Radio
Table of contents Safety Information and Warnings.................................... 4 Getting Started............................................................... 6 Oricom UHF2100 instructions....................................... 10 Operation...................................................................... 11 Specifications............................................................... 20 Warranty information (Australia).................................... 22 Customer support.....................
Safety Information and Warnings Safety Information and Warnings CAUTION WARNING 4 Damaged Antenna Do not use any radio that has a damaged antenna. If a damaged antenna comes in contact with the skin, a minor burn may result. Batteries All batteries can cause property damage and/ or bodily injury such as burns if conductive material such as jewelry, keys, or beaded chains touches exposed terminals. The material may complete an electrical circuit (short circuit) and become quite hot.
Safety Information and Warnings WARNING Batteries Do not replace or charge batteries in a potentially explosive atmosphere. Contact sparking may occur while installing or removing batteries and cause an explosion. Blasting Caps and Areas To avoid possible interference with blasting operations, turn your radio OFF near electrical blasting caps or in a “blasting area” or in areas posted: “Turn off the two way radio.” Obey all signs and instructions.
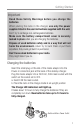
Getting Started Installation Removing the Belt Clip Pull the Belt Clip latch forward (away from the unit) While pulling the Belt Clip latch, push up the Belt Clip as shown in Figure1. Belt Clip latch Installing the Belt Clip Slide the Belt clip into the slot as shown in Figure2. A “click” indicates the Belt clip is locked into position. Installing the Batteries Figure 3 Figure 1 Figure 2 Figure 4 Caution: O bserve the proper battery polarity orientation when installing batteries.
Getting Started Important Read these Safety Warnings before you charge the batteries. When placing the radio in the charger, use only the power supplies listed in the user instructions supplied with the unit. Don’t try to recharge non-rechargeable batteries. Make sure the battery compartment cover is securely locked in place when you are charging the batteries.
Getting Started Battery meter The battery meter is located in the left corner of the LCD screen. It appears like a battery with three bars inside. These indicate the amount of power available. When the battery level reaches it minimum level, the unit will emit two beep tones and automatically it will power off. Your UHF2100 can detect the battery charge in 4 levels; Battery charge at high level. Battery charge at medium level. Battery charge at low level.
Getting Started Operation Transmitting range The talk range depends on the environment and terrain. It will reach (up to about 10km) in wide open spaces, without obstructions such as hills or buildings. Don’t try to use two radio units which are less than 1.5m (5feet) apart. Otherwise, you may experience interference. Important safety warning: To reduce radio frequency exposure when you are using your units, hold the unit at least 5cm (2 inches) away from your face.
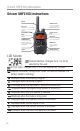
Oricom UHF2100 instructions Oricom UHF2100 instructions Antenna LCD Screen - Displays the current channel selection and other radio symbols. PTT (PUSH to TALK) button - Press and hold to transmit. UP/DOWN Buttons - Press to change channels, volume, and to select settings during programming. Speaker PWR/VOL Switch - Rotate clockwise/ counter clockwise to turn the unit ON or OFF. Ear/Mic/Charge jack CALL button - Press to send Ringing tone to other radio units.
Operation Operation Turning the Unit ON/OFF To Turn ON; a. R otate the POWER/VOL button clockwise until the LCD screen turns ON and displays the current channel. To switch OFF; b. R otate the POWER/VOL button counter clockwise until the LCD screen turns blank. Note: Every time you rotate the Power/Vol button to turn ON, the volume will also open. The volume level will increase or decrease by rotating the Power/Vol button.
Operation These are paired with higher channels as output/input (1/31, 2/32, etc.) Check for local repeater activity before using these channels in Simplex mode to avoid interference. Channels 9 and above are the best choices for general use in Simplex mode. You can find more information about channels and frequencies by visiting the Web site http://www.acma.gov.au/ACMAINTER.
Operation SETTING THE DCS ADVANCED DIGITAL CODE. Each channel also has 83 digital codes to let you set a group of users for more secured private communication. a. P ress the MENU button 3 times. DCS code is blinking on the LCD screen. b. Press the UP or DOWN button to select the desired DCS code. c. P ress the PTT button to confirm the DCS channel setting. Transmitting and Receiving The UHF2100 transmission is “one way-at-a-time.” While you are speaking, you can not receive a transmission.
Operation Monitor You can use the Monitor feature to check for weak signals on the current channel. a. P ress and hold the MENU and DOWN buttons at the same time. “ ” icon will be displayed on the LCD screen. Your radio will pick up signals on the current channel, including background noise. b. Press the MENU button to stop the channel monitoring. Setting the VOX (Voice Activated) Sensitivity In VOX mode, the radio will transmit a signal only when it is activated by your voice or other sounds around you.
Operation Activating the Auto Channel Scan Channel scan perform searches for active signals in an endless loop for all 40 channels, 38 CTCSS codes and all 83 DCS codes. a. P ress the MENU button 5 times, “SCAN” icon will display on LCD screen. b. P ress the UP or DOWN button to begin scanning channels when an active signal is detected, channel scan pauses on the active channel. c.
Operation Selecting a Call- Ring tone Your UHF2100 is equipped with 15 different types of Call-Ring tones. a. P ress the MENU button 8 times, the “C 1” icon will display and flash on the LCD Screen. b. P ress the UP or DOWN button to select the desired Callring tone. A respective Call- Ring tone sound will be played when changing from one tone to another. c. P ress the PTT button to confirm your setting. Activating the Vibrator mode a. P ress the MENU button 9 times; “3” flashes on the LCD Screen. b.
Operation a. P ress the MENU button 11 times, the “ON” icon is flashing on the LCD Screen. b. Press the UP or DOWN button to select Key tone On/Off. c. Press the PTT button to confirm your setting. Setting the Dual Watch Mode Your radio is capable of monitoring two channels, the current and another (dual watch) channel. If the unit detects a signal on either channel, it will stop and receive the signal. a.
Operation the repeater access for these specific Channels. When activated, your radio will receive the Repeater on its specific channel (all repeater outputs are on channel 1 to 8) but transmits to the repeater channel 31 through 38.
Operation Important • S peech transmissions are not allowed on channel 22 and 23 (Receive only) • CTCSS and Call ring tone calling should be disabled on channel 5 and 35. • If Call ring tone calling is provided, it is only allowed to operate for a maximum of 3 seconds and it can only be possible to operate once in any 60 second period. Auxiliary Features Key Lock The Key Lock feature allows the user to disable the UP, DOWN and MENU buttons so that the UHF2100 settings could not be changed accidentally.
Specifications Specifications Channels Available CTCSS Sub-channel Output Power (TX) Range 40 Channels 38 for each Channel 2.0 W Up to 10 Km. Channel Frequency Table 20 Channel Frequency (MHz) Usage 1 476.425 Duplex RX/Simplex 2 476.450 Duplex RX/Simplex 3 476.475 Duplex RX/Simplex 4 476.500 Duplex RX/Simplex 5 476.525 Emergency 6 476.550 Duplex RX/Simplex 7 476.575 Duplex RX/Simplex 8 476.600 Duplex RX/Simplex 9 476.625 Simplex 10 476.650 Simplex 11 476.
Specifications 20 476.900 Simplex 21 476.925 Simplex 22 476.950 No Use 23 476.975 No Use 24 477.000 Simplex 25 477.025 Simplex 26 477.050 Simplex 27 477.075 Simplex 28 477.100 Simplex 29 477.125 Simplex 30 477.150 Simplex 31 477.175 Duplex TX/Simplex 32 477.200 Duplex TX/Simplex 33 477.225 Duplex TX/Simplex 34 477.250 Duplex TX/Simplex 35 477.275 Emergency 36 477.300 Duplex TX/Simplex 37 477.325 Duplex TX/Simplex 38 477.350 Duplex TX/Simplex 39 477.
Warranty information (Australia) (a) Warranty. Oricom International Pty Ltd (Oricom) warrants that the product is free from defects in materials and workmanship for a period of 12 months effective from the date of purchase. This warranty in no way affects your statutory warranty under the Trade Practices Act 1974 or any other similar legislation.
Customer support If you feel this product is not working correctly please consult the user guide and ensure that you are using the product in accordance with the instructions. To order spare parts additional radio, replacement batteries and in case of any technical issues you may have with the product please consult our website for further information or send us an email for a prompt response to your enquiry. In the unlikely event of a fault developing, please contact us for assistance.
Australia Oricom International Pty Ltd Locked Bag 658 South Windsor, NSW 2756 Customer Support Email: support@oricom.com.au Web: Australia www.oricom.com.au New Zealand www.oricom.co.