Co a x i a l Sp e ak er OWNER'S MANUAL MODEL XTR402 XTR462 XTR522 XTR572 XTR602 XTR652 XTR693
TABLE OF CONTENTS English . . . . . . . . . . . . . . . . . . . . . . . . . . . . . . . . . . . . . . . . . . . . . . . . . . . . . . . . . . . . . . . 1 Français . . . . . . . . . . . . . . . . . . . . . . . . . . . . . . . . . . . . . . . . . . . . . . . . . . . . . . . . . . . . . . 9 Español. . . . . . . . . . . . . . . . . . . . . . . . . . . . . . . . . . . . . . . . . . . . . . . . . . . . . . . . . . . . . . 13 Deutsch . . . . . . . . . . . . . . . . . . . . . . . . . . . . . . . . . . . . . . . . .
Model Number: ____________________________ Serial Number: ____________________________ Date of Purchase: ____________________________ WHAT’S IN THE BOX Included in this box are all the necessary mounting hardware and cables for your basic installation. Listed below is a detailed list of the components included in this system package.
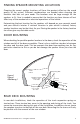
FINDING SPEAKER MOUNTING LOCATIONS Choosing the correct speaker locations will have the greatest effect on the sound quality of the system. Different considerations are needed when choosing the locations that best suit your needs. The locations must be large enough for the speakers to fit. Care is needed to ensure that the location you have chosen will not affect any of the mechanical or electrical operations of the vehicle.
Rear/Trunk of Car Rear Seat Figure 2 Figura 2 Abbildung 2 STEP BY STEP INSTALLATION Step 1: Determine where the speaker will be mounted. Make sure there is a flat area large enough for the speaker to fit properly. An uneven mounting surface can damage the driver. Step 2: Check to make sure the space you have chosen for the speaker will not interfere with the operation of the vehicle. Step 3: Using a template, mark the speaker hole with a pen. Step 4: Cut the hole for the speaker.
Screws Wiring Harness Figure 3 Figura 3 Abbildung 3 Other Channel Panel Source Unit stereo Figure 4 Figura 4 Abbildung 4 Figure 5 Figura 5 Abbildung 5 Cobalt Coaxial wired to a single channel Amplifier Cobalt Coaxial wired to a single channel * * * * * * The XTR speakers can be powered by a head unit or an amplifier. Les haut-parleurs XTR peuvent être alimentés par un récepteur ou un amplificateur. Los altavoces XTR se pueden alimentar con una unidad principal o un amplificador.
SPECIFICATIONS MODEL XTR402 XTR462 XTR522 XTR572 XTR602 XTR652 XTR693 Nominal Impedance (ohms) 4 4 4 4 4 4 4 Power Continuous/ Maximum (watts) 50/80 50/80 50/100 50/100 50/100 60/120 100/180 Frequency Response (Hz) 120 to 22k 90 to 22k 85 to 22k 80 to 22k 85 to 22k 85 to 22k 55 to 22k Sensitivity (dB) 86 86 86 89 86 86 89 Mounting Depth (inches) 1.89 1.89 2.28 2.17 1.75 2.01 3.23 Mounting Diameter (inches) 4.06 3.66 x 6.11 4.72 4.96 x 7.17 5.20 5.04 5.
A B Figure 6 Figura 6 Abbildung 6 C D E F G H I XTR402 XTR462 XTR522 XTR572 XTR602 XTR652 XTR693 Dimensions inches/mm, Dimensions pouces/mm, Dimensiones plg./mm, Abmessungen Zoll/ mm, Dimensioni pollici/millimetri, Dimensões polegadas/mm A 1.89/48 1.89/48 2.28/58 2.17/55 1.75/44.5 2.01/51 3.23/82 B 0.79/20 0.75/19 0.91/23 0.79/20 0.91/23 0.83/21 1.18/30 C 2.76/70 2.56/65 2.76/70 3.11/79 2.76/70 3.15/80 3.94/100 D 4.06/102 4.72/120 5.20/132 5.04/128 E 5.04/128 5.
FRANÇAIS OÙ MONTER LES HAUT-PARLEURS Le choix du bon emplacement des haut-parleurs aura un effet majeur sur la qualité du son du système. Plusieurs choses doivent être prises en considération pour faire le meilleur choix. Les emplacements doivent être assez grands pour accueillir les hautparleurs. Faites attention que l'emplacement choisi n'affecte en aucune façon le fonctionnement mécanique et électrique du véhicule.
INSTALLATION PAS À PAS Étape 1: Décidez où fixer les haut-parleurs et assurez-vous qu'il y ait une surface plane suffisante pour bien les fixer. Une surface de montage inégale peut endommager le moteur. Étape 2: Assurez-vous que l'emplacement choisi pour les haut-parleurs n'interfère pas avec le fonctionnement du véhicule. Étape 3: Au moyen d'un gabarit et d'un crayon, marquez l'emplacement du trou du haut-parleur. Étape 4: Découpez le trou pour le haut-parleur.
SPÉCIFICATIONS MODÈLE XTR402 XTR462 XTR522 XTR572 XTR602 XTR652 XTR693 Impédance nominale (ohms) 4 4 4 4 4 4 4 Puissance continue/ maximum (watts) 50/80 50/80 50/100 50/100 50/100 60/120 100/180 Réponse de fréquence (Hz) 120 22k 90 22k 85 22k 80 - 22k 85 22k 85 22k 55 - 22k Sensitivité (dB) 86 86 86 89 86 86 89 Profondeur de montage (pouces) 1.89 1.89 2.28 2.17 1.75 2.01 3.23 Diamètre de montage (pouces) 4.06 3.66 x 6.11 4.72 4.96 x 7.17 5.20 5.04 5.
ESPAÑOL UBICACIONES DE MONTAJE DE LOS ALTAVOCES Escoger la ubicación correcta de los altavoces tendrá el mayor efecto en la calidad del sonido del sistema. Es necesario que usted tenga en cuenta varias consideraciones cuando escoja el lugar que mejor se adapte a sus necesidades. Los lugares escogidos deben ser lo suficientemente grandes como para que quepan los altavoces. Es necesario que en la ubicación escogida no se afecte ninguna operación mecánica o eléctrica del vehículo.
INSTALACIÓN PASO A PASO Paso 1: Determine el lugar en que va a montar el altavoz. Debe haber una superficie plana suficientemente grande como para que el altavoz encaje correctamente. Las superficies de montaje irregulares pueden dañar el excitador. Paso 2: Verifique que, en el espacio que ha escogido, el altavoz no interfiera con el funcionamiento del vehículo. Paso 3: Con la plantilla y un lápiz, marque los agujeros de montaje del altavoz. Paso 4: Haga el agujero para el altavoz.
ESPECIFICACIONES MODELO XTR402 XTR462 XTR522 XTR572 XTR602 XTR652 XTR693 Impedancia nominal (ohms) 4 4 4 4 4 4 4 Potencia continua/ máxima (W) 50/80 50/80 50/100 50/100 50/100 60/120 100/180 Respuesta de frecuencias (Hz) 120 22k 90 22k 85 22k 80 22k 85 22k 85 22k 55 - 22k Sensibilidad (dB) 86 86 86 89 86 86 89 Profundidad de montaje (plg.) 1.89 1.89 2.28 2.17 1.75 2.01 3.23 Diámetro de montaje (plg.) 4.06 3.66 x 6.11 4.72 4.96 x 7.17 5.20 5.04 5.79 x 8.
DEUTSCH SO PLATZIEREN SIE DIE LAUTSPRECHER Die Wahl der korrekten Lautsprecherposition hat große Auswirkungen auf die Soundqualität des Systems. Bei der Wahl der Lautsprecherposition, die Ihren Ansprüchen am besten entspricht, sind mehrere Faktoren zu beachten. Es muss an der Stelle genügend Platz für den Lautsprecher vorhanden sein. Sie müssen sicherstellen, dass die gewählte Stelle die mechanischen oder elektrischen Funktionen des Fahrzeugs nicht beeinträchtigt.
SCHRITTWEISE EINBAUANLEITUNG 1. Schritt: Legen Sie die Einbaustelle für die Lautsprecher fest. Vergewissern Sie sich, dass es sich um eine ebene Stelle handelt, die groß genug für den fachgerechten Einbau ist. Eine unebene Oberfläche kann den Treiber beschädigen. 2. Schritt: Stellen Sie sicher, dass die gewählte Stelle den Betrieb des Fahrzeugs auf keine Weise behindert. 3. Schritt: Verwenden Sie eine Schablone und markieren Sie das Lautsprecherloch mit einem Stift. 4.
DATEN MODELL XTR402 XTR462 XTR522 XTR572 XTR602 XTR652 XTR693 Nennimpedanz (Ohm) 4 4 4 4 4 4 4 Dauerleistung/ Spitzenleistung (Watt) 50/80 50/80 50/100 50/100 50/100 60/120 100/180 Frequenzgang (Hz) 120 22k 90 22k 85 22k 80 22k 85 22k 85 - 22k 55 - 22k Empfindlichkeit (dB) 86 86 86 89 86 86 89 Einbautiefe (Zoll) 1.89 1.89 2.28 2.17 1.75 2.01 3.23 Einbaudurchmesser (Zoll) 4.06 3.66 x 6.11 4.72 4.96 x 7.17 5.20 5.04 5.79 x 8.
ITALIANO INDIVIDUAZIONE DELLA POSIZIONE DI MONTAGGIO DEGLI ALTOPARLANTI La scelta della posizione degli altoparlanti ha la massima influenza sulla qualità del suono dell'impianto. Nella scelta delle posizioni di montaggio che soddisfano meglio le proprie esigenze, occorre considerare diversi fattori. Le posizioni devono offrire uno spazio sufficiente per l'altoparlante. Accertarsi con cura che la posizione scelta non interferisca con il funzionamento dei componenti meccanici o elettrici del veicolo.
INSTALLAZIONE PROCEDIMENTO DETTAGLIATO Fase 1: stabilire dove montare l'altoparlante. Accertarsi che ci sia una superficie piana abbastanza grande per montare correttamente l'altoparlante. Una superficie di montaggio irregolare può danneggiare il driver. Fase 2: accertarsi che lo spazio scelto per l'altoparlante non interferisca con il funzionamento del veicolo. Fase 3: usando una dima, segnare con una penna il contorno del foro per l'altoparlante. Fase 4: praticare il foro per l'altoparlante.
DATI TECNICI MODELLO XTR402 XTR462 XTR522 XTR572 XTR602 XTR652 XTR693 Impedenza nominale (ohm) 4 4 4 4 4 4 4 Assorbimento continuo/ Massimo (watt) 50/80 50/80 50/100 50/100 50/100 60/120 100/180 Risposta in frequenza (Hz) 120 22k 90 22k 85 - 22k 80 - 22k 85 - 22k 85 22k 55 - 22k Sensibilità (dB) 86 86 86 89 86 86 89 Profondità di montaggio (pollici) 1.89 1.89 2.28 2.17 1.75 2.01 3.23 Diametro di montaggio (pollici) 4.06 3.66 x 6.11 4.72 4.96 x 7.17 5.
PORTUGUÊS DETERMINAÇÃO DOS LOCAIS PARA INSTALAÇÃO DOS ALTOS-FALANTES A seleção dos locais corretos para instalação dos alto-falantes é o fator que mais influenciará a qualidade do som produzido pelo sistema. É necessário considerar vários aspectos ao escolher os locais mais adequados às suas necessidades.
INSTALAÇÃO PASSO A PASSO Etapa 1: Determine onde o alto-falante será instalado. Certifique-se de que seja uma área plana e grande o suficiente para encaixar bem o alto-falante. Uma superfície de instalação desigual pode danificar o alto-falante. Etapa 2: Certifique-se de que o espaço selecionado para a instalação do alto-falante não interferirá com o funcionamento do veículo. Etapa 3: Usando um modelo, marque com uma caneta o orifício onde o alto-falante será instalado.
ESPECIFICAÇÕES MODELO XTR402 XTR462 XTR522 XTR572 XTR602 XTR652 XTR693 Impedância nominal (ohms) 4 4 4 4 4 4 4 Potência contínua/ máxima (watts) 50/80 50/80 50/100 50/100 50/100 60/120 100/180 Resposta de freqüência (Hz) 120 - 22k 90 - 22k 85 - 22k 80 - 22k 85 22k 85 22k 55 - 22k Sensibilidade (dB) 86 86 86 89 86 86 89 Profundidade de instalação (polegadas) 1.89 1.89 2.28 2.17 1.75 2.01 3.23 Diâmetro de instalação (polegadas) 4.06 3.66 x 6.11 4.72 4.
WARRANTY LIMITED ONE-YEAR CONSUMER WARRANTY/*LIMITED TWO-YEAR CONSUMER WARRANTY FOR AUTHORIZED DIRECTED DEALER PURCHASE & INSTALLATION Directed Electronics (herein “Directed”) promises to the original purchaser of the subwoofer or amplifier, as applicable (herein “Unit” or “Product”), to repair or replace with a new or refurbished Unit (at Directed’s sole and absolute discretion) should the Unit prove to be defective in workmanship or material under normal use, for a period of *two-years from the date of pu