¤ For model: HR-XVC1U DVD/VIDEO CASSETTE RECORDER USER’S GUIDE TV DVD MENU DISPLAY VCR DVD POWER MARKER RETURN OPEN/ CLOSE A.TRK C.RESET ZERO RETURN SUB TITLE ANGLE SEARCH MODE TITLE REPEAT A-B SP/EP PLAY MODE ZOOM TV POWER INPUT TV VOL 0 TIMER TV/VCR PLAY FF REW STOP PAUSE REC SKIP /INDEX SET TV/VCR CH + SKIP /INDEX ENTER/ SELECT SET UP MENU SET CANCEL TV/VC CH — R OSD SLOW A.
CAUTION RISK OF ELECTRIC SHOCK DO NOT OPEN CAUTION: TO REDUCE THE RISK OF ELECTRIC SHOCK, DO NOT REMOVE COVER (OR BACK). NO USER-SERVICEABLE PARTS INSIDE. REFER SERVICING TO QUALIFIED SERVICE PERSONNEL. The lightning flash with arrowhead symbol, within an equilateral triangle is intended to alert the user to the presence of uninsulated dangerous voltage within the product's enclosure that may be of sufficient magnitude to constitute a risk of electric shock.
Important safeguards 1. READ INSTRUCTIONS All the safety and operating instructions should be read before the unit is operated. 2. RETAIN INSTRUCTIONS The safety and operating instructions should be retained for future reference. 3. HEED WARNINGS All warnings on the unit and in the operating instructions should be adhered to. 4. FOLLOW INSTRUCTIONS All operating and use instructions should be followed. 5. CLEANING Unplug this unit from the wall outlet before cleaning.
Important safeguards 13. LIGHTNING To protect your unit from a lightning storm, or when it is left unattended and unused for long periods of time, unplug it from the wall outlet and disconnect the antenna or cable system. This will prevent damage to the unit due to lightning and power line surges. 14. POWER LINES An outside antenna system should not be located in the vicinity of overhead power lines or other electric light or power circuits, or where it can fall into such power lines or circuits.
Important safeguards / Power Source 28. LASER BEAM Do not look into the opening of the disc tray or ventilation opening of the product to see the source of the laser beam. It may cause sight damage. 29. DISC Do not use a cracked, deformed, or repaired disc. These discs are easily broken and may cause serious personal injury and product malfunction. 30.
Features VCR/DVD/CD Player • VCR With DVD/CD player - Unique space saving design combines a Hi-Fi Video cassette recorder and a DVD/CD player. The DVD disc has much more capacity, but is the same size as the audio CD disc. Picture quality is higher than Super VHS. Audio quality is higher than audio CD. The DVD PLAYER can play back video CDs and audio CDs. • High Quality Picture - More than 500 lines(VCR mode: 230 lines) of Horizontal Resolution.
Contents Before using your unit IMPORTANT SAFEGUARDS .............................................. 3 Power source ....................................................................... 5 Features ............................................................................... 6 Contents ............................................................................... 7 Parts and functions .............................................................. 8 Remote control .........................................
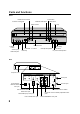
Parts and functions Front VCR/DVD select button PLAY button Cassette Loading Slot OPEN/CLOSE button STOP button Disc tray EJECT button PLAY STOP POWER VIDEO (M) L - AUDIO - R VCR EJECT CH OPEN/CLOSE REW FF REC DVD VCR/DVD Remote sensor POWER button CHANNEL +/– buttons AUDIO (L/R)/ VIDEO IN jacks DVD lamp REC button REW (Rewind) button VCR lamp FF (Fast Forward) button Rear AC power cord DVD OUTPUT DIGITAL AUDIO OPTICAL COAXIAL AUDIO S-VIDEO COMPONENT L IN Y VIDEO ( ANT.
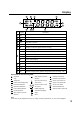
Display 1 2 3 4 11 5 6 10 No. 1 9 8 7 Display VCR Description VCR mode 2 Playback (lights) / Auto resume (flashes) 3 Still picture 4 DVD DVD disc is inserted. 5 CD Audio CD is inserted.
Remote control Page TV VCR DVD POWER DVD MENU MARKER RETURN OPEN/ CLOSE DISPLAY A.TRK C.RESET ZERO RETURN SUB TITLE ANGLE SEARCH MODE ZOOM TITLE REPEAT A-B SP/EP PLAY MODE TV/VCR/DVD switch POWER DVD MENU MARKER RETURN OPEN/CLOSE DISPLAY A.TRK SUBTITLE COUNTER RESET ANGLE ZERO RETURN TV POWER INPUT TV VOL 0 TIMER TV/VCR PLAY REW REC SKIP /INDEX SET FF STOP PAUS TV/VCR CH + E TIMER SKIP /INDEX ENTER/ SELECT SET UP MENU SET CANCEL T V/V C R C H — OSD SLOW A.
Remote control Inserting Batteries 1 Slide the battery compartment cover in the direction of the arrow. two "AA" batteries 2 Install 3 (supplied), paying attention to Replace the compartment cover. the polarity diagram in the battery compartment. BATTERY PRECAUTIONS The precautions below should be followed when using batteries in this device: 1. Use only the size and type of batteries specified. 2.
Basic connections If you are using an antenna system, follow the instructions. If you are a cable (CATV) subscriber,skip ahead to page 14 for the proper connections. ANTENNA TO DVD/VCR CONNECTION The DVD/VCR must be connected "between" the antenna and the TV. First, disconnect the antenna from the TV and connect it to the DVD/VCR. Then connect the DVD/VCR to the TV. Below are 3 common methods of connecting an antenna system to a DVD/VCR.
Basic connections DVD/VCR TO TV CONNECTION After you have connected the antenna to the DVD/VCR, you must connect the DVD/VCR to the TV. Below are 3 common methods of connecting your DVD/VCR to a TV. Find the type of TV you are using and follow the connection diagram. This DVD/VCR has a single 75 ohm output for connection to a TV. If your TV has separate VHF and UHF antenna inputs (numbers 2 and 3 below), use a splitter to connect the DVD/VCR to the TV for VHF and UHF reception.
CATV (CABLE TV) connections Many cable companies offer services permitting reception of extra channels including pay or subscription channels. This DVD/VCR has an extended tuning range and can be tuned to most cable channels without using a cable company supplied converter box, except for those channels which are intentionally scrambled. If you subscribe to a special channel which is scrambled, you must have a descrambler box for proper reception.
CATV (CABLE TV) connections IMPORTANT: Make sure the TV/CATV menu option is set to the "CATV" mode. This DVD/VCR cannot receive scrambled programs since it does not contain a descrambler. In order to receive scrambled programs, your existing descrambler must be used. Descrambler boxes are available from cable companies. Consult your local cable company for more information concerning connection to their descrambler equipment. There are many ways to connect your DVD/VCR to a cable system.
Playback Connection The exact arrangement you use to interconnect various video and audio components to the DVD/VCR is dependent on the model and features of each component. Check the Owner's Manual provided with each component for the location of video and audio inputs and outputs. Connect to a TV with Audio/Video Output You need an AUDIO/VIDEO Cord for connection.
Playback Connection Connect to a Stereo Amplifier with Audio Output NOTE: If your TV has COMPONENT VIDEO IN jack, you can connect the DVD/VCR to the TV with a COMPONENT cable (not supplied) as shown below. COMPONENT VIDEO output jack can send high-quality video signal to a TV than S-Video Input.
Setting the Video Channel / Setting the language Setting the Video Channel When a TV is connected with the 75 ohm coaxial cable only. To view playback of a recorded tape, or to watch a program selected by the VCR's channel selector, the TV must be set to channel 3 or 4 (video channel). To turn on the VCR/DVD, at first slide TV/VCR/DVD switch to 1 VCR/DVD. Then press POWER to turn on the VCR/DVD. VCR to select the VCR mode. The VCR indicator will 2 Press light.
Auto clock setting The Auto Clock feature enables the automatic clock setting and updating, and also to set the Time Zone and Daylight Saving Time by receiving XDS (Extended Data Service) information carried on the channel signal. Preparation: You must set the antenna connection before the AC cord plug is inserted into the AC outlet. TV VCR DVD POWER Auto clock setting WAIT 30 MINUTES! when the power switch is off, after the connections of the antenna and the power plug.
Auto clock setting Daylight saving time setting You can set the Daylight saving time automatically or manually. TV VCR DVD POWER Preparation: • Turn ON the TV. • When a TV is connected with an audio/video cable, select the video input mode on the TV. • When a TV is connected only with an antenna cable, set to the video channel 3 or 4. Then select VCR position with TV/VCR. • Make sure TV/VCR/DVD switch has been slided to VCR/DVD. Then press VCR to select the VCR mode.
Manual clock setting You must set the date and time manually for timer recordings. TV VCR DVD POWER Preparation: • Turn ON the TV and set to the video input mode. • Make sure TV/VCR/DVD switch has been slided to VCR/DVD. Then press VCR to select the VCR mode. (The VCR indicator will light) 1 Press SETUP MENU. The VCR menu screen will appear. or to select the 2 Press SYSTEM SET UP menu, then press ENTER. MAIN MENU DVD MENU MARKER RETURN OPEN/ CLOSE DISPLAY A.TRK C.
Tuner Setting This VCR is equipped with a channel memory feature which allows channels to skip up or down to the next channel set into memory, skipping over unwanted channels. Before selecting channels, they must be programmed into the VCR’s memory. In addition to normal VHF and UHF channels, this VCR can receive up to 113 Cable TV channels. To use this VCR with an antenna, set the TV/CATV menu option to the TV mode. When shipped from the factory, this menu option is in the CATV mode.
To ADD/DELETE channels / Noise elimination To ADD/DELETE channels You can add the channels you want or delete the channels you do not want manually. TV VCR DVD POWER Preparation: • Turn ON the TV and set to the video input mode. • Make sure TV/VCR/DVD switch has been slided to VCR/DVD. Then press VCR to select the VCR mode. (The VCR indicator will light) Repeat the steps 1~2 on page 19 1 and select CH SET UP, then press ENTER. Then press or to select the “ADD/DELETE” option.
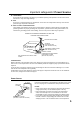
Loading and Unloading a Cassette Tape Use only video cassette tapes marked and . Loading Push the center of the tape until it is automatically inserted. Insert the cassette tape with its labeled side facing up and the erase prevention tab positioned at your left. An inverted cassette tape cannot be inserted. Erase prevention tab Automatic power ON When you insert a cassette tape the VCR power will turn ON automatically.
Cassette tape Playback You can add the channels you want or delete the channels you do not want manually. TV VCR DVD POWER Preparation: • Turn ON the TV and set to the video input mode. • Make sure TV/VCR/DVD switch has been slided to VCR/DVD. Then press VCR to select the VCR mode. (The VCR indicator will light) a prerecorded tape 1 Load (When loading a cassette tape without the erase prevention tab, playback will start automatically). start playback 2 To Press PLAY.
Picture search, Still Picture, Slow Motion, Tracking and Repeat playback Picture Search Repeat playback Reverse picture search function The whole of the video tape will be played until its end. Then the tape will be winded until its beginning and the playback will be repeated. Press x 1 or x 2 during the playback. Forward picture search function Press x 1 or x 2 during the playback. AUTO REPEAT, . .
ZERO RETURN function / Video Index Search system ZERO RETURN function This function makes tape-rewinding stop at the counter 00:00:00 position automatically. TV VCR DVD POWER Preparation: • Turn ON the TV and set to the video input mode. • Make sure TV/VCR/DVD switch has been slided to VCR/DVD. Then press VCR to select the VCR mode. (The VCR indicator will light) OSD. 1 Press The counter display shows the tape 12:00 SUN VPS CH 2 ZDF running time during playback or recording.
Recording a TV program Recording and viewing the same TV program TV VCR DVD POWER Preparation: • Turn ON the TV and set to the video input mode. • Make sure TV/VCR/DVD switch has been slided to VCR/DVD. Then press VCR to select the VCR mode. (The VCR indicator will light) a cassette tape with the erase 1 Load prevention tab intact. The VCR will automatically turn on. DVD MENU DISPLAY MARKER RETURN OPEN/ CLOSE A.TRK C.
Recording a TV program To stop recording Press STOP to stop recording. " " will appear on screen for about 4 seconds. To stop recording temporarily TV DVD MENU DISPLAY POWER VCR DVD MARKER RETURN OPEN/ CLOSE A.TRK C.RESET ZERO RETURN SUB TITLE ANGLE SEARCH MODE ZOOM TITLE REPEAT A-B Press PAUSE to avoid recording unwanted material. Press again to continue the recording. " " will appear on screen for about 4 seconds and “ ” will blink to continue pause mode.
One-touch Timer Recording The One-touch Timer Recording feature provides a simple and convenient way to make a timed recording. TV VCR DVD POWER Preparation: • Turn ON the TV and set to the video input mode. • Make sure TV/VCR/DVD switch has been slided to VCR/DVD. Then press VCR to select the VCR mode. (The VCR indicator will light) Example: One-touch Timer Recording for 30 minutes. a cassette tape with the erase 1 Load prevention tab intact. The VCR will automatically turn on.
Timer Recording Timer recording can be programmed on-screen with the remote control. The built-in timer allows automatic unattended recording of up to 8 programs within 1 month. TV VCR DVD POWER Preparation: • Make sure TV/VCR/DVD switch has been slided to VCR/DVD. Then press VCR to select the VCR mode. • Load a cassette tape with the erase prevention tab intact. • Make sure with OSD that the time and date are correct.(see page 27).
Timer-Recording Timer Recording Special case Weekly (e.g. WKL-TU: each Tuesday) or daily (e.g. MO-SA: Monday to Saturday) Timer recording Follow the procedure for timer recording on the previous page. At picture 3 press SET + or – repeatedly until the desired setting appears. Then press ENTER. When you press SET – repeatedly, the indicator at DATE will change as follows, in case today is Friday.
Stereo Recording and Playback / Separate Audio Program (SAP) Stereo Recording and Playback The VHS Hi-Fi audio system permits high fidelity recording of MTS STEREO TV broadcasts. TV CATV POWER DVD SUBTITLE CONTROL TITLE ZOOM REPEATA-B RETURN AUDIO PLAY MODE SLOW ANGLE 1 2 3 CANCEL 4 5 6 DISPLAY 7 8 9 INPUT AUDIO STEREO NOTE: When using a CATV system, stereo TV programs may be transmitted over a mono cable channel.
Duplicating a video tape If you connect the VCR to another VCR or camcorder, you can duplicate a previously recorded tape. Make all connections before turning on the power. a blank cassette tape with the erase prevenREC on the recording VCR. 1 Load 4 Press tion tab intact into the recording VCR. Or on the Remote, while holding REC, press PLAY. Load a previously recorded tape into the playback VCR or CAMCORDER. Then press PAUSE.
Disc This unit applies to DVD discs from Region 1 only. The loaded Disc (DVD, Video-CD, Audio-CD and MP3-CD) will be recognized automatically. The suitable Disc-format are: DVD, CD-R and CD-RW. Do not play DVD-ROM, DVD-Audio, CDV, CD-G or Photo CD to prevent accidental erasure of prerecorded material. Some DVDs is played back with a Copy guard system. In case of a dubbing on video tape, strong disturbance may occur. This is not a defect of this VCR/DVD.
Setting setup language The setup language can be selected. TV VCR DVD POWER Preparation: • Turn ON the TV and set to the video input mode. • Make sure TV/VCR/DVD switch has been slided to VCR/DVD. Then press DVD to select the DVD mode. (The DVD indicator will light) • When using an amplifier, switch on the amplifier. 1 Make sure TV/VCR/DVD switch has been slided to VCR/DVD. DVD to select the DVD 2 Press mode. (The DVD indicator will Reading DVD MENU DISPLAY MARKER RETURN OPEN/ CLOSE A.TRK C.
Playback procedure TV VCR DVD POWER Preparation: • Turn ON the TV and set to the video input mode. • Make sure TV/VCR/DVD switch has been slided to VCR/DVD. Then press DVD to select the DVD mode. (The DVD indicator will light) OPEN/CLOSE. 1 Press The disc tray will open. DVD MENU DISPLAY MARKER RETURN OPEN/ CLOSE A.TRK C.
Special playback Note: there may be a slight delay between you pressing the button and the function activating. Fast Forward Playback Press FF during normal playback. Each press of FF will increase the speed of the search x2, x4, x8, x20. (in case of Audio-CD: x6 and x16 are available) • To resume normal playback, press PLAY. TV VCR DVD POWER Review Playback Press REW normal playback. Each press of REW will increase the speed of the search x2, x4, x8, x20.
Zooming / Locating Desired Scene Preparation: • Turn ON the TV and set to the video input mode. • Make sure TV/VCR/DVD switch has been slided to VCR/DVD. Then press DVD to select the DVD mode. (The DVD indicator will light) Zooming TV VCR DVD POWER This unit will allow you to zoom in on the frame image. You can then make selections by switching the position of the frame. ZOOM during playback. 1 Press The centre part of the image will DVD MENU MARKER RETURN OPEN/ CLOSE DISPLAY A.TRK C.
Repeat playback Preparation: • Turn ON the TV and set to the video input mode. • Make sure TV/VCR/DVD switch has been slided to VCR/DVD. Then press DVD to select the DVD mode. (The DVD indicator will light) Title, Chapter, Track Playback TV VCR DVD POWER 1 Press PLAY MODE during playback or stop mode. DVD CD : Repeat Off /Enter/Play Mode DVD MENU MARKER RETURN OPEN/ CLOSE DISPLAY A.TRK C.
Program playback/Random playback (Audio CD) Preparation: • Turn ON the TV and set to the video input mode. • Make sure TV/VCR/DVD switch has been slided to VCR/DVD. Then press DVD to select the DVD mode. (The DVD indicator will light) TV VCR DVD POWER Program playback You can arrange the order of tracks on the disc. PLAY MODE in the stop 1 Press mode. DVD MENU MARKER RETURN OPEN/ CLOSE DISPLAY A.TRK C.
MP3 Playback This player can play back the MP3-data which recorded on CD-R or CD-RW. To produce the MP3-data, you need a WindowsPC with CD-ROM drive and a MP3-encoding Software (not supplied). The Apple-HFS-System can not be played. MP3 CD Information Limitations on MP3 CD playback • MP3 CD is the disc that standardized by ISO9660, its file name must include 3-digits extension letters, “mp3”. • The directory and file names of the MP3 CD must be corresponded to the ISO standardized files.
Marking Desired Scenes The unit stores the points that you want to watch again up to 3 points. You can resume playback from the each scene. Preparation: • Turn ON the TV and set to the video input mode. • Make sure TV/VCR/DVD switch has been slided to VCR/DVD. Then press DVD to select the DVD mode. (The DVD indicator will light) Marking the Scenes TV VCR DVD POWER DVD MENU MARKER RETURN OPEN/ CLOSE DISPLAY A.TRK C.
Changing soundtrack language / Subtitles TV VCR DVD POWER Preparation: • Turn ON the TV and set to the video input mode. • Make sure TV/VCR/DVD switch has been slided to VCR/DVD. Then press DVD to select the DVD mode. (The DVD indicator will light) Changing soundtrack language You can select the language when you play a multilingual disc. A.MONITOR 1 Press playback. DVD MENU MARKER RETURN OPEN/ CLOSE DISPLAY A.TRK C.
Changing angles / Title selection / DVD menu Preparation: • Turn ON the TV and set to the video input mode. • Make sure TV/VCR/DVD switch has been slided to VCR/DVD. Then press DVD to select the DVD mode. (The DVD indicator will light) TV VCR DVD POWER Changing Angles When playing back a disc recorded with multi-angle facility, you can change the angle that you are viewing the scene from. ANGLE during playback. 1 Press The current angle will appear. DVD MENU DISPLAY MARKER RETURN OPEN/ CLOSE A.
Parental control Some discs are specified not suitable for children. Such discs can be limited not to play back with the unit. TV VCR DVD POWER Preparation: • Turn ON the TV and set to the video input mode. • Make sure TV/VCR/DVD switch has been slided to VCR/DVD. Then press DVD to select the DVD mode. (The DVD indicator will light) Parental control setting SETUP MENU in the stop 1 Press mode. Press or to select “Parental”. Then press ENTER.
Parental control setting Some discs are specified not suitable for children. Such discs can be limited not to play back with the unit. DVD SETUP in the stop mode. 1 Press Press or to select Language Picture Parental. Then press TV CATV or ENTER. Password Parental Parental Other 8 POWER DVD SUBTITLE CONTROL TITLE ZOOM REPEATA-B RETURN AUDIO PLAY MODE SLOW ANGLE 1 2 3 CANCEL 4 5 6 7 8 9 DISPLAY or to select 2 Press Parental, then press or until the level you require appears.
To change the parental level Press DVD SETUP in the stop mode or No Disc. 1 Press or to select Language Picture Parental. Then press TV CATV or ENTER. ZOOM REPEATA-B RETURN AUDIO PLAY MODE SLOW ANGLE 1 2 3 CANCEL 4 5 6 DISPLAY 7 8 9 INPUT 1 number buttons 2 Press (0-9) to enter the password you have stored. Language Picture Password Parental Parental Other 1234 1 0 9/Cancel /Enter/Setup/Return 0 TV RETURN C.C.
Temporary disabling of rating level by DVD disc Depending on the DVD disc, the disc may try to temporarily cancel the rating level that you have set. It is up to you to decide whether to cancel the rating level or not. TV CATV POWER DVD SUBTITLE CONTROL TITLE ZOOM REPEATA-B RETURN AUDIO PLAY MODE SLOW ANGLE 1 2 3 CANCEL 4 5 6 DISPLAY 7 8 9 a DVD disc and press 1 Load PLAY or OPEN/CLOSE on the unit (see P.27).
Setting the aspect ratio of TV screen You can select the aspect ratio for your TV. 1 Press DVD SETUP in the stop mode or No Disc. Press Picture. TV CATV or to select Parental Other POWER DVD SUBTITLE CONTROL /Enter/Setup/Return TITLE ZOOM REPEATA-B RETURN AUDIO PLAY MODE SLOW ANGLE 1 2 3 CANCEL 4 5 6 DISPLAY 7 8 9 2 Press press Screen. or ENTER, then or to select Tv AUDIO Language Picture Tv Screen Display Parental Other 4:3 On /Enter/Setup/Return 0 TV RETURN C.C.
Setting on Screen display/Status display of Disc On screen display can be switched on or off when you press the buttons. 1 Press DVD SETUP in the stop mode or No Disc. Press Picture. TV CATV or to select Language Picture Other POWER DVD SUBTITLE CONTROL /Enter/Setup/Return TITLE ZOOM REPEATA-B RETURN AUDIO PLAY MODE SLOW ANGLE 1 2 3 CANCEL 4 5 6 DISPLAY 7 8 9 2 Press 0 TV RETURN C.C. SLEEP TIMER INPUT Parental AUDIO LIGHT press Display.
Setting menu language You can select the language of the disc menu messages of DVDs. 1 Press DVD SETUP in the stop mode or No Disc. Press or Language. TV CATV to select Language Picture Parental Other POWER DVD SUBTITLE CONTROL TITLE ZOOM REPEATA-B RETURN AUDIO PLAY MODE SLOW ANGLE 1 2 3 4 5 6 CANCEL /Enter/Setup/Return 2 Press press or ENTER, then or to select Menu. 7 DISPLAY 9 Menu Subtitle Audio 0 TV RETURN C.C.
Setting subtitle language The same subtitle language can always be selected even if you replace the disc or turn the power off. Press DVD SETUP in the stop mode or No Disc. 1 Press or to select Language. TV CATV Language Picture Parental Other POWER DVD SUBTITLE CONTROL TITLE ZOOM REPEATA-B RETURN AUDIO PLAY MODE SLOW ANGLE 1 2 3 CANCEL 4 5 6 DISPLAY 7 8 9 INPUT 2 Press press Subtitle.
Setting audio soundtrack language The same audio soundtrack language can always be selected by your unit even if you replace the disc or turn the power off. TV CATV Press DVD SETUP in the stop mode or No Disc. 1 Press or to select Language Picture Parental Other Language. POWER DVD SUBTITLE CONTROL /Enter/Setup/Return TITLE ZOOM REPEATA-B RETURN AUDIO PLAY MODE SLOW ANGLE 1 2 3 Press 2 press or ENTER, then or to select Audio.
Language Code List Enter the appropriate code number for the initial settings "AUDIO", "SUBTITLE" and/or "MENU LANGUAGE" (see pages 40-42).
Problems and troubleshooting Use the following check list for troubleshooting when you have problems with your unit. Consult your local dealer or service outlet if problems persist. Be sure all connections are properly made when using with other units. SYMPTOMS POSSIBLE SOLUTIONS PAGE POWER • Make sure the power cord is plugged in. • Try another AC outlet. • Power is off, check fuse or circuit breaker. • Unplug unit, then plug it back in.
SYMPTOMS POSSIBLE SOLUTIONS PAGE DVD Playback doesn’t start. • No disc is inserted. • The disc may be dirty. Clean up the disc. • The unit cannot play CD-ROMs, etc. 27 25 – No picture • TV/AV selector is not set correctly. 26 No sound • Check the input selector of the amplifier is set properly. • The unit is in the Special playback mode. • Select the correct Audio Output position on AV amplifier. – 28 44 Picture is distorted during CUE or REVIEW. • The picture will be distorted occasionally.
Reception disturbances Most types of television interference can be remedied by adjusting the height and position of the VHF/UHF antenna. Outdoor antennas are recommended for best results. The most common types of television interference are shown below. If one of these symptoms appear when the TV/DVD is connected to a Cable TV system, the disturbance may be caused by the local Cable TV company broadcast. IGNITION Black spots or horizontal streaks may appear, the picture may flutter or drift.
Specifications GENERAL Power supply: Power consumption: Weight: Dimensions: TELEVISION Picture tube: Tuner type: Receiving channels: Antenna input: Speaker: Audio output power: DVD/CD player Signal system: Applicable disc: Audio characteristics: Frequency response: S/N Ratio: Harmonic distortion: Wow and flutter: Dynamic range: Input/Output: Headphone Jack: Digital audio out: Pickup: ACCESSORIES: AC 120V 60Hz Operation: 120W Stand by: 8W 56.1lbs (25.
JVC COMPANY OF AMERICA Division of U.S. JVC CORP. 1700 Valley Road Wayne, New Jersey 07470 2A30201A K 01/03 JVC CANADA, INC.