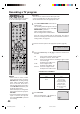
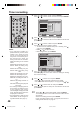
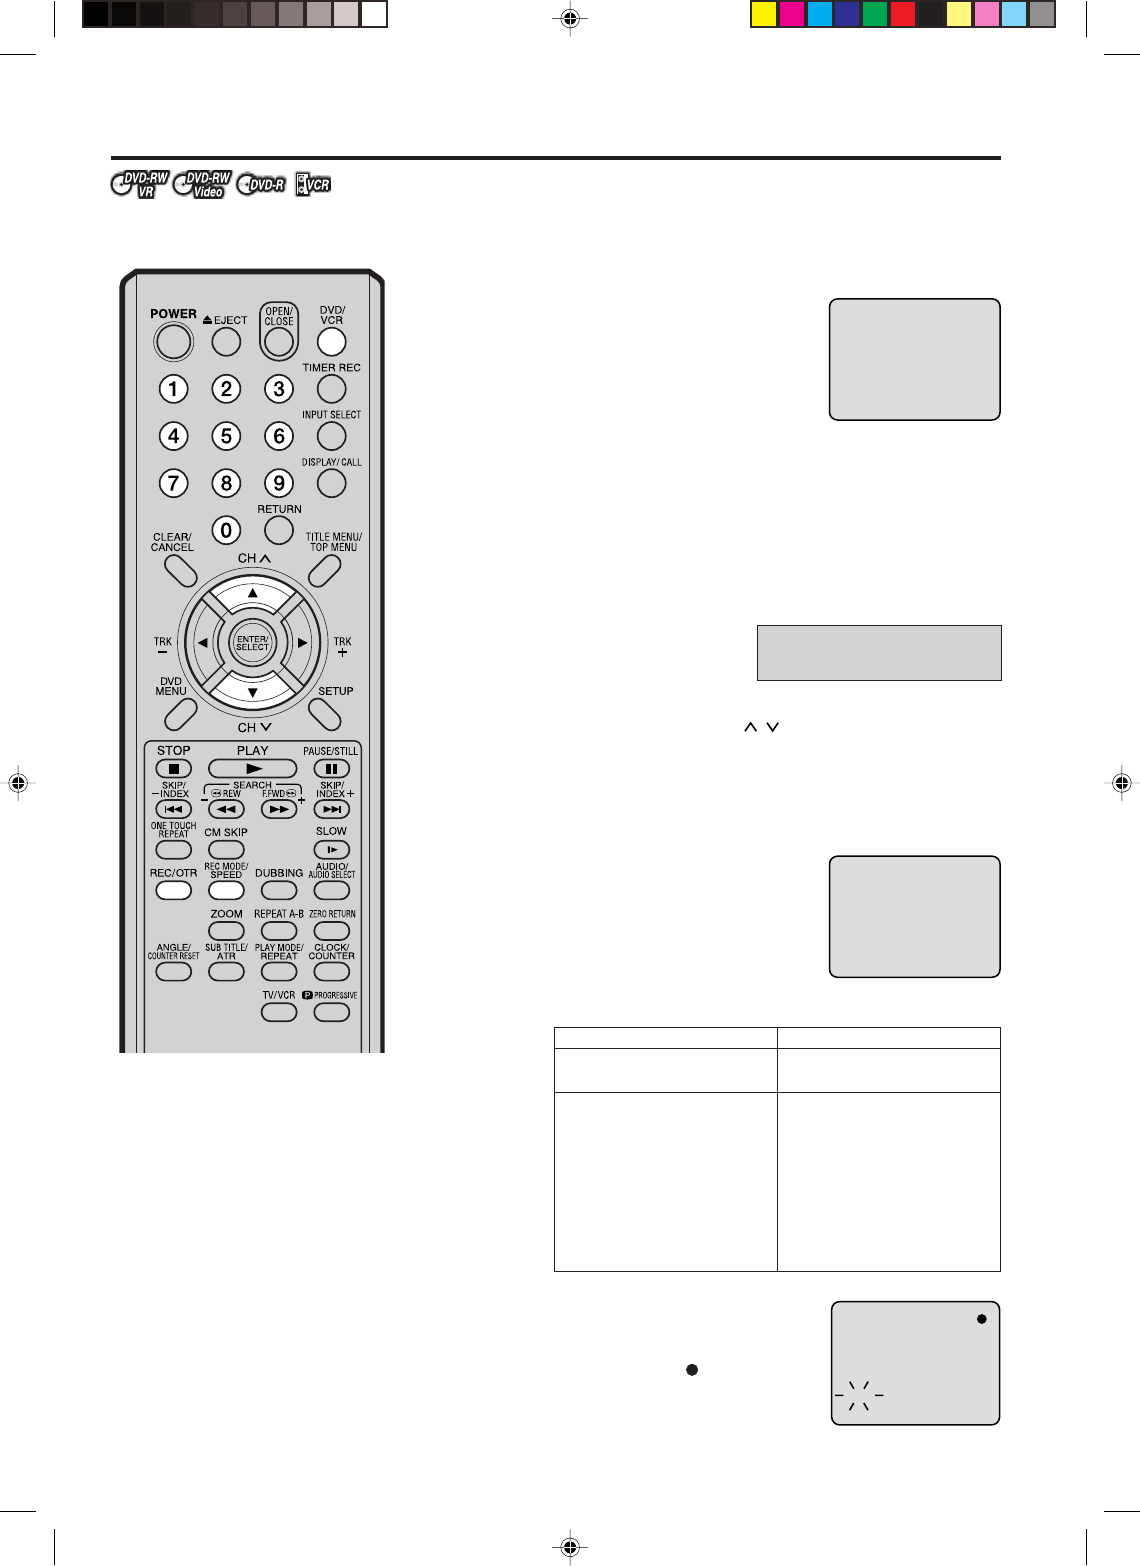
Recording a TV program You can record programs you watch on TV onto video tapes or DVDs. Preparation: • Turn ON the TV and set it to the video input mode. • Load a recordable DVD or video tape into the unit. • Press DVD/VCR to select the appropriate mode. REC MODE/SPEED and set the re1 Press cording mode. The recording mode will appear on the TV monitor and change every time REC MODE/SPEED is pressed.
Recording a TV program To stop recording Press STOP to stop recording. “ ” will appear on the screen for about 4 seconds. To stop recording temporarily Press PAUSE/STILL to avoid recording unwanted material. ” will appear on screen for about 4 sec“ onds. Press again to resume recording. NOTES: • The pause function will be released after 5 minutes to prevent damage to the tape or the VCR. The VCR will change to the STOP mode. • You can select a recording channel in the recording pause mode.
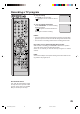
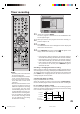
One-touch Timer Recording (OTR) Preparation: The One-touch Timer Recording feature provides a simple and convenient way to make a timed recording. • Turn ON the TV and set to the video input mode. • Load a recordable DVD or video tape into the unit. • Press DVD/VCR to select the appropriate mode. Example: One-touch Timer Recording for 30 minutes. REC MODE/SPEED to select the 1 Press recording mode. For the recording mode, see the step 1 on page 44.
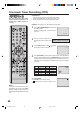
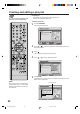
Timer recording Setting timer recording The timer recording system allows you to select the date, time and channel and record the desired programs. Up to 8 timer programs within a month can be stored in this unista Preparation: • • • • Turn ON the TV and set to the video input mode. Load a recordable DVD or video tape. Press DVD/VCR to select the appropriate mode. Confirm that the clock is indicating the correct time.
Timer recording Press 4 Press or or to select “TYPE” and press ENTER. to select “ONCE” from the list and press ENTER. SETUP MENU TIMER REC SET TYPE EVERY SUN ONCE 11,08,03(--) EVERY SUN 02:17 EVERY MON EVERY TUE 03:17 EVERY WED EVERY000 THU EVERY FRI DVD MON-FRI XP DATE START END CH REC TO REC MODE REC REC TO MORE OK SELECT ENTER/ SELECT ENTER RETURN BACK SETUP END 5 Press Press or to select “DATE” and press ENTER. or to select the date to be recorded from the list and press ENTER.
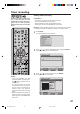
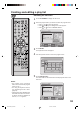
Timer recording SETUP MENU TIMER REC SET TYPE ONCE DATE 20,08,03(--) START 20:00 END 21:30 CH REC REC TO MORE 06 REC TO DVD REC MODE LP OK SELECT ENTER/ SELECT 11 RETURN ENTER SETUP BACK END Select “OK” and press ENTER. The timer program is determined and the TIMER REC SET screen appears again. you enter the other program for the timer recording, re12 When peat the steps 3 to 11. 13 Press SETUP. The TIMER REC SET screen disappears and the display will return to the normal screen.
Stereo recording and playback The VHS Hi-Fi audio system permits high fidelity recording of MTS STEREO TV broadcasts. When a MTS STEREO broadcast is received, the word “STEREO” will appear on the screen and the program can be viewed or recorded in stereo. The Hi-Fi STEREO recording procedure is the same as for normal recordings. STEREO NOTE: When using a CATV system, stereo TV programs may be transmitted over a mono cable channel.
Editing the disc This section explains how to edit the recorded DVD. Editing the disc means editing the title menu. However, the items that you can edit vary with the recording formats. In VR mode, you can edit various title menus, whereas in video mode, you can edit only a few items. Title menu When you record a video first time on the DVD (in VR mode) where nothing is recorded, the recorded content is automatically set to Title1. Then, the second recorded content is set to Title2, and so on.
Creating and editing a play list Preparation: You can create and edit the play list based on the original title. • Turn ON the TV and set to the video input mode. • Load the recorded DVD-RW (VR). Creating a play list Press TITLE MENU. 1 The title menu will appear.
Creating and editing a play list Renaming the title menu 1 Press TITLE MENU to display the title menu. the play list where you want to rename the program name. 2 Select • Press or to select the play list. to display the editing menu of the play list. or to select “RENAME PROG”.
Creating and editing a play list Erasing scenes (Edit program) You can erase an unnecessary scene from the created play list. When you erase the scene from the play list, the scene is not erased from the original title. 1 Press TITLE MENU to display the title menu. the play list where a scene you want to erase is included. 2 Select • Press or to select the play list. • Press • Press to display the editing menu of the play list. or to select “EDIT PROGRAM”.
Creating and editing a play list EDIT PROGRAM NAME Family CHAPTER LENGTH 2/3 00:11:42 00/00:30:17 Adjust start SET END Finish 00:08:28 Preview 00:30:17 SELECT ENTER/ SELECT ENTER RETURN TITLE MENU BACK END “SET END” at the end point of the scene you want to erase 6 Select and press ENTER. The still image at the end point appears at the right small screen.
Creating and editing a play list Combining the title You can create a play list by combining the several original titles. To combine the titles, it is necessary to create a play list at first. By combining the original titles in the play list, a play list where several titles are combined is created. 1 Press TITLE MENU to display the title menu. the play list where you want to combine the titles. 2 Select or to select the play list. • Press • Press • Press to display the editing menu of the play list.
Creating and editing a play list Erasing a play list You can erase the created play list. Even if you erase the play list, the original title will not be erased. 1 Press TITLE MENU to display the title menu. the play list that you want to erase. 2 Select or to select the play list. • Press • Press • Press to display the editing menu of the play list. or to select select “DELETE PROGRAM”.
Editing original Adding a chapter mark The original titles can be edited only in the DVD-RW (VR). You can add a chapter mark to the original title. You can add up to 999 chapter marks to one title. 1 Press TITLE MENU to display the title menu. the original title where a chapter mark is added. 2 Select or to select the original title. • Press • Press • Press to display the editing menu of the original. or to select “ADD CHAPTER MARK”.
Recording a TV program the scene you want to add a chapter mark, press ENTER. 5 When The playback is temporally stopped and the position of the added chapter mark appears yellow. ADD CHAPTER MARK NAME Title 2 CHAPTER LENGTH 2/4 08/00:45:10 17% The added chapter mark 6 If you continue to add a chapter mark, carry out the steps 4 & 5. chapter marks is finished. 7 Adding • To display the title menu, press RETURN. • To return to the normal screen, press TITLE MENU.
Editing original COMBINE CHAPTERS 6:41 NAME Title 1 CHAPTER LENGTH ENTER/ SELECT 2/3 08/00:01:50 ENTER RETURN BACK TITLE MENU END 4 Press INDEX + or INDEX - to select the chapter marks to be erased. ENTER. 5 Press The chapter marks are erased and 2 chapters are combined into 1 chapter. 6 To continue erasing the chapter marks, carry out the steps 4 & 5. chapter combination will be completed. 7 The • To display the title menu, press RETURN. • To return to the normal screen, press TITLE MENU.
Editing original Erasing a scene (Edit program) You can erase an unnecessary scene from the original title. Erase the scene after checking the title items. You cannot reproduce the erased scene. 1 Press TITLE MENU to display the title menu. the original program that you want to rename. 2 Select or to select the original program. • Press • Press • Press to display the original editing menu. or to select “EDIT PROGRAM”.
Editing original Erasing the original program You can erase the original program. Erase the original program after checking its items. The erased program cannot be reproduced. When you erase the programs, you can increase the disc space. 1 Press TITLE MENU to display the title menu. the original title you want to erase. 2 Select or to select the program. • Press • Press • Press to display the original editing menu. or to select “DELETE PROGRAM”.
Renaming a disc name Preparation: You can rename a disc name from the title menu. In addition, to initialize a disc, the disc name can be entered. • Turn ON the TV and set to the video input mode. • Load the recorded disc. Renaming a disc name 1 By pressing TITLE MENU, display the title menu. or to select “DISC NAME”. 2 •• Press to display the editing menu. Press • Press or to select “RENAME DISC”.
Renaming a disc name Character input 2 Example: Explain here the procedure when you input “F” and “J”. Using the keyboard screen This section explains the function of the keyboard screen and how to input characters. The disc name ant the program name can be renamed using the keyboard screen. the numerical keys where a character you 1 Press want to input is assigned. 3 Keyboard screen types d The keyboard screen has three types of “Letters”, “Numbers” and Signs”.
Renaming a disc name one among the following items in the list 2 Select and press ENTER. Erasing a character You can erase the input character. Erasing method 1 1 Press , , or and select “Back”. ENTER. 2 Press The last input character will be erased. Auto Caps: Determines uppercase and lowercase automatically. Upper: Inputs all with uppercase letters. Lower: Inputs all with lowercase letters. Determining a name the characters continuously, press ENTER.
Dubbing a tape onto a disc Preparation: You can record video or audio on a video tape onto a disc. • Turn ON the TV and set to the video input mode. • Load a source video tape and a disc for recording. • Set the erase-protection tab of the source video tape to prevent the data from accidentally being erased. • Confirm the disc space before operation. DVD/VCR to set this unit to DVD mode. 1 Press The DVD mode lamp comes on. REC MODE and select the recording mode.
Dubbing a disc onto a tape Preparation: You can record video or audio on a disc onto a video tape. When the disc with a copy guard function is used, a disordered image is recorded on the video tape. • Turn ON the TV and set to the video input mode. • Load a source disc and a video tape for recording. • Confirm the remaining tape for recording before operation. 1 Press DVD/VCR to set this unit to VCR mode. The VCR mode lamp comes on. REC MODE/SPEED and select the recording mode.
Dubbing video or audio by connecting other equipment You can connect the other VCR or comcorder to dub video or audio.
SETUP MENU The SETUP MENU consists of several menus where you can make various settings concerning language, audio functions, and images. In addition, this menu includes a clock, channel and other things that require setting just after purchase. For details of each menu, see the corresponding section in this chapter. or to choose the submenu you want to 3 Press select and press ENTER. The setting screen of the selected submenu will appear.
Setting the language You can choose the language of the menu screen, DVD menu, DVD audio and subtitles. Selectable languages: Preparation: ENGLISH, FRANCAIS, ESPANOL The language you have selected will play if it is recorded on the disc. • Turn ON the TV and set it to the video input mode. • Select “LANGUAGE” from “SYSTEM SETUP”. For the procedure, see steps 1 to 3 in “Using the SETUP MENU”. ORIGINAL The unit will select the first priority language of each disc.
Selecting and cancelling of parental control Some discs are specified as not suitable for children. This unit can prevent playback of such discs. Preparation: • Turn ON the TV and set it to the video input mode. • Select “PARENTAL” from “SYSTEM SETUP”. For the procedure, see steps 1 to 3 in “Using the SETUP MENU”. NOTE: • The selected level will apply to operations executed after this. • The unit cannot restrict playback of some discs.
Setting the clock The clock is set to the correct time automatically, but it can also be set manually. The clock can be set for daylight saving time and time zone. Preparation: • Turn ON the TV and set it to the video input mode. • Select “Clock” from “SYSTEM SETUP”. For the procedure, see steps 1 to 3 in “Using the SETUP MENU”. SETUP MENU TIMER REC SET CLOCK SYSTEM SETUP CLOCK SET NOTE: • If power is lost or the power plug is disconnected for 30 minutes or longer, the built-in clock is reset.
Disc setup and operation You can format, protect or finalize the disc. Preparation: • Turn ON the TV and set it to the video input mode. • Select “DISC SETUP” from “SYSTEM SETUP”. For the procedure, see steps 1 to 3 in “Using the SETUP MENU”.
Disc setup and operation / other (SYSTEM SETUP) PROTECT DISC You can protect a disc to prevent the content recorded on it from being erased, edited or re-recorded. Only DVD-RW (in VR mode) can be protected. Select “PROTECT DISC” and select “ON” to protect the disc. To cancel the disc protection, select “OFF”. NOTES: • Some discs may require about 2 minutes for the protection process. • You cannot format a disc where the disc protection is “ON”.
Turning on the screen display This section describes settings about movie playback. STILL BY FRAME An image is displayed on the screen from when the unit is paused. Preparation: • Turn ON the TV and set it to the video input mode. • Select “AV SETUP 1” from “AV SETUP”. For the procedure, see steps 1 to 3 in “Using the SETUP MENU”.
Adjusting audio This section describes image quality settings. This section describes audio settings. Preparation: Preparation: • Turn ON the TV and set it to the video input mode. • Select “AV SETUP 2” in “AV SETUP”. For the procedure, see steps 1 to 3 in “Using the SETUP MENU”. • Turn ON the TV and set it to the video input mode. • Select “AUDIO” from “AV SETUP”. For the procedure, see steps 1 to 3 in “Using the SETUP MENU”.
Turning on image quality control / recording SAP (Second Audio Program) This unit is fitted with an SAP broadcast system that enables you to switch to a second audio program while viewing a selected channel. This function applies only when the program is broadcast in multiple languages through the SAP broadcast system. Select “SAP” and select “ON” to use SAP, and to not use it, select “OFF”. This section describes image quality settings. Preparation: • Turn ON the TV and set it to the video input mode.
Selecting reception channel / other This DVD/VCR is equipped with a channel memory feature that allows you to skip channels up or down to the next channel set in memory, hence skip over unwanted channels. Before selecting channels, they must be programmed into the DVD/VCR’s memory. In addition to normal VHF and UHF channels, this DVD/ VCR can receive up to 113 Cable TV channels. To use this DVD/VCR with an antenna, set the TV/CATV menu option to the TV mode.
Glossary auto chapter Feature that automatically makes chapter marks on a DVD disk during recording. auto clock Feature that automatically sets the internal clock. blue background Feature that automatically changes unpleasant noise images to a blue screen when a channel without a broadcast or a channel on which the broadcast has ended has been selected. CATV Acronym for Community Antenna Television chapter A section within a title is called a “chapter”.
Discs A-B Repeat Playback Playback that repeats between two set points, A and B. One touch repeat If ONE TOUCH REPEAT is pressed during playback, playback returns to a point 10 sec earlier and resumes. region number There is software that enables DVD playback in differing countries. The number of that kind of disk is called the “region number”. edit program Feature that deletes unnecessary scenes of a title recorded on a disk.
Language code list Enter the appropriate code number for the initial settings “DVD MENU”, “AUDIO” and/or “SUBTITLE” (see page 73).
82 VRDVD4005_P69-P86 82 03.8.
Problems and troubleshooting Use the following check list for troubleshooting when you have problems with your unit. Consult your local dealer or service outlet if problems persist. Be sure all connections are properly made when using with other units. SYMPTOMS POSSIBLE SOLUTIONS PAGE DVD/VCR DVD/VCR does not operate. 12~15 No picture. • Antenna connection is not correct or antenna cable is disconnected.
Problems and troubleshooting / Video head cleaning SYMPTOMS POSSIBLE SOLUTIONS PAGE • The S-VIDEO/COMPONENT selecter is not set correctly. No picture, or the screen is blurred • The progressive scanning mode is active through the unit is or divided into two parts. connected to a TV via the VIDEO OUT jack. 16 52 No 4:3 (16:9) picture • The setup does not match your TV. 49 No on-screen display • Select Display On. 50 No surround sound • The setup does not match your stereo system.
Get it fixed, at your home or ours! Your Home For repair – in your home – of all major brand appliances, lawn and garden equipment, or heating and cooling systems, no matter who made it, no matter who sold it! For the replacement parts, accessories and owner’s manuals that you need to do-it-yourself. For Sears professional installation of home appliances and items like garage door openers and water heaters. 1-800-4-MY-HOME® (1-800-469-4663) Call anytime, day or night (U.S.A. and Canada) www.sears.