DRAFT DVD Player &VCR DV-PT100 Register Your Product on www.pioneerelectronics.com Operating Instructions VRB1362A_01(cover).pm6 1 04.9.
CAUTION RISK OF ELECTRIC SHOCK DO NOT OPEN The lightning flash with arrowhead, within an equilateral triangle, is intended to alert the user to the presence of uninsulated "dangerous voltage" within the product's enclosure that may be of sufficient magnitude to constitute a risk of electric shock to persons. CAUTION: TO PREVENT THE RISK OF ELECTRIC SHOCK, DO NOT REMOVE COVER (OR BACK). NO USER-SERVICEABLE PARTS INSIDE. REFER SERVICING TO QUALIFIED SERVICE PERSONNEL.
IMPORTANT SAFETY INSTRUCTIONS READ INSTRUCTIONS — All the safety and operating instructions should be read before the product is operated. RETAIN INSTRUCTIONS — The safety and operating instructions should be retained for future reference. HEED WARNINGS — All warnings on the product and in the operating instructions should be adhered to. FOLLOW INSTRUCTIONS — All operating and use instructions should be followed. CLEANING — The product should be cleaned only with a polishing cloth or a soft dry cloth.
Recording equipment and copyright: You may use this product only to reproduce or copy materials for which you own the copyright or have obtained permission to copy from the copyright owner or for which you otherwise have a legal right to reproduce or copy.
Features DVD/CD Player/Video Cassette Recorder • DVD/CD player with Video Cassette Recorder - Unique space saving design combines a DVD/CD player and a Hi-Fi Video cassette recorder. The DVD disc has much more capacity, but is the same size as the audio CD disc. Picture quality is higher than Super VHS. Audio quality is higher than audio CD. The DVD PLAYER can play back audio CDs. • High Quality Picture - More than 500 lines (VCR mode: 230 lines) of Horizontal Resolution.
Contents Features ................................................................... 5 Changing soundtrack language ........................ 25 Contents ................................................................... 6 Subtitles ............................................................ 25 Parts and functions .................................................. 7 Karaoke playback ............................................. 25 Remote control ......................................................
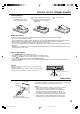
Parts and functions Front VCR/DVD mode selector button PLAY button OPEN/CLOSE button Cassette Loading Slot STOP button Disc tray VCR EJECT button CHANNEL buttons STANDBY/ON button AUDIO L (MONO)/R/ VIDEO INPUT jacks VCR indicator / Display window DVD indicator REW (Rewind) button Remote sensor REC button FF (Fast Forward) button Display window Play indicator VCR indicator Pause indicator DVD indicator REC indicator CD indicator TRK indicator PM indicator Video tape indicator Number ind
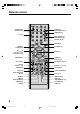
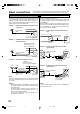
Remote control STANDBY/ON [9] DVD/VCR [9] DVD OPEN/CLOSE [24] VCR EJECT [17] TIMER REC [20] 0 – 9 [16] INPUT SELECT [22] PROGRESSIVE [30] DISPLAY [15] [25] RETURN [23] TOP MENU [26] SETUP [23] VCR MENU [14] CH / [9] TRK/SET + / – [14] Cursor Buttons [15] ENTER [14] CANCEL [21] DVD MENU [26] PLAY [17] [24] STOP [17] [24] PAUSE/STILL [18] [24] SKIP [24] INDEX + / – [18] SEARCH + / – [17] [24] SLOW [18] [24] MARKER [25] CLOCK/COUNTER [18] AUDIO [25] AUDIO SELECT [22] TV/VCR [14] REC [19] REPE
Remote control / Power source Inserting Batteries 1 Open the battery compartment cover on the back of the remote control. two AAA/R03 batteries into 2 Insert 3 the battery compartment following Close the cover. the indications (+,–) inside the compartment. Battery precautions Incorrect use of batteries can result in hazards such as leakage and bursting. Please observe the following: • Don't mix new and old batteries together.
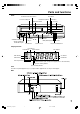
Before making or changing any rear panel connections, make sure that all components are switched off and unplugged from the wall outlet. Basic connections Antenna to DVD/VCR connection DVD/VCR to TV connection The DVD/VCR must be connected “between” the antenna and the TV. First, disconnect the antenna from the TV and connect it to the DVD/VCR. Then connect the DVD/VCR to the TV. Below are 3 common methods of connecting an antenna system to a DVD/VCR.
CABLE TV connections Many cable companies offer services permitting reception of extra channels including pay or subscription channels. This DVD/ VCR has an extended tuning range and can be tuned to most cable channels without using a cable company supplied converter box, except for those channels which are intentionally scrambled. If you subscribe to a special channel which is scrambled, you must have a descrambler box for proper reception.
Playback connections The exact arrangement you use to interconnect various video and audio components to the DVD/VCR is dependent on the model and features of each component. Check the Owner's Manual provided with each component for the location of video and audio inputs and outputs. Connect to a TV with Audio/Video Output You can enjoy playback by connecting the unit to a TV. Connect the unit to a TV equipped with audio input (L/R) and video input jacks using the supplied audio/video cable.
Connect to a Stereo Amplifier with Audio Output You can enjoy high quality audio by connecting the audio output to your amplifier. Connect the AUDIO OUT jacks to any line-level inputs (such as AUX, DVD, CD, etc.) of an audio amplifier.
Setting up the VCR section Setting the video channel To view playback of a recorded tape or DVD disc, or to watch a program selected by the VCR's channel selector, the TV must be set to channel 3 or 4 (video channel). Setting the language You can choose from three different languages (English, French and Spanish) for the on-screen displays. 1 Press VCR MENU. MENU TIMER REC SET The VCR menu screen AUTO REPEAT ON OFF will appear.
Auto clock setting 4 The Auto Clock function will automatically set the builtin clock (Month, Day, Year and Time) when the DVD/ VCR is connected to an Antenna or Cable system and it is turned off. As the DVD/VCR searches for a receivable station in your area and it receives a broadcast signal for Auto Clock, the Auto Clock needs several minutes to set itself. 1 2 3 4 5 6 Connect the Antenna or Cable system. • If you use a cable box, turn it on. Plug the AC Power cord to the AC outlet.
Manual clock setting Automatic memory tuning You must set the date and time manually for Timer Recordings, ON/OFF Timer and Daylight Saving Time if the Auto Clock process did not set them correctly. The VCR can receive a maximum of 181 channels by presetting the channels into memory. 1 In the “CH SETUP” menu, press SET + or – to select “AUTO CH MEMORY”, then press ENTER. 2 The DVD/VCR will begin memorizing all the channels available in your area.
Tape playback operation Loading and Unloading a cassette tape Cassette tape playback Loading Load a prerecorded tape (When loading a cassette tape without the erase prevention tab, playback will start automatically). Push the center of the tape until it is automatically retracted into the unit. To start playback Automatic power on and play Press PLAY to begin playback. “ ” will appear on the screen. Use only video cassette tapes marked .
Slow Motion ZERO RETURN function During playback press SLOW. To return to playback: Press PLAY or SLOW. This function makes tape-rewinding stop at the counter 00:00:00 position automatically. Slow tracking and vertical lock adjustment If noise bars appear in the picture during slow motion, press the TRK + or – to reduce the noise bars. If the still picture jitters excessively, press TRK + or – to stabilize the still picture. 1 Press DISPLAY.
Recording To stop recording Recording a TV program Press STOP to stop recording. “ ” will appear on screen for about 4 seconds. Recording and viewing the same TV program. 1 Load a cassette tape with the erase prevention tab intact. The unit will automatically turn on. 2 Press SPEED to select the desired tape speed SP or SLP. The tape counter and SP or SLP will appear on the screen for about 4 seconds. Press PAUSE/STILL to avoid recording unwanted material.
One-touch Timer Recording (OTR) The One-touch Timer Recording feature provides a simple and convenient way to make a timed recording. Example: One-touch Timer Recording for 30 minutes. 1 Load a cassette tape with the erase prevention tab intact. The unit will automatically turn on. 2 Press SPEED to select the desired tape speed SP or SLP. The tape counter and SP or SLP will appear on the screen for about 4 seconds. 3 Set the TV/CABLE option to the appropriate position.
Timer recording special case Weekly (e.g. WKL-TU: each Tuesday) or daily (e.g. MO-SA: Monday to Saturday) Timer recording. Follow the procedure of timer recording on the previous page. At picture 3 press SET + or – repeatedly until the desired setting appears. Then press ENTER. When you press SET – repeatedly, the indicator at DATE will change as follows, in this case the day is Friday.
Advanced function of VCR section Stereo recording and playback Duplicating a video tape The VHS Hi-Fi audio system permits high fidelity recording of MTS STEREO TV broadcasts. If you connect the VCR to another VCR or camcorder, you can duplicate a previously recorded tape. Make all connections before turning on the power. When a MTS STEREO broadcast is received, the word STESTEREO REO will appear on the screen and the program can be viewed or recorded in stereo.
Disc playback operation Disc Setting setup language This unit applies to DVD discs from Region 1 or Region ALL. The loaded Disc (DVD, Audio-CD and MP3/WMA/JPEG-CD) will be recognized automatically. The suitable Disc-formats are: DVD, CD-R and CD-RW. Some CD-R/RW discs may be incompatible. The setup language can be selected. 1 Press DVD/VCR to select the DVD mode. (The DVD indicator will light) “No Disc” will appear on the screen. (If a DVD disc has already loaded, the playback will start automatically.
Playback procedure Special playback 1 Press DVD OPEN/CLOSE. The disc tray will open. There may be a slight delay between pressing the button and the function activation. 2 Place a disc onto the tray. Hold the disc, position it with the printed label side up, align it with the guides, and place it in its proper position. Fast Forward Playback 3 Press PLAY or DVD OPEN/CLOSE. The disc tray closes automatically. On the screen, changes to “Reading” and then playback will commence.
Locating desired scene Changing soundtrack language Use the title, chapter and time recorded on the disc to locate the desired point to play back. You can select the language when you play a multilingual disc. To check the title, chapter and time, press DISPLAY. (see page 30) 1 1 2 3 4 Press JUMP during playback or stop mode. Jump Time Title Chapter /Enter/0 9/Cancel/Jump Press or to select the “Time”, “Title” or “Chapter”. Press ENTER. Playback starts.
2 Changing angles to select “Repeat” and then In case of CD, at first press press ENTER once or twice to select “Track” or “All”. When playing back a disc recorded with multi-angle facility, you can change the angle that you are viewing the scene from. 1 2 Press ANGLE during playback. The current angle will appear. Press ENTER once or twice to select “Chapter” or “Title”.
Random playback (CD) 1 Press PLAY MODE in the stop mode. 2 Press / “Random”. 3 Press PLAY. “Random Play” will appear on the screen and Random Playback will start. Play Mode : Random Repeat : Off /Enter/Play Mode to select NOTES: • To cancel program play, select “Clear” at step 4 and press ENTER. • The program is cancelled when you open the disc tray or turn the power off. • Random playback can not be combined with Repeat playback.
4 Press / or / or the Number keys to select the desired file. • In case the folder includes more than 15 files, press or to display next file list. -/72 CD-R --:-- A file menu screen will appear on the TV screen. Press / to select folder.
Setting the JPEG Interval You can continuously play back all JPEG files automatically. 1 Press SETUP in the stop mode. Press / to select “Picture”, then press ENTER. 2 Press or “JPEG Interval”. Language Picture Sound Parental Other or /Enter/Setup/Return to select Language Picture Sound Parental Other 4:3 Tv Screen On Display JPEG Interval Off All Select Files /Enter/Setup/Return 3 Press ENTER or / to select your desired time.
Advanced function of DVD section Parental control Some discs are specified not suitable for children. Such discs can be prevented from play back with the unit. Language Picture Sound Parental Other Depending on the DVD disc, the disc may try to temporarily cancel the rating level that you have set. It is up to you to decide whether to cancel the rating level or not. Password Parental 1 Load a DVD disc and press PLAY or DVD OPEN/CLOSE (see page 24).
Setting the aspect ratio of TV screen Setting language You can select the language of the disc menu messages of DVDs. 1 Press SETUP in the stop mode. Press or to select “Language”. 2 Press option. or ENTER, then press 3 Press or ENTER. or to select desired You can select the aspect ratio for your TV. 1 Press SETUP in the stop mode. Press or to select “Picture”. 2 Press or ENTER, then press Screen”. 3 or ENTER. Press Press or to select your desired screen type, then press ENTER.
Setting on screen display Progressive scan On screen display can be switched on or off when you press the DISPLAY button. 1 Press SETUP in the stop mode. Press or to select “Picture”. 2 Press or ENTER, then press or to select “Display”. 3 Tv Screen Display Press or ENTER to select “On” or “Off”. On: Off: 4 Language Picture PictureSound Parental Language Parental Other The unit supports the Progressive scanning system as well as the conventional interlaced scanning system.
Language code list Enter the appropriate code number for the initial settings “Menu”, “Subtitle” and/or “Audio” (see page 29).
Problems and troubleshooting Incorrect operation is often mistaken for trouble and malfunction. If you think there is something wrong with this component, please check the points below. Sometimes the trouble may lie in another component. Investigate the other components and electrical appliances being used. If the trouble cannot be rectified even after checking the points below, ask your nearest Pioneer authorized service center or your dealer to carry out repair work.
Problems and troubleshooting / Video head cleaning SYMPTOMS POSSIBLE SOLUTIONS PAGE No 4:3 (16:9) picture. • The setup does not match your TV. 29 No on-screen display. • Select Display On. 30 No surround sound. • The setup does not match your stereo system. 13 The unit or remote operation key is not functioning. • Turn off the unit and unplug the AC power cord for several minutes, then replug it. – Playback does not start when the title is selected. • Check the Parental setup.
Screen sizes and disc formats / Additional information Screen sizes and disc formats When viewing on a standard TV or monitor Screen format of disc Setting Appearance 16:9 The program is shown in widescreen with black bars at the top and bottom of the screen. 4:3 (Letter box) The sides of the program are cropped so that the picture fills the whole screen. Please note that many widescreen discs override the player's settings so that the disc is shown in letter box format regardless of the setting.
Additional information Cleaning the pickup lens The DVD player's lens should not become dirty in normal use, but if for some reason it should malfunction due to dust or dirt, consult your nearest Pioneer-authorized service center. Although lens cleaners for CD players are commercially available, we do not recommend using them since some may damage the lens.
Specifications GENERAL Power supply: Power consumption: Weight: Dimensions: Inputs/Outputs: Video: Audio: Antenna: Hi-Fi frequency response: Hi-Fi dynamic range: AC 120V 60Hz Operation: 18W Stand by: 2W 7.7 lbs (3.
VRB1362A_30-back.pm6 39 04.9.
Published by Pioneer Corporation. Copyright © 2004 Pioneer Corporation. All rights reserved. PIONEER CORPORATION 4-1, Meguro 1-Chome, Meguro-ku, Tokyo 153-8654, Japan PIONEER ELECTRONICS (USA) INC. P.O. BOX 1540, Long Beach, California 90810-1540, U.S.A. TEL: (800) 421-1404 PIONEER ELECTRONICS OF CANADA, INC. 300 Allstate Parkway, Markham, Ontario L3R OP2, Canada TEL: (905) 479-4411 PIONEER EUROPE NV Haven 1087, Keetberglaan 1, B-9120 Melsele, Belgium TEL: 03/570.05.