Operating Instructions 14" LCD TV with DVD Player Region / Region discs only TELETEXT Before operating the unit, please read this manual thoroughly.
WARNING To prevent fire or shock hazard, do not expose this equipment to rain or moisture. MAINS SUPPLY This unit is designed to operate from AC 240V 50Hz household mains supply. CAUTION: THIS UNIT IS A CLASS 1 LASER PRODUCT. HOWEVER THIS UNIT USES A VISIBLE LASER BEAM WHICH COULD CAUSE HAZARDOUS RADIATION EXPOSURE IF DIRECTED. BE SURE TO OPERATE THE PLAYER CORRECTLY AS INSTRUCTED. THE FOLLOWING CAUTION LABEL IS LOCATED ON THE REAR PANEL OF THE UNIT.
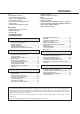
FEATURES TV • TELETEXT Function • On-Screen Programming • Picture Control Adjustments • Auto Power Shut Off • On Screen 5 Language Display • Sleep Timer • Programmable ON/OFF Timer • • • • • • • • • Repeat Playback Memory/Random Playback Zoom Video Aspect Ratio Parental Control Digital output for Dolby Digital (AC-3) and DTS Playback of DVD, Audio-CD and MP3/JPEG-CD PAL & NTSC DVDs playback A-B Repeat playback DVD Player • Digital Audio Jack (Coaxial) • Multi-Language • Multi-Angle CONTENTS PREPARATION
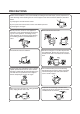
PRECAUTIONS Under certain conditions, such as low humidity or walking across wool carpet, you may experience a static discharge when touching the unit. If this happens and it fails to function, follow the procedure below. 1) Un-plug the unit from the AC socket. 2) It may take two to three hours for the static build up to clear. 3) Re-plug the unit again. Do not place the unit on or near appliances which may cause electromagnetic interference eg. TV or hi-fi speakers, etc.
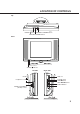
LOCATION OF CONTROLS Top POWER button CHANNEL UP/DOWN buttons VOLUME UP/DOWN buttons Front Remote sensor Standby indicator Left Side Handle Headphones socket Right Side DISC slot PLAY 1 button STOP 3 button SKIP 7/6 buttons EJECT 5 button AUDIO (L/R)/VIDEO IN (AV IN 3) sockets 3
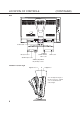
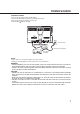
LOCATION OF CONTROLS (CONTINUED) Rear Cable holder COAXIAL DIGITAL AUDIO OUT socket DC input socket SCART input socket RF IN socket AUDIO (L/R)/VIDEO IN (AV IN 2) sockets Variable TV-screen angle Approx. 15˚ 0˚ Approx. 5˚ You can adjust the angle of the TV-screen for 5˚ forward or for 15˚ backward from vertical angle.
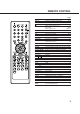
REMOTE CONTROL Page DISPLAY TV/DVD Power on/off 11,15,25,27 Display TV or DVD operation status 16,25 Select to operate TV or DVD 10,11,15,25,26,27 (EJECT) 0-9 Ejects the disc 27 Direct channel selection of TV 15 Input setting 30,33 Enter a security code 40,41,42 VOL +/– Volume Up/Down 15 MUTE Mute 16 0/AV Scart Input or AV input 10,16 SLEEP Sleep timer 16 SETUP/MENU Display the setup menu 11~14,17~20,26,31,32,38~41,43~45 DVD MENU Select menu of a DVD disc 37 ? CH/PAGE M/? Select channel of the TV 15,16 T
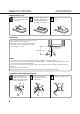
REMOTE CONTROL (CONTINUED) INSERTING BATTERY Open the battery compartment cover in the direction of the arrow. Install two “AAA” batteries (supplied), paying attention to the polarity diagram in the battery compartment. Replace the compartment cover. OPERATION • Aim the remote control at the remote sensor and press control buttons to operate. • Operate the remote control within 30° angle on either side of the remote sensor, up to a distance of Approx. 5 meters. Approx.
POWER SOURCE TO USE AC POWER 1. Connect the AC mains lead to the AC adaptor. 2. Connect the AC adaptor plug into this unit’s DC input socket. 3. Connect the AC mains lead into an AC socket. 4. The Standby indicator will light. AC 240V, 50Hz AC mains lead (supplied) AC adaptor (supplied) NOTES: • Please make sure to insert the plug of each cord securely. • During use the AC adaptor becomes warm. This is not a malfunction.
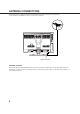
ANTENNA CONNECTIONS Connect an indoor or outdoor antenna to the antenna socket at the rear panel as shown below. For all antenna circuit problems, please consult your local dealer. Antenna socket EXTERNAL ANTENNA The type of antenna required depends on the position of your home, its distance from the transmitter and local interference. If you do not have an antenna and you are uncertain of what to buy, you should seek the advice of a local antenna contractor.
CONNECTION TO OTHER EQUIPMENT The exact arrangement you use to interconnect various video and audio components to the unit is dependent on the model and features of each component. Check the User Guide provided with each component for the location of video and audio inputs and outputs. Using an AV Amplifier with built-in digital surround If you are using an Amplifier with a built-in digital surround sound decoder (such as Dolby Digital / DTS / MPEG / etc.), you can connect it as shown below.
CONNECTION TO OTHER EQUIPMENT (CONTINUED) Input Selection If you connect the unit to a VCR, camcorder or games console, you can select this input by pressing the 0/AV button. AV1(Scart socket) Press the TV/DVD button to select TV mode and AV1 then press the 0/AV button repeatedly to select AV1, AV2(Rear AV input) AV2 or AV3. AV3(Left AV input) 1. To connect the unit to a VCR TV-program Press the 0/AV button to select AV1 to use the TV as a monitor.
LANGUAGE SETTING This unit has 5 different languages for MENU set up which can be selected through the ON Screen Display: English, German, French, Italian or Spanish. PREPARATION Press Power on the top of the unit or remote control to turn on the unit. TV/DVD to select TV 1 Press mode. Then press MENU. 2 To select the LANGUAGE mode, press ENTER. or , then press select the desired language, 3 To English (ENGLISH), German (DEUTSCH), French (FRANCAIS), Italian (ITALIANO) or Spanish (ESPANOL), press or .
PRESETTING THE CHANNELS Once you have connected up this unit, you will need to tune in the channels in order to watch TV stations. There are two ways that you can do this: - Automatic tuning The stations will be preset in the order that they appear when the automatic tuning is activated. - Manual tuning In this mode the TV searches until a picture appears. If it is a station that you want to keep, you can choose which channel preset you want to store it on.
PRESETTING THE CHANNELS MANUAL TUNING How to tune a station to channel 10 position. MENU. 1 Press or Press to select the CH TUNING mode, then press ENTER. or to select the 2 Press MANUAL mode, then press ENTER. MENU ON/OFF TIMER CH TUNING PICTURE AUDIO NICAM AUTO OFF AV COLOUR AUTO LANGUAGE PRESS: ▲ / ▼ / ENTER / MENU CH TUNING MANUAL AUTO CH ALLOCATION PRESS: ▲ / ▼ / ENTER / MENU Press or to select PAL or 3 SECAM-L. Then press ENTER.
PRESETTING THE CHANNELS (CONTINUED) TO CHANGE THE CHANNELS EXAMPLE: Changing of channel position from CH2 and CH5. 1 Press MENU. Press or to select the CH TUNING mode, then press ENTER. Press or to select the CH 2 ALLOCATION mode, then press ENTER. MENU ON/OFF TIMER CH TUNING PICTURE AUDIO NICAM AUTO OFF AV COLOUR AUTO LANGUAGE PRESS: ▲ / ▼ / ENTER / MENU CH TUNING MANUAL AUTO CH ALLOCATION PRESS: ▲ / ▼ / ENTER / MENU 3 Press or to select the channel position No.
TV OPERATIONS Once you have correctly connected and set up the channels on your set, you can view the channels as follows. Power on the top of the unit or remote control to 1 Press turn on the unit. The standby indicator will go off. Press TV/DVD to select TV mode. Channel Selection buttons (0-9) 2 Direct Press the Direct Channel Selection buttons on the remote control. 1-9 CH: Press your required number only. 10-110 CH: Press the two or three digits in accordance to the channel numbers required.
CONVENIENT FUNCTIONS The following functions are available from the remote control handset only. TV/AV Selection For receiving the desired signal: Press AV to select the TV or AV mode. +0 # TV position - to view a normal TV programme. QUICK VIEW )8 AV position - to receive through the direct Video input. AV1 (from 21 pin SCART socket on the rear), AV2 (from Audio/Video in sockets on the rear) or AV3 (from Audio/ Video in sockets on the left side) indicator appears on the screen in AV mode.
ON/OFF TIMER The on timer feature allows you to automatically turn on your TV after a preset amount of time (up to 12 hours and 59 minutes) on the selected channel. The off timer also allows you to turn off your TV after a preset amount of time. You can set the off timer in conjunction with the on timer. 1 Press MENU. Press ▲ or ▼ to select ON/ OFF TIMER mode. Press ENTER. ▲ or ▼ to select ON 2 Press TIMER mode. Press ENTER.
PICTURE ADJUSTMENTS The picture settings have been adjusted at the factory under optimum signal reception conditions. However, you can adjust for BRIGHTNESS, CONTRAST, COLOUR and SHARPNESS to your preference. 1 Press MENU. or to select the 2 Press PICTURE mode, then press ENTER. MENU ON/OFF TIMER CH TUNING PICTURE AUDIO NICAM AUTO OFF AV COLOUR AUTO LANGUAGE PRESS: ▲ / ▼ / ENTER / MENU 3 To adjust the BRIGHTNESS, press or , then press .
BASS, TREBLE AND BALANCE 1 Press MENU. Press or to select AUDIO. Then press ENTER. 2 Press BASS. or MENU ON/OFF TIMER CH TUNING PICTURE AUDIO NICAM AUTO OFF AV COLOUR AUTO LANGUAGE PRESS: ▲ / ▼ / ENTER / MENU to adjust the If BASS has not appeared, press or repeatedly until BASS appears. BASS 0 PRESS: B/A/C/D/MENU The adjusting screen will disappear about one minute after finishing an adjustment. , the sound adjustment screen Each time you press changes as shown below.
AV COLOUR ADJUSTING/NICAM STEREO SOUND AV COLOR ADJUSTING When connecting external equipment to the unit, the picture may become black and white. This can be corrected by selecting AV (Extension) Colour as follows. MENU. 1 Press Press ▲ or ▼ to select the AV COLOUR mode. MENU ON/OFF TIMER CH TUNING PICTURE AUDIO NICAM AUTO OFF AV COLOUR AUTO LANGUAGE PRESS: ▲ / ▼ / ENTER / MENU Press ENTER to select one of the colour options, 2 AUTO, PAL, SECAM, NTSC4.43, NTSC3.58 or PAL60.
RECEPTION OF INTERFERENCE The most common types of television interference are as follows. IGNITION Black spots and horizontal streaks may appear, the picture may flutter or drift. This is usually caused by interference from car ignition system, neon lamps, electric drills or other electrical appliances. IGNITION GHOSTING Ghosting is caused by the TV signal following two paths. One is the direct path and the other is reflected from tall buildings, hills or similar obstruction.
TELETEXT Most broadcasting stations offer a Teletext service in addition to their standard TV program. Teletext offers news, weather forecast, winning Lotto numbers, TV listings and other interesting news. The text is received page by page, as soon as you select the broadcasting station. A single page can be displayed on the screen. The pages are numbered and broadcasted one by one. Therefore you'll have to wait a certain time until the selected page is displayed on the screen.
TELETEXT To call a teletext page Leaf through the pages with the PAGE (M M/? ?) - button (forward or backward). Note: You will not necessarily find a page for every page number you enter. E.g. you have entered page no. 116 but it does not offer this page. Available page numbers can be found on the Index page (most stations offer this page 100). Enter the three-digit page number with the number buttons. Example: You want to display page 300. Enter: 3 then 0 and 0.
DISC DVD discs must be Region 4 or Region ALL type to play on this unit. The loaded Disc (DVD, Audio-CD and MP3/JPEG-CD) will be recognized automatically. The suitable disc formats are: DVD-Video, CD, CD-R/RW and DVD-R/RW (Video format only). Some CD-R/RW discs may be incompatible. Do not play DVD-ROM, DVD-Audio, VCD, CD-G or Photo CD to prevent accidental erasure of prerecorded material. Title When two or more movies are recorded on a disc, the disc is divided into two or more sections.
PREPARATION/STATUS DISPLAY OF DISC The following pages describe the setup/operation in DVD mode. Preparation Before DVD/CD operation, please make preparations as follows. the AC cord plug into a standard 240V 50Hz AC outlet. 1 Insert • If the AC cord plug is plugged in for the first time, wait for about 5 seconds before pressing POWER (ON) on the front. NOTE: When connecting to other equipment, unplug the unit from the AC outlet. Press Sub Power ( 2 turn on the unit.
SETTING SETUP LANGUAGE You can change the default settings to customize performance to your preference. TV/DVD to select the 1 Press DVD mode. No Disc “No Disc” will appear on the screen. (If a DVD disc has already loaded, the playback will start automatically.) SETUP in the stop 2 Press mode. The SETUP MENU Language Picture Sound Parental Other of DVD will appear on the screen. Then press to select Other. /Enter/Setup/Return or ENTER to se3 Press lect OSD Language.
PLAYBACK PROCEDURE TV/DVD to select 1 Press DVD mode. the disc in the disc 2 Place slot with the label side facing forward. (If the disc has a label.) Hold the disc without touching either of its surfaces, align it with the guides, and place it in position. the TV-screen, “No Disc” 3 On changes to “Reading” and No Disc then playback commences. • A menu screen will appear on the TV screen, if the disc has a menu feature. 4 Press / or / Reading to make a selection. ENTER.
SPECIAL PLAYBACK NOTE: There may be a slight delay between when you press the button and the function activating. Fast Forward Playback Press F.FWD during normal playback. Each press of the F.FWD button will increase the speed of (x 2), (x 4), (x 8), (x 15). the search (CD: (x 2), (x 4), (x 8), (x 20)) • To resume normal playback, press PLAY. Review Playback Press REW during normal playback. Each press of the REW button will increase the speed of the (x 2), (x 4), (x 8), (x 15).
MP3/JPEG PLAYBACK This player can play back the MP3/JPEG-data which has been recorded on CD-R or CD-RW. To produce the MP3/JPEG-data, you need a Windows-PC with CD-R/RW drive and a MP3/JPEGencoding Software (not supplied). The Apple-HFS-System cannot be played. MP3/JPEG CD information Limitations on MP3/JPEG CD playback • MP3/JPEG CD is the disc that is standardized by ISO9660, its file name must include 3-digits extension letters, “mp3”, “jpg”.
MP3/JPEG PLAYBACK (CONTINUED) JPEG CD playback 1 Place a disc on which JPEG files have been recorded in the disc slot. the TV-screen, “Reading” 2 On will appear. Reading will take as Reading much time as the number of file. A file menu screen will appear on the TV screen. 3 Press / / or / or 4 Press Number keys to select the desired file. About file menu to select folder.
SETTING THE JPEG INTERVAL You can continuously play back all JPEG files automatically. 1 Press SETUP in the stop mode. Language Picture Sound Parental Other Press or to select “Picture”, then press ENTER. /Enter/Setup/Return or to select 2 Press “JPEG Interval”. # $ $ & ' % ! " 3 Press or desired time. to select your Off: Plays back one file at a time.
SETTING THE SELECT FILES When playing back a CD containing a mixture of MP3 and JPEG files, only MP3 or JPEG files can be displayed on the file menu. 1 Press SETUP in the stop mode. Language Picture Sound Parental Other Press / to select “Picture”, then press ENTER. /Enter/Setup/Return 2 Press Files”. or to select “Select Language Picture Sound Parental Other Tv Screen Display JPEG Interval Select Files 4:3 On Off All /Enter/Setup/Return ENTER or / to 3 Press select your desired file type.
ZOOMING/LOCATING DESIRED SCENE Zooming This unit will allow you to zoom in on the frame image. You can then make selections by switching the position of the frame. ZOOM during play1 Press back. 1 The centre part of the image will be zoomed in. Each press of ZOOM will 1 change the ZOOM (Min.), 2 (Medium) and 3 (Max.). / / / to view a different part of the frame. 2 Press You may move the frame from the centre position to UP, DOWN, LEFT or RIGHT direction.
REPEAT PLAYBACK Title, Chapter, Track Playback 1 Press PLAY MODE during playback or stop mode. DVD Repeat : Off /Enter/Play Mode CD Play Mode : Off Repeat : Off /Enter/Play Mode ENTER once or twice to select “Chapter” or “Title”. 2 Press In case of CD, at first press to select “Repeat” and then press ENTER once or twice to select “Track” or “All”. DVD Repeat : Chapter /Enter/Play Mode CD Play Mode Off : Repeat All : /Enter/Play Mode 3 Press PLAY MODE again to make the screen disappear.
MARKING DESIRED SCENES The unit stores the points that you want to watch again. You can resume playback from that scene. Marking the Scenes MARKER during 1 Press playback. 2 Select the blank Marker using / , then press ENTER at the desired scene. Marker 1 Marker 2 Marker 3 /Enter/Cancel/Marker Marker 1 00 27 54 Marker 2 Marker 3 /Enter/Cancel/Marker • Up to 3 scenes can be selected. • Repeat this procedure to set the other 2 scenes. 3 Press MARKER to remove this display.
CHANGING SOUNDTRACK LANGUAGE/SUBTITLES Changing soundtrack language You can select the language when you play a multilingual disc. AUDIO during play1 Press back. 1/8 Eng Dolby Digital The current soundtrack language will appear. AUDIO repeatedly 2 Press until the desired language 2/8 Fra Dolby Digital is selected. The on-screen display will disappear after a few seconds. Subtitles Turning the Subtitles On and Off When playing back a disc recorded with subtitles, you can turn the subtitles on or off.
CHANGING ANGLES/TITLE SELECTION/DVD MENU Changing Angles When playing back a disc recorded with multi-angle facility, you can change the view angle. ANGLE during play1 Press back. 1/9 The current angle will appear. 2 Press ANGLE repeatedly until the desired angle is selected. Title Selection Two or more titles are recorded on some discs. If the title menu is recorded on the disc, you can select the desired title. TITLE during playback. 1 Press Title menu appears on the screen.
SETTING THE ASPECT RATIO OF TV SCREEN/SETTING ON SCREEN DISPLAY Setting the aspect ratio of TV screen You can select the aspect ratio of the picture. Press SETUP in the stop mode. 1 Press or to select “Picture”. Language Picture Sound Parental Other /Enter/Setup/Return 2 Pressor or ENTER, then press to select “Tv Screen”. Language Picture PictureSoundParental Language Parental Other Other 4:3 Tv Screen Display On JPEG lnterval Off All Select Files /Enter/Setup/Return 3 Press Press or ENTER.
DYNAMIC RANGE CONTROL DRC (Dynamic Range Control) enables you to control the dynamic range so as to achieve a suitable sound for your equipment. SETUP in the stop 1 Press mode or No Disc. Press or “Sound”. Language Picture Sound Parental Other to select /Enter/Setup/Return or ENTER to se2 Press lect “DRC”. Language Picture Sound Parental Other DRC On /Enter/Setup/Return 3 Press press or ENTER, then or to select desired setting, then press ENTER.
PARENTAL CONTROL SETTING Some discs are specified not suitable for children. Such discs can be limited not to play back with the unit. 1 Press SETUP in the stop mode or No Disc. or to select “PaPress or ENrental”. Then press TER. Press or to select “Pa2 rental”, then press or until the level you require appears.
TO CHANGE THE PARENTAL LEVEL SETUP in the stop mode 1 Press or No Disc. or to select Press or “Parental”. Then press ENTER. 2 Press Number buttons (0-9) to enter the password you have stored. • If you input a wrong number, press CANCEL. ENTER. 3 Press The rating is now unlocked.
TEMPORARY DISABLING OF RATING LEVEL BY DVD DISC Depending on the DVD disc, the disc may try to temporarily cancel the rating level that you have set. It is up to you to decide whether to cancel the rating level or not. 1 Load a DVD disc (see page 27). the DVD disc has been designed to temporarily cancel the 2 IfRating level, the screen which follows the “Reading” screen will change, depending on which disc is played. If you select “YES” with ENTER key, “Your disc exceeds the parental control level 1.” (e.
SETTING MENU LANGUAGE You can select the language of the disc menu messages of DVDs. SETUP in the stop mode. 1 Press or to select “LanPress Language Picture Sound Parental Other guage”. /Enter/Setup/Return or ENTER. 2 Press Then press or Language Picture Sound Parental Other to select “Menu”. Menu Subtitle Audio English Automatic English /Enter/Setup/Return 3 Press or ENTER. or to select your Press desired language, then press ENTER.
SETTING SUBTITLE LANGUAGE The same subtitle language can always be selected even if you replace the disc or turn the power off. Press SETUP in the stop mode. 1 Press or to select “Lan- Language Picture Sound Parental Other guage” /Enter/Setup/Return 2 Press or ENTER. or Then press “Subtitle”. Language Picture Sound Parental Other to select Menu Subtitle Audio English Automatic English /Enter/Setup/Return 3 Press or ENTER. Press or to select your desired language, then press ENTER.
SETTING AUDIO SOUNDTRACK LANGUAGE The same audio soundtrack language can always be selected by your unit even if you replace the disc or turn the power off. Press SETUP in the stop mode. 1 Press or to select “Language” Language Picture Sound Parental Other /Enter/Setup/Return or ENTER. 2 Press or Then press Language Picture Sound Parental Other to select “Audio”. Menu Subtitle Audio English Automatic English /Enter/Setup/Return 3 Press Press or ENTER.
LANGUAGE CODE LIST Enter the appropriate code number for the initial settings "AUDIO", "SUBTITLE" and/or "MENU LANGUAGE" (see pages 43~45).
BEFORE REQUESTING SERVICE If your unit does not work properly check the following before calling a service engineer. SYMPTOMS CAUSE SOLUTION PAGE POWER No power. Connect Mains lead to AC socket. Set it to ON. 7 11 The Mains lead is disconnected. Connect the Mains lead to the AC socket. 7 Antenna connector is not connected or wires are broken. Check antenna connections or broken wires. 8 POWER button is off. Possibly station trouble. Press the POWER button. Try another channel.
SPECIFICATIONS GENERAL Power supply: Power consumption: Weight: Dimensions: Operating temperature: Operating humidity: TELEVISION Type: Display method: Number of Pixels: Viewing angle: Tuner type: Receiving channels: Antenna input: Speaker: Audio output power: DVD/CD player Signal system: Applicable disc: Input: Digital audio out: Pickup: ACCESSORIES: AC 240V 50Hz Operation : 50W Stand by : 3W 5.5 kg (12.1 lbs) Width : 476 mm Height : 357.5 mm Depth : 182 mm 5°C - 40°C Less than 80% 14” (356.
49
ORION ELECTRIC CO., LTD.
Quick Set-up Sheet for 14LD Antenna and Power Connections Connect as follows. Antenna socket AC adaptor (supplied) How to install the batteries Use battery type UM-4 (AAA-Size). the cover in direction of 1 Open the arrow and take it off. the batteries as shown 2 Install below, pay attention to polarities. 1 3 Replace cover.
Unit Unit turning turning on on Gerät einschalten 1 POWER Make sure that the AC mains lead and AC adaptor plug are connected correctly. (See the previous page.) (ON/OFF) button 2 Press (Power) on the top of the unit or remote control. The STANDBY ( indicator will go off. On-screen language selection 1 Press TV/DVD to select TV mode. 2 Press MENU. If you press MENU for the first time, the language setting menu will appear. 3 Press or to select the desired language. Then press ENTER.
Channel preset Automatic tuning 1 Press TV/DVD to select TV mode. 2 Press MENU. Press or press ENTER. 3 Press or to select CH TUNING. Then MENU ON/OFF TIMER CH TUNING PICTURE AUDIO NICAM AUTO OFF AV COLOUR AUTO LANGUAGE PRESS: ▲ / ▼ / ENTER / MENU to select AUTO. CH TUNING MANUAL AUTO CH ALLOCATION PRESS: ▲ / ▼ / ENTER / MENU 4 5 Then press ENTER. The auto search starts and all channels are stored automatically, in the order that they are found.
Setting Setup language for DVD 1 2 Press TV/DVD to select DVD mode. Press SETUP in the stop mode. Press to select “Other”, then press to select “OSD Language”, then press or ENTER. Language Picture Sound Parental Other OSD Language English /Enter/Setup/Return 3 Press or to select desired language, then press ENTER. Language Picture Sound Parental Other OSD Language English 4 Press SETUP until normal TV screen appears.