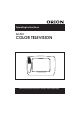
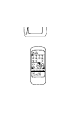
Operating Instructions AC/DC COLOR TELEVISION Before operating the unit, please read this manual thoroughly.
WARNING TO PREVENT FIRE OR SHOCK HAZARD, DO NOT EXPOSE THIS EQUIPMENT TO RAIN OR MOISTURE. DO NOT REMOVE COVER, NO USER SERVICEABLE PARTS INSIDE. REFER SERVICING TO QUALIFIED SERVICE ENGINEER. DISCONNECT FROM MAINS SUPPLY WHEN NOT IN USE FOR LONG PERIODS. POWER SOURCES AC 110-240 Volts 50Hz or DC 12 Volts Only WARNING Never connect the AC power cord to any other voltages other than the one specified. Use the attached power cord only. NOTE: Disconnect from the housing outlet when not in use for a long time.
FEATURES • • • • • • • • • • • • • • • AC/DC Power Operation On Screen Programming Daily 4 event Programmable ON/OFF Timer Auto Tuning for Channel Presetting 110 Preset Channel Sleep Timer (Up to 120 minutes) Child Lock (Hotel Lock) Automatic Power Shut Off 24:00 Clock Timer 2 Speaker AUDIO/VIDEO IN & OUT Jack 5 Language on Screen Menu Picture Adjustment CATV Capability NTSC 3.58/4.43 - PLAYBACK ON PAL 60Hz CONTENTS PREPARATIONS LOCATION OF CONTROLS ........................................................
POWER QUICK VIEW 1 2 3 4 5 6 7 8 9 0 CH CALL SLEEP AV CH VOL MUTE MENU NORMAL SKIP – SET + COLOR SYSTEM TUNING ENTER
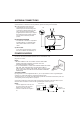
(Continued) REMOTE CONTROL BATTERY INSTALLATION Use two "UM-4" size batteries. Slide the cover in the direction of the arrow and remove. Load the two batteries as shown below. Replace the cover. NOTE: Your TV will not work in the following cases. Check them carefully. 4 If direct sunlight or other strong light is shining on the remote control sensor. If there is an obstacle between the TV and the remote control handset. If the polarities, + and –, are wrongly aligned. If the batteries are weak.
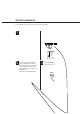
ANTENNA CONNECTIONS Connect the cable from the outdoor or indoor antenna to the antenna jack on the rear panel as shown below. For all antenna circuit problems, please consult your local dealer. A) A twin-lead telescopic antenna is supplied with the unit. Insert the antenna post into the mounting hole on the back cabinet until it locks into place. Insert the antenna adaptor (supplied) to the antenna jack. Adjust the length and angle of both antenna rods to receive the best possible picture.
SETTING LANGUAGE This TV has 5 different languages for MENU set up which can be selected through ON Screen Display: English, German, French, Italian or Spanish. 1 CLOCK SET ON/OFF TIMER SET CH TUNING PICTURE LANGUAGE PRESS:+/-/ENTER/MENU 3 To select the desired language, English (ENGLISH), Spanish (ESPANOL), French (FRANCAIS), German (DEUTSCH) or Italian (ITALIANO), press the SET UP or DOWN button. Then press the ENTER button. 4 Press the MENU button to return to the normal TV screen.
PRESETTING THE CHANNELS After connecting, preset the desired channel (up to 110 channels) in the following procedure. There are two types of station presettings you may choose from: - Automatic tuning All stations will be preset in sequence available in your area. - Manual tuning You activate the auto search function until your preferred station is tuned in. Then you memorize this station into the chosen channel memory. For each station you repeat the same procedure.
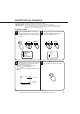
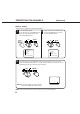
PRESETTING THE CHANNELS (Continued) MANUAL TUNING - How to tune a station to channel 10 position. 1 Press the MENU button. Press the SET UP or DOWN button to select the CH TUNING mode, then press the ENTER button. MENU SET 2 ENTER CLOCK SET ON/OFF TIMER SET CH TUNING PICTURE LANGUAGE SET ENTER CH TUNING MANUAL AUTO CH ALLOCATION PRESS:+/-/ENTER/MENU 3 Press the SET UP or DOWN button to select the MANUAL mode, then press the ENTER button.
4 Press the SET UP or DOWN button to select channel position No.10, then press the ENTER button. SET 5 Repeat step 3 through 4 until all the required channels have been stored. ENTER 3 4 PAL 6 CH 10 When all desired channels have been set in your required position, press the MENU button three times to return to normal TV screen.
PRESETTING THE CHANNELS (Continued) TO CHANGE THE CHANNELS EXAMPLE: Changing of channel position from CH2 to CH5. 1 Press the MENU button. Press the SET UP or DOWN button to select the CH TUNING mode, then press the ENTER button. 2 Press the SET UP or DOWN button to select the CH ALLOCATION mode, then press the ENTER button.
(Continued) TV OPERATIONS After completing the connection and presetting the channels, follow these steps for viewing. 1 Press the POWER button on the TV. Then press POWER button on the remote control to turn off (STAND BY indication will light up) or on (STAND BY indication will goes off). POWER POWER 2 Direct Channel Selection buttons (0-9) CHANNEL UP and DOWN buttons Press the Direct Channel Selection Press CHANNEL UP/DOWN button on button on the remote control. the remote control.
SETTING THE CLOCK This TV set is fitted with a 24 hr. CLOCK/TIMER. This clock controls all timed functions and the clock should be set to the correct time immediately. EXAMPLE: If you want to set the time 12:34. 1 Press the MENU buton. 2 SET MENU 3 To set the present time, press the SET UP or DOWN button to set the present hour, then press the ENTER button. SET Press the SET UP or DOWN button to select the CLOCK SET mode, then press the ENTER button.
SETTING THE ON / OFF TIMER The built-in timer function allows the TV to automatically switch 'ON' (or 'OFF') of up to 4 programs daily. If you program the ON TIMER once, the TV will automatically turns on daily at the same time and to the same channel (If you program the OFF TIMER once, the TV will be turned off daily at the same time). EXAMPLE: If you want to set channel 3 to come on at 7:30.
SETTING THE ON / OFF TIMER 5 Press the SET UP or DOWN button to set the desired minute, then press the ENTER button. SET ENTER ON TIMER CH CH CH CH 1 1 1 1 CANCEL CANCEL CANCEL CANCEL 7: 30 0: 00 0: 00 0: 00 OFF TIMER 0: 00 0: 00 0: 00 0: 00 Press the SET UP or DOWN button to set the desired channel (only to set the ON TIMER), then press the ENTER button.
CANCEL CANCEL CANCEL CANCEL L L L L CONVENIENT FUNCTIONS The following functions are available from the remote control handset only. TV/AV Selection For receiving the desired signal: Press the AV select button to select the TV or AV mode. PAL 0 CH 5. PAL AV AV TV position - to view a normal TV. AV position - to receive through the direct Video input. VIDEO indicator appears on the screen in AV mode.
CONVENIENT FUNCTIONS (Continued) MUTE When the MUTE button is pressed, the TV sound system will be turned off completely. To disable this function, press the button again. To control the volume, press VOLUME UP/DOWN. MUTE MUTE SLEEP To set the sleep timer, press the SLEEP button on the remote control. The timer will change in step of 10 minutes each time the button is pressed in the order of 120, 110, 100,...20, 10, 0.
(Continued) PICTURE CONTROL The picture setting have been adjusted at the factory under optimum signal reception conditions. However, you can adjust for BRIGHTNESS, CONTRAST, COLOUR, SHARPNESS and TINT to your preference. 1 Press the MENU button. 2 Press the SET UP or DOWN button to select the PICTURE mode, then press the ENTER button.
PICTURE CONTROL (Continued) 3-c 3-b To adjust the COLOUR, press the To adjust the CONTRAST, press SET UP or DOWN button, then the SET UP or DOWN button, then press the ENTER button. press the ENTER button. The control should be set to where colors Picture looks sharpest in the daytime by appear normal in intensity and brilliance. increasing the contrast. At night, the sharpest picture is obtained by reducing the contrast.
TUNER LOCK Channel tuning once tuned in can be disable by selecting the tuner lock to "ON" by following steps 1-3. 1 Press and hold the VOLUME UP button on the TV, and press the POWER button on the remote control simultaneously at the Stand By mode. VOLUME 2 POWER Press the SET UP or DOWN button to select the TUNER LOCK mode. SET HOTEL LOCK VOLUME LIMIT TUNER LOCK ON OFF HOTEL LOCK ALL CLEAR 3 Press the ENTER button to select the TUNER LOCK "ON".
AV JACK CONNECTIONS AV JACK CONNECTIONS The exact arrangement you use to interconnect various video and audio components to the TV is dependent on the model and features of each component. Check the instruction book provided with each component for the location of video and audio inputs and outputs. The connection diagrams in the following are offered as suggestions. You may need to modify them to accommodate your particular assortment of components.
AV JACK CONNECTIONS (Continued) 3. To connect the TV to an External Stereo Amplifier The AUDIO OUT JACK from the TV can be connected to a Stereo amplifier, which allows a higher quality sound (Monaural) when watching your favorite program. Rear of TV VIDEO Stereo Amplifier AUDIO DC (- - - -) 12V OUT IN To AUDIO L/R IN (Not Supplied) 4. To connect the TV to the Video Camera To playback from the Video Camera, connect the Video Camera to the TV as shown.
TO WATCH NTSC VIDEO LASER DISC, DVD AND RECORDED VIDEO TAPE This TV has 4 COLOR SYSTEM (PAL, SECAM, NTSC 3.58/4.43) which allows you to watch Video Laser Disc and recorded video tapes. To watch NTSC Video Laser Disc, DVD and Recorded Video Tapes, appropriate equipment with NTSC playback must be used. 1. Connect with NTSC VCR. 1. Press the AV button to select the AV mode. 2. Press the COLOR SYSTEM button to select NTSC 3.58 VIDEO mode. 3. Operate the VCR as usual.
RECEPTION OF INTERFERENCE The most common types of television interference are as follows. IGNITION Black spots and horizontal streaks may appear, the picture may flutter or drift. This is usually caused by interference from car ignition system, neon lamps, electric drills or other electrical appliances. IGNITION GHOSTING Ghosting is caused by the TV signal following two paths. One is the direct path and the other is reflected from tall buildings, hills or similar obstruction.
TROUBLESHOOTING GUIDE In the event of problems, please check the following before seeking service. CHECKING ITEMS PRESET TV CHANNELS CHECK IF POWER PLUG IS FIRMLY CONNECTED TO THE POWER SUPPLY TRY A DIFFERENT CHANNEL. IF OK, THERE COULD BE A TRANSMISSION PROBLEM FROM THE TV STATION.
SPECIFICATIONS Power Source: AC 110-240V 50Hz, DC 12V Power Consumption: Approx. 36 W at 240V/DC 12V 10 W at 240V (STAND BY) Operation Temperature: 5 ˚C - 40 ˚C Storage Temperature: -20˚C - 60˚C System: PAL B/G, D/K, I system NTSC 3.58/4.43 Picture Tube: 14" (measured diagonally), 90 degree deflection Speaker: (6 1/4 X 2 1/4 Inches Permanent Magnet Dynamic)x 2, 4 ohm Output Power: 0.