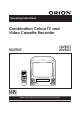
Operating Instructions Combination Colour TV and Video Cassette Recorder TELETEXT 14VROT 20VROT Before operating the unit, please read this manual thoroughly.
IMPORTANT Unauthorized recording of copyright television programmes, films, video tapes and other materials may infringe on the rights of copyright owners and be contrary to copyright laws. WARNING To prevent fire or shock hazard, do not expose this equipment to rain or moisture. MAINS SUPPLY This unit is designed to operate from AC 240V 50Hz Power supply. HQ This TV/VCR is equipped with HQ (High Quality) recording capability.
FEATURES • • • • • • • • • • • • TELETEXT Auto Channel Memory 4 Video Head 1 Month, 8 Programmes Timer One-Touch Timer Recording (OTR) 30 Minutes Back Up Real Time Tape Counter NTSC Playback (PAL 60Hz) On-Screen Programming TV Monitor Slow Motion Front A / V IN jack • Video Index Search System • Digital Auto Tracking • Auto Head Cleaning • Programmable ON/OFF Timer • Auto Power On/Auto Play • Auto Rewind/Auto Eject • Dual Picture Search • 2 Speed (SP/LP) Record/Playback • On Screen 5 Language Display • Pr
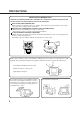
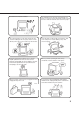
PRECAUTIONS MOISTURE CONDENSATION If the unit is suddenly moved from a cold place to a warm place, moisture may form inside the unit. In this case, do not operate it for two or three hours. WHAT IS MOISTURE CONDENSATION? When cold water is poured into a glass, for, example, water vapor in the air will condense on the surface of the glass. This is called moisture condensation. MOISTURE WILL CONDENSE ON THE UNIT IN THE FOLLOWING CASES; • When you move this TV/VCR from a cold to a warm place.
Avoid extreme moisture and dust. The ventilation holes prevent overheating. Do not block or cover these holes. Especially avoid covering the holes with soft materials such as cloth or paper. Do not insert fingers or any other objects into the cassette loading slot. Do not spray cleaner or wax directly on the unit or use forced air to remove dust. Place the unit on a flat, stable, level surface, and never subject it to violent shaking or any other shock or impact.
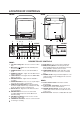
LOCATION OF CONTROLS FRONT REAR 17 1 2 3 4 5 6 7 8 AV1 AERIAL 18 19 20 14VROT 20VROT STAND BY STAND BY T.REC REC/OTR VOLUME STAND BY T.REC PLAY REC/OTR VOLUME STAND BY STOP/EJECT REW VIDEO IN AUDIO IN REC/OTR 9 10 11 CHANNEL REC/OTR F.FWD CHANNEL 12 13 14 15 PHONES 16 2 DESCRIPTION OF CONTROLS FRONT: 1. Cassette Loading Slot - To insert or remove a video tape. 2. Main Power ( ) switch - Turn the TV/VCR power on or off completely. 3.
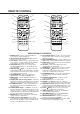
REMOTE CONTROL 9 1 POWER 2 SLEEP TV MONI. 1 2 3 4 5 6 7 8 9 21 EJECT POWER 10 CH/TRACKING PAGE + 3 15 16 – VOLUME SLEEP TV MONI. 1 2 3 4 5 6 7 8 9 EJECT CH/TRACKING PAGE + – + CALL 0 + AV – SPEED 11 MUTE 17 CALL REC/OTR PLAY/SLOW 18 PAUSE/STILL F.FWD 5 – MUTE REC/OTR PLAY/SLOW REW 12 PAUSE/STILL 23 F.
REMOTE CONTROL (CONTINUED) BATTERY INSTALLATION Open the battery compartment cover. Install two “AAA/R03/UM-4” (penlight size) batteries. Replace the cover. BATTERY CAUTIONS • Use two "AAA/R03/UM-4" size penlight batteries for the remote control handset. • The batteries may last approximately one year depending on how much the remote control is used. For best performance the batteries be replaced on a yearly basis, or when remote operation becomes erratic. • Do not mix old and new batteries.
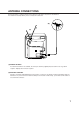
ANTENNA CONNECTIONS Connect an indoor or outdoor antenna to the antenna socket at the rear panel as shown below. For all antenna circuit problems, please consult your local dealer. (B) (A) AV1 AERIAL (A) INDOOR ANTENNA If an external antenna is not available, the telescopic antenna (supplied) may be used in areas of good TV reception. Adjust position for best reception.
ON-SCREEN LANGUAGE SELECTION The on-screen menu can display five languages, English, German, French, Italian or Spanish. Press the ▲ or ▼ button to select the LANGUAGE mode. Then press the ENTER button. Press the MENU button. Press the ▲ or ▼ button to select the SYSTEM SETUP mode. Then press the ENTER button. • Make sure that the MAIN POWER ( ) switch is pushed in (ON). (The STAND BY indicator lights up.) • Press the POWER button or MENU STAND BY button to turn on the TV/VCR.
9
TUNING THE TV CHANNELS (CONTINUED) TO CHANGE THE TV STATIONS TO ANOTHER CHANNEL POSITION EXAMPLE : Changing the TV Station from CH 4 to CH6 position. ENTER ENTER ENTER MENU Press ▲ / ▼ or number button to select the TV station to be moved. Then press the ENTER button. Press ▲ / ▼ button to select the CH ALLOCATION mode, then press the ENTER button. Press the MENU button. Press ▲ / ▼ button to select the CHANNEL SETUP mode, then press the ENTER button.
In certain areas of the countries which have poor reception the Automatic Tuning System may not tune your TV/VCR to the strongest broadcast signal. If you are not satisfied with the automatic tuning you may manually tune your TV/ VCR. MANUAL TUNING Press the ▲ or ▼ button to select the CH TUNING mode, then press the ENTER button. Press the MENU button. Press the ▲ or ▼ button to select the CHANNEL SETUP mode, then press the ENTER button.
TO SET THE CLOCK Your TV/VCR will not work properly unless the time and date is set and kept running. Please note that you will not be able to set TIMER or ON/OFF TIMER RECORDING from the main menu until you have set the clock. EXAMPLE: Setting the clock to 11:30, 26th October, 2002. Press the ▲ or ▼ button to select the CLOCK SET mode, then press the ENTER button. Press the MENU button. Press the ▲ or ▼ button to select the SYSTEM SETUP mode, then press the ENTER button.
TV OPERATION Select channels either with the Direct Channel Selection buttons or with the CH buttons. To select with the Direct To select with the CH buttons: channel selection buttons: Press and release the CH + or – 1-9: Press one digit button. The channel changes one button for in between by one. Hold the button down to channel 1 - 9. 10-99: Press two digits buttons scan through unwanted channels. for in between channel 10 - 99.
TV OPERATION (CONTINUED) MUTE CALL Press the CALL button. The current time, channel number, real time tape counter and tape operation will be indicated. Press the CALL button again to cancel the call display. To cut off the sound, press this button once. The TV/ VCR will be silenced and the symbol "MUTE" will appear on the screen. The muting can be released by pressing the MUTE button again or the VOLUME +/– buttons. Current time CALL MUTE VCR operation 11 : 30 SAT CH 2 01 : 30 : 21 SP Channel No.
PICTURE CONTROL ADJUSTMENTS 15
PICTURE CONTROL ADJUSTMENTS (CONTINUED) Each time you press the ENTER button, the picture adjustment Screen changes as follows. CONTRAST BRIGHTNESS Press the ENTER button until "BRIGHTNESS" appears on the screen, then press the or button to adjust the brightness. When the button is pressed, the darker portions of the picture become lighter. Press the ENTER button until "CONTRAST" appears on the screen, then press the or button to adjust the contrast.
LL AV P /L EW – R TE W O MU SL / AY PL RA G O PR D W / AL VETR RE A EN ER M TI / XT TV TE IX/ M RO RN ZE TU RE EC R B T/ EL F/ NC CA R TE T UN SE CO RE P O ST LD R HO TE F F. U EN M ILL M ST E/ PA US T A SP OT R EC C D EE SP + C/ IN 9 0 TV MO EJ NI .
TO SET THE OFF TIMER This feature allows you to have the TV turn off automatically at a predetermined time. If you programme the OFF TIMER once, the TV will be automatically turned off at the same time daily. EXAMPLE: Turning off the TV at 8:30. Press the ▲ or ▼ button to select the ON/OFF TIMER SET mode, then press the ENTER button. Press the MENU button. Select the TV SETUP mode using the ▲ or ▼ button, then press the ENTER button.
HOTEL LOCK (CHILD LOCK) Hotel Lock feature enables you to limit the maximum volume and channel tuning. This special feature prevents someone from altering the VOLUME LIMIT or CHANNEL SETUP mode. These convenient functions are useful for hotel or hospital usage. VOLUME LIMIT You can adjust the maximum volume by setting VOLUME LIMIT mode. Press the ▲ or ▼ button to select the VOLUME LIMIT mode, then press the ENTER button.
20
LOADING AND UNLOADING THE VIDEO CASSETTE TAPE Use only video cassette tapes marked . LOADING Push the centre of the tape until it is automatically inserted. AUTOMATIC POWER ON AND PLAY When loading a cassette tape without the erase prevention tab intact, playback will start immediately and the TV will turn on. Insert the cassette with its labelled side facing you. An inverted cassette cannot be inserted.
PLAYBACK To play a pre-recorded cassette tape. TO START PLAYBACK Load a pre-recorded tape. (When loading a cassette tape without the erase prevention tab, playback will start automatically.) TO STOP PLAYBACK Press the STOP button. " " will appear on the screen. Press the PLAY/SLOW button. Playback will start. " " will appear on the screen. PLAY/SLOW STOP PO W ER 1 SL 4 7 TV EC LL T CK AV IN G + VO /L P R EJ C PA H/T GE RA 9 SP OT .
SPECIAL PLAYBACK TO VISUALLY SEARCH FOR DESIRED POINTS When either the F.FWD or REW button is pressed in the PLAYBACK mode, the speed search picture will appear. When pressed twice the search picture will increase in speed. Speed search times depend upon the speed used (SP or LP) during recording. To rewind or fast forward a tape, press the STOP button, and then press the REW or F.FWD button. Press the REW button once or twice in the PLAYBACK mode.
SPECIAL PLAYBACK (CONTINUED) TO MONITOR A TV PROGRAMME DIGITAL AUTO TRACKING ADJUSTMENTS When a tape is played, the Digital Auto Tracking system automatically adjusts the tracking to obtain the best possible picture. If noise bars appear during playback, adjust the tracking manually as follows: • Press the CH/TRACKING + or – button to obtain the best possible picture. To resume auto tracking, press the ATR button. "AUTO TR." will appear for 4 seconds on the screen. Press the TV MONI.
RECORDING A TV PROGRAMME RECORDING AND VIEWING THE SAME TV PROGRAMME Load a cassette tape with the erase prevention tab intact. Press the POWER button to turn on the TV/VCR. Press the SPEED SP/LP button to select the desired tape speed (SP or LP). SP or LP will appear on the screen. POWER SPEED SP/LP 1 PO W ER 1 3 SL 4 7 LL A C D 0 .
RECORDING A TV PROGRAMME (CONTINUED) TO STOP RECORDING TEMPORARILY Select the recording channel then press the PAUSE/STILL button to stop recording of unwanted material. " appear on the screen and the REC/OTR indicator will blink on and off. Press again to continue the recording. " will PAUSE/STILL REC/OTR NOTE: • To prevent damage to the video head and video tape the pause function will stop the VCR operation after about 5 minutes.
27
TIMER RECORDING (CONTINUED) Set the start time, end time, channel and tape speed as in step 4. When you have finished setting all your recordings, press ENTER. Press MENU to return to normal TV screen. MENU ENTER STOP 13 : 00 14 : 30 3 LP : : : : : : : : : : : : : : SELECT : / ENTER EXIT : MENU TIMER REC SET DATE 23 SAT START 13 : 00 END 14 : 30 CH 3 SPEED LP SELECT : : SET : MENU OK : ENTER EXIT 23 SAT PO 5 W ER 1 SL 4 LL A C TV 0 D 9 EJ EC T IN G + VO /L P R .
OTHER FUNCTIONS FOR TIMER RECORDING TO SET DAILY/WEEKLY TIMER TO CONFIRM THE SETTINGS Press the PROGRAM button once. The TV screen displays the timer program list. Press the PROGRAM button again. The TV screen displays the ON/OFF timer setting. When setting the date in step 4 on page 27, press the button repeatedly when the current day is displayed.
ONE-TOUCH TIMER RECORDING (OTR) The one-touch timer recording feature provides a simple and convenient way to make a timed recording. EXAMPLE: One-touch timer recording for 30 minutes. Press the POWER button to turn on the TV/VCR. Load a video cassette with the erase prevention tab intact. Press the SPEED SP/LP button to select the desired tape speed (SP or LP). SP or LP will appear on the screen. POWER SPEED SP/LP 1 PO W ER 1 SL 4 LL A EC T AV NG + VO P LU ME R EW 5 EJ KI /L R .
USING THE REAL TIME TAPE COUNTER The On-Screen Real Time Tape Counter shows the tape running time in Hours, Minutes and Seconds. You can easily determine how long the tape has been running or how much time is left on the tape. TO VIEW THE COUNTER DISPLAY Press the CALL button to display the Real Time Tape counter. Press the COUNTER RESET button to set the counter to "00:00:00".
PLAY/SLOW 32
VIDEO INDEX SEARCH SYSTEM (INDEX) The VIDEO INDEX SEARCH SYSTEM (INDEX) enables you to locate the beginning of any recording made on the TV/VCR. The Index Search function automatically records an INDEX mark on the tape whenever a recording is initiated. This mark can easily be located by using the F.FWD and REW buttons. SEARCHING FOR AN INDEX MARK To search for an index mark, or skip over a number of index marks: Press INDEX button during stop or playback.
VIDEOTEXT (TELETEXT) Most broadcasting stations offer the videotext in addition to their standard TV program. The videotext offers news, weather forecast, winning Lotto numbers, the program overview and other interesting news. The text is received page by page, as soon as you select the broadcasting station. A single page can be displayed on the screen. The pages are numbered and broadcasted one by one. Therefore you'll have to wait a certain time until the selected page is display on the screen.
To call a videotext page Leaf through the pages with the PAGE ( / ) - button (forward or backward). Note: you will not necessarily find an existing page. for every page number you enter..E.g. you have called the page no. 116, but it will not appear on your screen. This happens because the broad casting station momentarily does not offer this page. Available page numbers you will find inside the station's table of contents (toc). (most stations offer this toc on Videotextpage 100).
DUPLICATING A VIDEO TAPE If you connect the TV/VCR to another VCR or VIDEO CAMERA, you can duplicate a previously recorded tape. Make all connections before turning on the power. Load a blank cassette tape with the erase prevention tab intact into the recording VCR. Load a previously recorded tape into the playback VCR or VIDEO CAMERA. Press the AV button to select the AUDIO/VIDEO input position. The "AV1" will appear on the screen. AV )8 NOTE: You can also use the front AUDIO/VIDEO IN Jacks.
RECEPTION DISTURBANCE The most common types of television interference are as follows. IGNITION Black spots or horizontal streaks may appear, picture may flutter or drift. Usually caused by interference from car ignition systems, neon lamps, electrical drills and other electrical appliances. GHOSTS Ghosts are caused by the television signal following two paths. One is the direct path and the other is reflected from tall buildings, hills or some other object.
BEFORE REQUESTING SERVICE If your TV/VCR does not work properly check the following before calling a service engineer. SYMPTOM SOLUTION CAUSE PAGE POWER No power. Recorder does not work even though STAND BY. The AC power cord is not connected. Connect the AC power cord to AC outlet. 4 Main power switch is OFF. Set it to ON. 4 TIMER REC button is ON. (T.REC indicator is on.) Set it to OFF. (T.REC indicator is off.) 28 Moisture condensation on the video heads.
SYMPTOM CAUSE SOLUTION PAGE PLAYBACK Noise bars on screen. Can not locate INDEX mark. Tracking is not adjusted. Adjust the TRACKING control. 24 Video heads are dirty. Clean the video heads. 39 The tape is worn or damaged. Try another tape. - The tape is worn or damaged. Try another tape. - It is not aimed at the remote sensor. Aim it at the remote control sensor. 6 Distance too far or there is too much light in the room. Operate within 5 metres and reduce the light of the room.
SPECIFICATIONS TELEVISION Picture Tube: Tuner: Receiving Channels: 14VROT 14" (34 cm "V") measured diagonally 90 degrees deflection Antenna Input: Electronic Tuner VHF: 0-S41 UHF: 21 - 69 VHF/ UHF 75 ohm unbalanced Audio Output Power: Speaker: 1.5 W (max) 3.8 x 6.4 cm 8 ohm VCR Operating Temperature: Television System: Video Recording System: Head: Audio Track: Tape Format: F.
MEMO ○ ○ ○ ○ ○ ○ ○ ○ ○ ○ ○ ○ ○ ○ ○ ○ ○ ○ ○ ○ ○ ○ ○ ○ ○ ○ ○ ○ ○ ○ ○ ○ ○ ○ ○ ○ ○ ○ ○ ○ ○ ○ ○ ○ ○ ○ ○ ○ ○ ○ ○ ○ ○ ○ ○ ○ ○ ○ ○ ○ ○ ○ ○ ○ ○ ○ ○ ○ ○ ○ ○ ○ ○ ○ ○ ○ ○ ○ ○ ○ ○ ○ ○ ○ ○ ○ ○ ○ ○ ○ ○ ○ ○ ○ ○ ○ ○ ○ ○ ○ ○ ○ ○ ○ ○ ○ ○ ○ ○ ○ ○ ○ ○ ○ ○ ○ ○ ○ ○ ○ ○ ○ ○ ○ ○ ○ ○ ○ ○ ○ ○ ○ ○ ○ ○ ○ ○ ○ ○ ○ ○ ○ ○ ○ ○ ○ ○ ○ ○ ○ ○ ○ ○ ○ ○ ○ ○ ○ ○ ○ ○ ○ ○ ○ ○ ○ ○ ○ ○
ORION ELECTRIC CO., LTD.