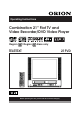
Operating Instructions Combination 21” Flat TV and Video Recorder/DVD Video Player Region / Region discs only TELETEXT PAL SECAM Before operating the unit, please read this manual thoroughly.
IMPORTANT Unauthorized recording of copyright television programmes, films, video tapes and other materials may infringe on the rights of copyright owners and be contrary to copyright laws. WARNING To prevent fire or shock hazard, do not expose this equipment to rain or moisture. MAINS SUPPLY This unit is designed to operate from AC 240V 50Hz household mains supply. CAUTION: THIS UNIT IS A CLASS 1 LASER PRODUCT.
FEATURES TV/VCR • HQ (High Quality) • TELETEXT Function • 1 Month, 8 Programme Timer • One-Touch Timer Recording (OTR) • 30 Minute Back Up • Real Time Tape Counter with Zero Return • NTSC Playback (PAL 60Hz) • Hi-Fi Stereo • Picture Control Adjustments • Slow Motion • Video Index Search System • Digital Auto Tracking • Programmable ON/OFF Timer • Auto Power On/Auto Play • Auto Rewind/Auto Eject • Dual Speed Picture Search • 2 Speed (SP/LP) Record/ Playback • On Screen 5 Language Display • Sleep Timer • Aut
PRECAUTIONS MOISTURE CONDENSATION If the unit is suddenly moved from a cold place to a warm place, moisture may form inside the unit. In this case, do not operate it for two or three hours. WHAT IS MOISTURE CONDENSATION? When cold water is poured into a glass, for example, water vapor in the air will condense on the surface of the glass. This is called moisture condensation. MOISTURE WILL CONDENSE ON THE UNIT IN THE FOLLOWING CASES; • When you move the unit from a cold to a warm place.
PRECAUTIONS Avoid extreme moisture and dust. The ventilation holes prevent overheating. Do not block or cover these holes. Especially avoid covering the holes with soft materials such as cloth or paper. Do not insert fingers or any other objects into the cassette loading slot. Do not spray cleaner or wax directly on the unit or use forced air to remove dust. Place the unit on a flat, stable, level surface, and never subject it to violent shaking or any other shock or impact.
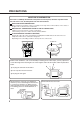
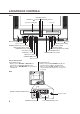
LOCATION OF CONTROLS Front REC/OTR Indicator STAND BY ( ) Indicator TIMER REC Indicator Cassette Loading Slot CH Disc tray VOL Sub Power ( Main Power (ON) Switch Phones socket VIDEO/AUDIO IN (L/R) jacks (AV2) REW (Rewind) button (VCR) STOP/EJECT button (VCR) PLAY button (VCR) F.FWD button (VCR) ) button F.
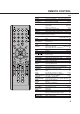
REMOTE CONTROL Page Sub Power on/off 10,15,22,24,27,37 Select to operate TV/VCR 9,10~14,17~22,24,25,27~31 Select to operate DVD 33,37,38 Select channel of the VCR 16,24 Utilize the teletext 35 0-9 Direct channel selection of TV 13 Input setting 30,42,45 Enter a security code 52,53 AV Scart Input or Front AV input 9,32 VOL +/– Volume +/– 15 DISPLAY Display VCR or DVD operation status 16,28,31,37 ▲/▼/B/A Cursor buttons Four Coloured buttons Access the Teletext 34 SETUP MENU Display the setup menu 10~14,17~19,
REMOTE CONTROL (CONTINUED) BATTERY INSTALLATION Open the battery compartment cover in the direction of the arrow. Install two “AAA” batteries (supplied), paying attention to the polarity diagram in the battery compartment. Replace the compartment cover. BATTERY CAUTIONS • Use two “AAA/R03/UM-4” size penlight batteries for the remote control transmitter. • The batteries may last approximately one year depending on how much the remote control is used.
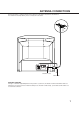
ANTENNA CONNECTIONS Connect an indoor or outdoor antenna to the antenna socket at the rear panel as shown below. For all antenna circuit problems, please consult your local dealer. Antenna socket Mains lead EXTERNAL ANTENNA The type of antenna required depends on the position of your home, it's distance from the transmitter and local interference. If you do not have an antenna and you are uncertain of what to buy, you should seek the advice of a local antenna contractor.
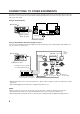
CONNECTIONS TO OTHER EQUIPMENTS The exact arrangement you use to interconnect various video and audio components to the unit is dependent on the model and features of each component. Check the Owner's Manual provided with each component for the location of video and audio inputs and outputs.
Connection to other equipment Input Selection If you connect the unit to a VCR, camcorder or games console, you can select this input by pressing the AV button. Press the TV/VCR button to select the TV mode and then press the AV button repeatedly to select AV1 or AV2. AV1(Scart socket) AV1 AV2(Front AV input) TV-program 1. To connect the unit to a VCR Press the AV button to select AV2 to use the TV as a monitor.
ON-SCREEN LANGUAGE SELECTION This unit can display five languages, English, German, French, Italian or Spanish. Preparation • Make sure that the MAIN POWER (ON) switch on the front panel is pushed in (ON). (The STANDBY ( • Press Sub Power ( ( ) indicator lights up.) ) to turn on the unit. (The STANDBY ) indicator goes off.) TV/VCR to select TV/VCR mode. 1 Press Press MENU. Press ▲ or ▼ to select the 2 SYSTEM SETUP mode. Then press ENTER.
TO SET THE CLOCK Besides displaying the channel number and functions symbols on the screen, the unit also displays the present time and the day of the week. The digital clock is the 24 hour type. Preparation Press TV/VCR to select TV/VCR mode. EXAMPLE: Setting the clock to 11:30, 25 March, 2006. MENU. 1 Press Press ▲ or ▼ to select the SYSTEM SETUP mode, then press ENTER.
TUNING THE TV CHANNELS This unit has 110 channels for you to tune and memorize into the Television. You must tune in the broadcast stations before you can enjoy watching them. AUTO TUNING 1 Press TV/VCR to select TV/VCR mode. Press MENU. Note: If the clock is not set, press MENU twice. 2 Press ▲ or ▼ to select the CHANNEL SETUP mode, then press ENTER.
TUNING THE TV CHANNELS TO CHANGE THE TV STATIONS TO ANOTHER CHANNEL POSITION Example: Changing the TV Station from CH 4 to CH 6 position. TV/VCR to select TV/ 1 Press VCR mode. Press MENU. Press ▲ or ▼ to select the CHANNEL SETUP mode, then press ENTER. 2 Press ▲ or ▼ to select the CH ALLOCATION mode, then press ENTER.
TUNING THE TV CHANNELS In certain areas of the countries which have poor reception the Automatic Tuning System may not tune your unit to the strongest broadcast signal. If you are not satisfied with the automatic tuning then select the Manual Tuning. (CONTINUED) MANUAL TUNING 1 Press TV/VCR to select TV/VCR mode. Press MENU. Press ▲ or ▼ to select the CHANNEL SETUP mode, then press ENTER. 2 Press ▲ or ▼ to select the CH TUNING mode, then press ENTER.
TV OPERATION Sub Power ( 1 Press TV/VCR mode. ). Then press TV/VCR to select 2 Press Direct Channel Selection. CH 2 1-9: Press one of keys 1-9 as required. 10-110: Press the two or three digits in order from left to right. VOLUME can be adjusted to 3 The a desired level by pressing VOL + or –. The VOLUME control is represented by a green bar on the screen. VOLUME 32 NOTE: If the station being viewed stops broadcasting, the TV will shut off after 15 minutes.
TV OPERATION (CONTINUED) MUTE To cut off the sound, press this button once. The unit will be silenced and the symbol “MUTE” will appear on the screen. The muting can be released by pressing MUTE again or VOL + or –. USING CH + OR – BUTTON Press and release CH + or –. For channels to change properly, they must be correctly tuned into the unit's memory (P.12-13). QUICK VIEW This button allows you to go back to the last channel selected by pressing QUICK VIEW.
PICTURE CONTROL ADJUSTMENTS The picture settings have been factory adjusted under optimum signal reception. However, conditions may not be the same in your area. After tuning in the unit, allow it to warm up for a few minutes. If the picture is not to your liking, make the following adjustments using the remote control. Preparation Press TV/VCR to select TV/VCR mode. adjust the picture, press 1 To MENU. Press ▲ or ▼ to select the TV SETUP mode, then press ENTER.
TO SET THE ON TIMER This feature allows you to have the TV automatically turn “ON” at a predetermined time. Once you have programmed the ON TIMER, it will switch the TV on every day at the same time and same channel, until you cancel this setting. Preparation Press TV/VCR to select TV/VCR mode. EXAMPLE: Turning on the TV to channel 3 at 7:45, MONDAY-FRIDAY. MENU. Select the TV 1 Press SETUP mode using ▲ or ▼ then press ENTER.
TO SET THE OFF TIMER This feature allows you to have the TV turn “OFF” automatically at a predetermined time. Once you have programmed the OFF TIMER, the TV will be automatically turned off at the same time each day, until you cancel this setting. Preparation Press TV/VCR to select TV/VCR mode. EXAMPLE: Turning off the TV at 8:30. Press MENU. Select the TV 1 SETUP mode using the ▲ or ▼ button, then press ENTER.
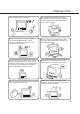
LOADING AND UNLOADING THE VIDEO CASSETTE TAPE Use only video cassette tapes marked . PAL SECAM Preparation: Press TV/VCR to select TV/VCR mode. LOADING Push the centre of the tape until it is automatically inserted. AUTOMATIC POWER ON AND PLAY (Make sure that the MAIN POWER switch is pushed in.) When loading a cassette tape without the erase prevention tab intact, the unit will turn on and playback will start immediately. Insert the cassette with its labelled side facing you.
COLOUR SYSTEM SELECTION Select your appropriate Colour System. Preparation Press the TV/VCR to select TV/VCR mode. 1 Press MENU. Press ▲ or ▼ to select the SYSTEM SETUP mode. Then press ENTER. TIMER REC SET AUTO REPEAT CHANNEL SETUP TV SETUP SYSTEM SETUP OFF SELECT : ENTER : ENTER EXIT : MENU 2 Press ▲ or ▼ to select the COLOUR SYSTEM mode. 3 Press to select the AUTO, PAL, MESECAM or SECAM. Press MENU twice to return to normal TV screen.
PLAYBACK To play a pre-recorded cassette tape. TO START PLAYBACK 1 To turn “ON” the power of the TV/VCR, press Sub Power ( ). Press TV/VCR to select TV/VCR mode. a pre-recorded tape 2 Load (When loading a cassette tape without the erase prevention tab, playback will start automatically). PLAY. 3 Press Playback will start. “ ” will appear on the screen. TO STOP PLAYBACK Press STOP. “ ” will appear on the screen. TO REWIND OR FORWARD THE TAPE RAPIDLY Press REW when in the STOP mode.
SPECIAL PLAYBACK TO VISUALLY SEARCH FOR DESIRED POINTS When either F.FWD or REW is pressed in the PLAYBACK mode, the speed search picture will appear. When pressed twice the search picture will increase in speed. Speed search times depend upon the speed used (SP or LP) during recording. To rewind or fast forward a tape, press STOP and then press REW or F.FWD.
RECORDING A TV PROGRAMME RECORDING AND VIEWING THE SAME TV PROGRAMME turn “ON” the TV/VCR, press Sub Power ( 1 To Press TV/VCR to select TV/VCR mode. ). a cassette tape with the 2 Load erase prevention tab intact. 3 Press SP/LP to select the desired tape speed SP or LP. Direct channel selection 4 Press or CH + or – to select the CH 2 channel to be recorded (Example: Channel 2). 5 Press REC/OTR. “ ” and the channel number will appear on the screen and the REC/ OTR indicator will light.
TIMER RECORDING Timer recording can be programmed on screen with the remote control. The built-in timer allows automatic unattended recording of up to 8 programmes within 1 month. Preparation • Load a cassette tape with the erase prevention tab intact. The unit will automatically turn on. • Make sure that the clock shows the present time correctly. EXAMPLE: Programme a timer recording for 13:00-14:30, channel 3, on timer programme number 1 (Tape speed : LP). TV/VCR to select TV/VCR mode.
OTHER FUNCTIONS FOR TIMER RECORDING TO SET DAILY/WEEKLY TIMER When setting the date in the step 4 on page 25, press repeatedly when the current day is displayed. The setting changes as follows: TO CONFIRM THE SETTINGS Press PROGRAM once. The TV screen displays the timer program list. Press PROGRAM again. The TV screen displays the ON/OFF TIMER setting.
ONE-TOUCH TIMER RECORDING (OTR) The One-touch Timer Recording feature provides a simple and convenient way to make a timed recording. EXAMPLE: One-touch Timer Recording for 30 minutes. Sub Power ( ) to turn on the unit. 1 Press Then press TV/VCR to select TV/VCR mode. a video cassette with the 2 Load erase prevention tab intact. SP/LP to select the desired tape speed (SP or 3 Press LP). SP or LP will appear on the screen.
USING THE REAL TIME TAPE COUNTER The On-Screen Real Time Tape Counter shows the tape running time in Hours, Minutes and Seconds. TO VIEW THE COUNTER DISPLAY TV/VCR to select TV/ 1 Press VCR mode. TV/VCR 11 : 30 SAT CH 2 Press DISPLAY to display the Real Time Tape counter. 01 : 30 : 21 SP Press COUNTER RESET to 2 set the counter to “00:00:00”. TV/VCR 11 : 30 SAT CH 2 00 : 00 : 00 SP PLAY or REC/OTR to start the tape, the counter will 3 Press display the passed time.
USING ZERO RETURN The zero return function provides a convenient method of rapidly returning to the starting point of recording or playback. The starting point can be indexed for any location on the tape by pressing the COUNTER RESET button and ZERO RETURN button. TV/VCR to select TV/ 1 Press VCR mode. TV/VCR 11 : 30 SAT CH 2 Press DISPLAY. 01 : 30 : 21 SP playback or recording, 2 Before press COUNTER RESET to set TV/VCR 11 : 30 SAT CH 2 the counter to “00:00:00”.
VIDEO INDEX SEARCH SYSTEM (INDEX) The VIDEO INDEX SEARCH SYSTEM (INDEX) enables you to locate the beginning of any recording made on the unit. The Index Search function automatically records an INDEX mark on the tape whenever a recording is initiated. This mark can easily be located by using F.FWD and REW. SEARCHING FOR AN INDEX MARK TV/VCR to select TV/ 1 Press VCR mode. To search for an index mark, or skip over a number of index marks: Press INDEX during stop or playback.
NICAM STEREO RECORDING AND PLAYBACK/RECEPTION DISTURBANCE RECORDING This unit is capable of recording sound in Hi-Fi system. NICAM STEREO broadcasts are recorded in its original sound system automatically. If the NICAM sound has noise, select NICAM “OFF” as follows. Press TV/VCR to select TV/VCR mode. Then press MENU. Press ▲ or ▼ to Press ▲ or ▼ to Press MENU to select the TV SETUP mode, then press ENTER. select the NICAM mode. Then press to select [OFF]. return to normal TV screen.
DUPLICATING A VIDEO TAPE If you connect the unit to another VCR or VIDEO CAMERA, you can duplicate a previously recorded tape. Make all connections before turning on the power. Press REC/OTR on the remote control of the unit, a blank cassette tape with the erase prevention 3 then 1 Load press PAUSE/STILL. tab intact into the unit (these instructions show how to use this unit as the recording, rather than the playback device). Load a previously recorded tape into the playback VCR or VIDEO CAMERA.
DUPLICATING FROM DISC TO VIDEO TAPE With this unit it is theoretically possible to record from a DVD or Audio CD to a video tape. If the DVD disc has a Copy-guard feature, the duplication is not possible. A symbol ” will appear on the mark “ screen for approx. 4 seconds. See page 36 for more information about DVD discs. Preparation • Load a cassette tape with the erase prevention tab intact. • Select the tape speed in the TV/VCR mode. (see P.24) • Load a disc you wish to duplicate.
TELETEXT Most broadcasters offer a Teletext service in addition to their standard TV programmes. Teletext offers news, weather forecast, winning Lotto numbers, TV listings and other interesting news. The text is received page by page, as soon as you select the broadcasting station. A single page can be displayed on the screen. The pages are numbered and broadcasted one by one. Therefore you'll have to wait a certain time until the selected page is displayed on the screen.
TELETEXT To call a teletext page Leaf through the pages with PAGE (+/–) (forward or backward). NOTE: You will not necessarily find a page for every page number you enter. E.g. you might enter page no.116 but there may or may not be a page no.116. Available page numbers can be found on the Index page (this will be page 100 on most stations). Enter the three-digit page number with the number buttons. Example: You want to display page 300. Enter: 3 then 0 and 0.
DISC DVD discs must be Region 4 or Region ALL type to play on this unit. The loaded Disc (DVD, Audio-CD and MP3/JPEG-CD) will be recognized automatically. The suitable disc formats are: DVD-Video, CD, CD-R, DVD-R/RW (Video format only) and CD-RW. Some CD-R/RW discs may be incompatible. Do not play DVD-ROM, DVD-Audio, CDV, CD-G or Photo CD to prevent accidental erasure of prerecorded material. Title When two or more movies are recorded on a disc, the disc is divided into two or more sections.
PREPARATION/STATUS DISPLAY OF DISC The following pages describe the setup/operation in DVD mode. Preparation Before DVD/CD operation, please make preparations as follows. the AC cord plug into a standard 240V 50Hz AC outlet. 1 Insert • If the AC cord plug is plugged in for the first time, wait for about 5 seconds before pressing POWER (ON) on the front. NOTE: When connecting to other equipment, unplug the unit from the AC outlet. Press Sub Power ( 2 turn on the unit.
SETTING SETUP LANGUAGE You can change the default settings to customize performance to your preference. DVD to select the 1 Press DVD mode. No Disc “No Disc” will appear on the screen. (If a DVD disc has already loaded, the playback will start automatically.) SETUP in the stop 2 Press mode. The SETUP MENU Language Picture Sound Parental Other of DVD will appear on the screen. Then press to select Other. /Enter/Setup/Return or ENTER to se3 Press lect OSD Language.
PLAYBACK PROCEDURE OPEN/CLOSE on 1 Press the unit or the remote control. The disc tray will open. a disc onto the tray. 2 Place Position it with the printed label side up, align it with the guides, and place it in its proper position. PLAY or OPEN/ 3 Press CLOSE. The disc tray closes automatically. On the screen, changes to “Reading” and then playback will commence. • A menu screen may appear on the TV screen, if the disc has a menu feature.
SPECIAL PLAYBACK NOTE: There may be a slight delay between when you press the button and the function activating. Fast Forward Playback Press F.FWD during normal playback. Each press of the F.FWD button will increase the speed of (x 2), (x 4), (x 8), (x 15). the search (CD: (x 2), (x 4), (x 8), (x 20)) • To resume normal playback, press PLAY. Review Playback Press REW during normal playback. Each press of the REW button will increase the speed of the (x 2), (x 4), (x 8), (x 15).
MP3/JPEG PLAYBACK This player can play back the MP3/JPEG-data which has been recorded on CD-R or CD-RW. To produce the MP3/JPEG-data, you need a Windows-PC with CD-R/RW drive and a MP3/JPEGencoding Software (not supplied). The Apple-HFS-System cannot be played. MP3/JPEG CD information Limitations on MP3/JPEG CD playback • MP3/JPEG CD is the disc that is standardized by ISO9660, its file name must include 3-digits extension letters, “mp3”, “jpg”.
MP3/JPEG PLAYBACK (CONTINUED) JPEG CD playback 1 Press OPEN/CLOSE. The disc tray will open. Place a disc on which JPEG files have been recorded onto the tray. OPEN/CLOSE or PLAY. 2 Press The disc tray closes automati- Reading cally. On the TV-screen, “Reading” will appear. Reading will take as much time as the number of file. screen will appear 3 Aonfilethemenu TV screen. Press / to select folder. / or / or 4 Press Number keys to select the desired file.
SETTING THE JPEG INTERVAL Setting the JPEG Interval You can continuously play back all JPEG files automatically. 1 Press SETUP in the stop mode. Press / to select “Picture”, then press ENTER. Language Picture Sound Parental Other /Enter/Setup/Return or to select 2 Press “JPEG Interval”. Language Picture Sound Parental Other Tv Screen Display JPEG Interval Select Files 4:3 On Off All /Enter/Setup/Return 3 Press ENTER or / to select your desired time. Off: Plays back one file at a time.
SETTING THE SELECT FILES When playing back a CD containing a mixture of MP3 and JPEG files, only MP3 or JPEG files can be displayed on the file menu. 1 Press SETUP in the stop mode. Language Picture Sound Parental Other Press / to select “Picture”, then press ENTER. /Enter/Setup/Return 2 Press Files”. or to select “Select Language Picture Sound Parental Other Tv Screen Display JPEG Interval Select Files 4:3 On Off All /Enter/Setup/Return ENTER or / to 3 Press select your desired file type.
ZOOMING/LOCATING DESIRED SCENE Zooming This unit will allow you to zoom in on the frame image. You can then make selections by switching the position of the frame. ZOOM during play1 Press back. 1 The centre part of the image will be zoomed in. Each press of ZOOM will 1 change the ZOOM 2 (x 3) and 3 (x 2), (x 4). / / / to view a different part of the frame. 2 Press You may move the frame from the centre position to UP, DOWN, LEFT or RIGHT direction.
REPEAT PLAYBACK Title, Chapter, Track Playback 1 Press PLAY MODE during playback or stop mode. DVD Repeat : Off /Enter/Play Mode CD Play Mode : Off Repeat : Off /Enter/Play Mode ENTER once or twice to select “Chapter” or “Title”. 2 Press In case of CD, at first press to select “Repeat” and then press ENTER once or twice to select “Track” or “All”. DVD Repeat : Chapter /Enter/Play Mode CD Play Mode Off : Repeat All : /Enter/Play Mode 3 Press PLAY MODE again to make the screen disappear.
PROGRAM PLAYBACK/RANDOM PLAYBACK (CD) Program playback You can arrange the order of tracks on the disc. PLAY MODE in the stop 1 Press mode. ENTER repeatedly until 2 Press the program table shown at right appears. Play Mode : Off Repeat : Off /Enter/Play Mode Play Mode Repeat 1 2 3 Clear In case you wish to 3 Example: program in order of 7, 3, 11: Enter as 7 ,3 , 11. If you input a wrong number, press CANCEL. Press / or / to select 4 “Program Playback” and press ENTER.
CHANGING SOUNDTRACK LANGUAGE/SUBTITLES Changing soundtrack language You can select the language when you play a multilingual disc. AUDIO during play1 Press back. 1/8 Eng Dolby Digital The current soundtrack language will appear. AUDIO repeatedly 2 Press until the desired language is 2/8 Fra Dolby Digital selected. The on-screen display will disappear after a few seconds. Subtitles Turning the Subtitles On and Off When playing back a disc recorded with subtitles, you can turn the subtitles on or off.
CHANGING ANGLES/TITLE SELECTION/DVD MENU Changing Angles When playing back a disc recorded with multi-angle facility, you can change the viewing angle. ANGLE during play1 Press back. 1/9 The current angle will appear. 2 Press ANGLE repeatedly until the desired angle is selected. Title Selection Two or more titles are recorded on some discs. If the title menu is recorded on the disc, you can select the desired title. TITLE during playback. 1 Press Title menu appears on the screen.
SETTING THE ASPECT RATIO OF TV SCREEN/SETTING ON SCREEN DISPLAY Setting the aspect ratio of TV screen You can select the aspect ratio of the picture. Press SETUP in the stop mode. 1 Press or to select “Picture”. Language Picture Sound Parental Other /Enter/Setup/Return 2 Pressor or ENTER, then press to select “Tv Screen”. Language Picture PictureSound Parental Language Parental Other Other 4:3 Tv Screen Display On JPEG Interval Off Select Files All /Enter/Setup/Return 3 Press Press or ENTER.
DYNAMIC RANGE CONTROL DRC (Dynamic Range Control) enables you to control the dynamic range so as to achieve a suitable sound for your equipment. SETUP in the stop 1 Press mode or No Disc. Press or “Sound”. Language Picture Sound Parental Other to select /Enter/Setup/Return or ENTER to se2 Press lect “DRC”. Language Picture Sound Parental Other DRC On /Enter/Setup/Return 3 Press press or ENTER, then or to select desired setting.
PARENTAL CONTROL SETTING Some discs are specified not suitable for children. Such discs can be limited not to play back with the unit. 1 Press SETUP in the stop mode or No Disc. or to select “PaPress or ENrental”. Then press TER. Press or to select “Pa2 rental”, then press or until the level you require appears.
TO CHANGE THE PARENTAL LEVEL SETUP in the stop mode 1 Press or No Disc. or to select Press or “Parental”. Then press ENTER. 2 Press number buttons (0-9) to enter the password you have stored. • If you input a wrong number, press CANCEL. ENTER. 3 Press The rating is now unlocked.
TEMPORARY DISABLING OF RATING LEVEL BY DVD DISC Depending on the DVD disc, the disc may try to temporarily cancel the rating level that you have set. It is up to you to decide whether to cancel the rating level or not. a DVD disc and press PLAY 1 Load or OPEN/CLOSE (see page 39). the DVD disc has been designed to temporarily cancel the 2 IfRating level, the screen which follows the “Reading” screen will change, depending on which disc is played.
SETTING MENU LANGUAGE You can select the language of the disc menu messages of DVDs. SETUP in the stop mode. 1 Press or to select “LanPress Language Picture Sound Parental Other guage”. /Enter/Setup/Return or ENTER. 2 Press Then press or Language Picture Sound Parental Other to select “Menu”. Menu Subtitle Audio English Automatic English /Enter/Setup/Return 3 Press or ENTER. or to select your Press desired language, then press ENTER.
SETTING SUBTITLE LANGUAGE The same subtitle language can always be selected even if you replace the disc or turn the power off. Press SETUP in the stop mode. 1 Press or to select “Lan- Language Picture Sound Parental Other guage”. /Enter/Setup/Return 2 Press or ENTER. or Then press “Subtitle”. Language Picture Sound Parental Other to select Menu Subtitle Audio English Automatic English /Enter/Setup/Return 3 Press or ENTER. Press or to select your desired language, then press ENTER.
SETTING AUDIO SOUNDTRACK LANGUAGE The same audio soundtrack language can always be selected by your unit even if you replace the disc or turn the power off. Press SETUP in the stop mode. 1 Press or to select “Language”. Language Picture Sound Parental Other /Enter/Setup/Return or ENTER. 2 Press or Then press Language Picture Sound Parental Other to select “Audio”. Menu Subtitle Audio English Automatic English /Enter/Setup/Return 3 Press Press or ENTER.
LANGUAGE CODE LIST Enter the appropriate code number for the initial settings “AUDIO”, “SUBTITLE” and/or “MENU LANGUAGE” (see pages 55–57).
BEFORE REQUESTING SERVICE If your unit does not work properly check the following before calling a service engineer. SYMPTOMS SOLUTION CAUSE PAGE POWER No power. Recorder does not work even though STANDBY light is on. The Mains lead is not connected. Connect Mains lead to AC outlet. 7 Main power (ON) switch is OFF. Set it to ON. 4 TIMER REC button is ON. (TIMER REC indicator is on.) Set it to OFF. (TIMER REC indicator is off.) 25 Moisture condensation has formed inside recorder.
BEFORE REQUESTING SERVICE SYMPTOMS (CONTINUED) SOLUTION CAUSE PAGE DVD Insert a disc. Insert a playable disc (Check the disc type and colour system). Place the disc with the playback side down. Place the disc correctly inside the guide on the disc tray. Clean the disc. 36 The parental lock function is set. Cancel the parental lock function or change the parental lock level. 52,53 It is in the mode of repeat playback, memory playback, etc.
SPECIFICATIONS TELEVISION Picture Tube: Television System: Tuner: Receiving Channels: Antenna Input: Audio Output Power: Speaker: VCR Video Recording System: Audio Track: Tape Format: F.
ORION ELECTRIC CO., LTD.
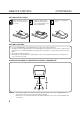
QUICK SET-UP GUIDE Antenna Connections MODEL 21FVD Connect as follows. Antenna socket Mains lead How to install the batteries Use micro batteries type UM-4 (AAA-Size). the battery compartment 2 Install two “AAA” batteries paying 3 Replace the compartment cover. 1 Open cover in the direction of the attention to the polarity diagram in arrow. the battery compartment.
Power On 1 Turn on Main power (ON) switch. The STAND BY 2 Press Sub Power ( indicator will light up. Main power (ON) switch ). The indicator will disappear. On-screen language selection 1 Press TV/VCR to select TV/VCR mode. 2 Press MENU. If you press MENU for the first time, the language setting menu will appear. 3 Press or to select the desired LANGUAGE. Then press ENTER.
To set the clock 1 Press MENU. The SYSTEM SETUP menu will appear before the clock is set. Press ENTER. LANGUE 2 Press / to set the day and press ▼ to memorize. Set the month, year, hour and minute in the same way above. Then press ENTER. Channel preset 1 2 Press the TV/VCR button to select TV/VCR mode.
Playback procedure 1 2 3 Press DVD to select the DVD mode. Press OPEN/CLOSE. The disc tray will open. Place a disc onto the tray. Hold the disc, position it with the printed label side up, align it with the guides, and place it in its proper position. PLAY. 4 Press The disc tray closes automatically. On the screen, changes to “Reading” and then playback will commence. • A menu screen may appear on the TV screen, if the disc has a menu feature. In this case, press / / ture.