instruction Manual Orion SkyView Pro 150mm EQ ® ™ #9968 Equatorial Maksutov-Cassegrain Telescope Customer Support (800)‑676-1343 E-mail: support@telescope.com Corporate Offices (831)‑763-7000 Providing Exceptional Consumer Optical Products Since 1975 89 Hangar Way, Watsonville, CA 95076 IN 258 Rev.
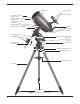
Optical tube Finder scope Finder scope bracket Declination lock lever (opposite‑side) Right ascension lock lever (opposite‑side) Declination slow-motion control knob Safety thumbscrew Eyepiece Mounting plate securing knob Star diagonal Focus knob (not shown) Counterweight shaft Right ascension slow-motion control knob Counterweights Right ascension axis rear‑cover Counterweight lock knobs Latitude scale Latitude adjustment L-bolts Center support shaft Tripod support tray Tripod leg Leg lock‑knobs
Congratulations on your purchase of an Orion telescope. Your new SkyView Pro 150mm EQ is designed for high-resolution viewing, and astrophotography of astronomical objects. With its precision optics and sturdy equatorial mount, you’ll be able to enjoy hundreds of fascinating celestial denizens. These instructions will help you set up, properly use, and care for your telescope. Please read them over thoroughly before getting started. Table of Contents 2. Parts List 1. Unpacking . . . . . . . . . . . .
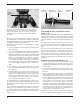
Finder scope bracket Nylon alignment thumbscrews Finder scope Azimuth adjustment knobs Post Tensioner Figure 2. Orient the equatorial mount so that the post on the tripod head lines up between the azimuth adjustment knobs on the equatorial mount. 2. Place the base of the equatorial mount into the tripod head. Orient the equatorial mount so that the post on the tripod head lines up between the azimuth adjustment knobs on the equatorial mount (Figure 2).
Figure 4a-d. Proper operation of the equatorial mount requires that the telescope tube be balanced on both the right ascension and Declination axes. (a) With the R.A. lock lever released, slide the counterweights along the counterweight shaft until it just counterbalances the tube. (b) When you let go with both hands, the tube should not drift up or down. (c) With the Dec.
Turn the focus knob until the object is properly focused. Make sure to position the object in the center of the telescope’s eye‑ piece by turning the R.A. and declination slow-motion control knobs (the R.A. and Dec. lock levers must be tightened to use the slow-motion control knobs). View through finder scope Now look in the finder scope. Is the object visible? Ideally it will be somewhere in the field of view.
Dec. slow-motion control knob Dec. lock lever Dec. setting‑circle Front opening A Ri (R scenght .A si .) on ax is R.A. slow-motion control knob Latitude scale n( De Latitude adjustment L-bolts tio cli na De R.A. lock lever Polar axis finder (optional) c.) ax is R.A. setting‑circle a. b. Figure 6a-b. The SkyView Pro 150mm EQ mount. able for most telescopes. Your SkyView Pro 150mm EQ has an aperture of 150 millimeters, so the maximum magnification would be about 300x.
Azimuth adjustment knobs Figure 8. For polar alignment, position the tripod so that the "N" label at the base of the mount faces north. The azimuth fine adjustment knobs above it are used to make small adjustments to the mount’s azimuth position. Be certain to loosen the tripod attachment knob on the central support shaft before adjusting these knobs. Observers in the Southern Hemisphere aren’t so fortunate to have a bright star so near the south celestial pole (SCP).
“Polaris” on the finder’s reticle. You must first loosen the knob underneath the equatorial mount on the center sup‑ port shaft to use the azimuth adjustment knobs. Once Polaris is properly positioned within the reticle, you are precisely polar aligned. Retighten the knob underneath the equatorial mount. Note: From this point on in your observing session, you should not make any further adjustments in the azimuth or the latitude of the mount, nor should you move the tripod.
the R.A. slow-motion control knob clockwise. The Dec. slowmotion control knob is not needed for tracking. Objects will appear to move faster at higher magnifications, because the field of view is narrower. Optional Motor Drives for Automatic Tracking An optional DC motor drive can be mounted on the R.A. axis of the equatorial mount to provide hands-free tracking. Objects will then remain stationary in the field of view without any manual adjustment of the right ascension slow-motion control knob.
a. b. c. d. Figure 12a-d. This illustration show the telescope pointed in the four cardinal directions (a) north, (b) south, (c) east, (d) west. Note that the tripod and mount have been moved; only the telescope tube has been moved on the R.A. and Dec. axes. The setting circles must be re-calibrated every time you wish to locate a new object. Do so by calibrating the setting circles for the centered object before moving on to the next one.
Dipper” connecting the handle to the “dipper”. If you cannot see Megrez, then you have fog, haze, clouds, smog, light pollution or other conditions that are hindering your viewing (Figure 13). C. Cooling the Telescope All optical instruments need time to reach “thermal equilib‑ rium” to achieve maximum stability of the lenses and mirrors, which is essential for peak performance.
viewing comfort, and helps bring out the subtle features if the lunar surface. B. The Sun You can change your nighttime telescope into a daytime Sun viewer by installing an optional full-aperture solar filter over the front opening of a SkyView Pro 150mm EQ. The primary attraction is sunspots, which change shape, appearance, and location daily. Sunspots are directly related to magnetic activ‑ ity in the Sun.
Continue using stars as guideposts in this way until you are at the approximate position of the object you are trying to find (Figure 14). Look in the telescope’s eyepiece, and the object should be somewhere within the field of view. If it’s not, sweep the telescope carefully around the immediate vicinity until the object is found. If you have trouble finding the object, start the starhop again from the brightest star near the object you wish to view.
Cleaning the Tube Your SkyView Pro 150mm EQ telescope requires very little mechanical maintenance. The optical tube is aluminum and has a smooth painted finish that is fairly scratch-resistant. If a scratch does appear on the tube, it will not harm the tele‑ scope. Smudges on the tube can be wiped off with a soft cloth and a household cleaning fluid.
Appendix: Collimating Collimating is the process of aligning a telescope’s optics. Your Maksutov-Cassegrain's primary mirror was aligned at the fac‑ tory and should not need adjustment unless the telescope is handled roughly. This manual contains information on how to test the collimation of your telescope and instructions for prop‑ er alignment should that be needed.
Secondary mirror Front of telescope Secondary reflection of inside of tube Figure 17a Reflection of your eye in secondary mirror Secondary mirror Front of telescope Reflection of your eye in secondary mirror Reflection of inside of tube (misalignment) Figure 17a. If the telescope’s optics are out of alignment the view through the rear opening of the telescope will resemble Figure‑2a.
Figure 19b Figure 19a Figure 19a. Using the 3mm Allen wrench, turn the large screw clockwise a small amount, no more than 1/4 of a turn. (Note, actual selected alignment screw will vary.) Figure 19b. Now, with the 2mm Allen wrench, turn the two adjacent small screws counterclockwise no more than 1/4 turn. If the alignment screw is a large screw First, using the 4mm Allen wrench, turn the large screw clockwise a small amount, no more than a 1/4 turn. (Figure 19a) Now, with the 2.
One-Year Limited Warranty This Orion SkyView Pro 150mm EQ is warranted against defects in materials or workmanship for a period of one year from the date of purchase. This warranty is for the benefit of the original retail purchaser only. During this warranty period Orion Telescopes & Binoculars will repair or replace, at Orion’s option, any warranted instrument that proves to be defective, provided it is returned postage paid to: Orion Warranty Repair, 89 Hangar Way, Watsonville, CA 95076.