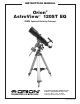
instruction Manual Orion® AstroView™ 120ST EQ #9005 Equatorial Refracting Telescope Customer Support (800) 676-1343 E-mail: support@telescope.com Corporate Offices (831) 763-7000 Providing Exceptional Consumer Optical Products Since 1975 89 Hangar Way, Watsonville, CA 95076 IN 155 Rev.
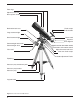
Tube rings Objective lens cell Dew cap/lens shade Declination lock lever Finder scope Finder bracket Large counterweight Small counterweight Counterweight lock knobs Counterweight shaft “Toe saver” Focus knob Eyepiece Star diagonal Right Ascension slow-motion control Declination slow-motion control Right Ascension lock lever Polar axis finder scope Latitude adjustment T-bolts Tripod leg Accessory tray attachment point Accessory tray bracket Accessory tray Leg lock knob Figure 1.
Congratulations on your purchase of a quality Orion telescope! Your new AstroView 120ST EQ Refractor is designed for high-resolution viewing of astronomical objects. With its precision optics and equatorial mount, you’ll be able to locate and enjoy hundreds of fascinating celestial denizens, including the planets, Moon, and a variety of deep-sky galaxies, nebulas, and star clusters. If you have never owned a telescope, we are pleased to welcome you to amateur astronomy.
2. Assembly Carefully open all of the boxes in the shipping container. Make sure all the parts listed in Section 1 are present. Save the boxes and packaging material. In the unlikely event that you need to return the telescope, you must use the original packaging. Assembling the telescope for the first time should take about 30 minutes. No tools are needed, other than the ones provided.
on the worm gear shaft. Then tighten the screw. 12. To place the finder scope in the finder scope bracket (Figure 3), first unthread the two black nylon thumbscrews until the screw ends are flush with the inside diameter of the bracket. Place the O-ring that comes on the base of the bracket over the body of the finder scope until it seats into the groove on the middle of the finder scope.
a. b. c. d. Figure 5. Proper operation of the equatorial mount requires that the telescope tube be balanced on both the R.A. and Dec. axes. (a) With the R.A. lock knob released, slide the counterweight along the counterweight shaft until it just counterbalances the tube. (b) When you let go with both hands, the tube should not drift up or down. (c) With the Dec. lock knob released, loosen the tube ring lock clamps a few turns and slide the telescope forward or back in the tube rings.
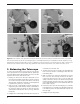
The telescope is now balanced on both axes. Now when you loosen the lock lever on one or both axes and manually point the telescope, it should move without resistance and should not drift from where you point it. 4. Aligning the Finder Scope A finder scope has a wide field of view to facilitate the location of objects for subsequent viewing through the main telescope, which has a much narrower field of view.
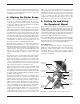
Note: From this point on in your observing session, you should not make any further adjustments to the latitude of the mount, nor should you move the tripod. Doing so will undo the polar alignment. The telescope should be moved only about its R.A. and Dec. axes. Little Dipper (in Ursa Minor) Big Dipper (in Ursa Major) ter Poin a t S rs N.C.P. Polaris Cassiopeia Figure 7. To find Polaris in the night sky, look north and find the Big Dipper.
that is cast into the mount (located directly below the large thumbscrew; see Figure 3). Retighten the thumbscrew. 2. Rotate the date circle until the “0” line on the meridian offset scale lines up with the time meridian indicator mark. The meridian offset scale is printed on the inner circumference of the date circle, and is labeled “E20” to “W20”. The time meridian indicator mark is an engraved line on the exterior of the polar finder’s housing.
loosen the big tripod attachment knob directly underneath the base of the equatorial mount. The fine adjustment knobs work by loosening one and then tightening the other. When done, retighten the tripod attachment knob to firmly secure the mount and tripod. Once Polaris is centered in the small circle, you are done. The telescope is now accurately polar aligned, and can be used for advanced observational applications, such as astrophotography or precise use of the manual setting circles.
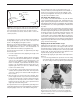
a. c. b. d. Figure 9. This illustration shows the telescope pointed in the four cardinal directions: (a) north, (b) south, (c) east, (d) west. Note that the tripod and mount have not been moved; only the telescope tube has been moved on the R.A. and Dec. axes. weight shaft is horizontal (parallel to the ground). Then loosen the Dec. lock lever and rotate the telescope until it is pointing straight overhead. The counterweight shaft is still horizontal. Then retighten both lock levers.
Cooling the Telescope All optical instruments need time to reach “thermal equilibrium.” The bigger the instrument and the larger the temperature change, the more time is needed. Allow at least a half-hour for your telescope to cool to the temperature outdoors. In very cold climates (below freezing), it is essential to store the telescope as cold as possible. If it has to adjust to more than a 40° temperature change, allow at least one hour.
lence causes objects viewed through the telescope to “boil.” If the stars are twinkling noticeably when you look up at the sky with just your eyes, the seeing is bad and you will be limited to viewing with low powers (bad seeing affects images at high powers more severely). Planetary observing may also be poor. In conditions of good seeing, star twinkling is minimal and images appear steady in the eyepiece. Seeing is best overhead, worst at the horizon.
C. The Planets The planets don’t stay put like the stars (they don’t have fixed R.A. and Dec. coordinates), so you’ll have to refer to charts published monthly at our website, www.telescope.com, or in monthly magazines like Astronomy, Sky & Telescope, to locate them. Venus, Mars, Jupiter, and Saturn are the brightest objects in the sky after the Sun and the Moon. Not all four of these planets are normally visible at any one time. JUPITER The largest planet, Jupiter, is a great subject to observe.
used or the image will be blurred beyond recognition. Try exposure times between 1 and 10 seconds, depending upon the brightness of the planet to be photographed and the ISO of the film being used. “Piggybacking Photography” The Moon and planets are interesting targets for the budding astrophotographer, but what next? Literally thousands of deepsky objects can be captured on film with a type of astrophotography called “piggybacking.
To remove fingerprints or smudges from a lens, use photographic-type lens cleaning fluid and lint-free optical lens cleaning tissue. Do not use household cleaners or eyeglasstype cleaning cloth or wipes, as they often contain undesirable additives like silicone, which don’t work well on precision optics. Place a few drops of fluid on the tissue (not directly on the lens), wipe gently, then remove the fluid with a dry tissue or two. Do not “polish” or rub hard when cleaning the lens, as this will scratch it.