instruction Manual Orion® AstroView™ 6 EQ #9827 Equatorial Reflecting Telescope Customer Support (800)‑676-1343 E-mail: support@telescope.com Corporate Offices (831)‑763-7000 Providing Exceptional Consumer Optical Products Since 1975 89 Hangar Way, Watsonville, CA 95076 IN 160 Rev.
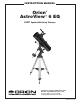
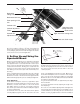
Finder scope Finder scope bracket Eyepiece Focus knob Tube rings Optical tube Declination slow motion control Declination lock lever Counterweight shaft Large counterweight Small counterweight Right ascension slowmotion control “Toe Saver” Right ascension lock lever Counterweight lock knobs Polar axis finder (covered) Latitude scale Tripod leg Latitude adjustment T-bolts Accessory tray bracket Accessory tray Leg lock knob Figure 1.
Welcome to the exciting world of amateur astronomy! Your new AstroView 6 EQ Reflector is designed for high-resolution viewing of astronomical objects. With its precision optics and equatorial mount, you’ll be able to locate and enjoy hundreds of fascinating celestial denizens, including the planets, Moon, and a variety of deep-sky galaxies, nebulas, and star clusters. These instructions will help you set up, properly use, and care for your telescope. Please read them thoroughly before getting started.
5. Next, tighten the wingnuts at the top of the tripod legs, so the legs are securely fastened to the equatorial mount. Use the larger wrench and your fingers to do this. 6. Orient the equatorial mount as it appears in Figure 1, at a latitude of about 40°, i.e., so the pointer next to the latitude scale is pointing to the line at “40”. To do this, loosen one of the latitude adjustment T-bolts and then tighten the other latitude adjustment T-bolt until the pointer and the “40” line up. The declination (Dec.
Figure 3a Figure 3b Figure 3a, b, c, d: Proper operation of the equatorial mount requires that the telescope tube be balanced on both the R.A. and Dec. axes. (a) With the R.A. lock lever released, slide the counterweight along the counterweight shaft until it just counterbalances the tube. (b) When you let go with both hands, the‑tube should not drift up or top of the focuser. Lock the bracket into position by tightening the knurled thumbscrew on the dovetail slot.
adjust the finder scope bracket’s alignment thumbscrews until the star or planet is centered on the finder’s crosshairs. Naked-eye view View through finder scope and telescope Figure 4. The view through a standard finder scope and reflector telescope is rotated 180°. This is true for the AstroView 6 and its finder scope as well. Aligning the Finder Scope The AstroView 6 EQ comes with a 6x30 achromatic finder scope (Figure 2a).
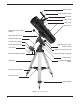
as Ri ce gh ax nsi t is on Right Ascension lock lever Declination setting circle Declination lock lever Front opening in R.A. axis Latitude scale Right Ascension setting circle lock thumb screw Latitude adjustment T-bolts n Right Ascension setting circle cl ax inat is io Azimuth fine adjustment knobs De Polar axis finder scope Figure 5: The equatorial mount of the AstroView 6 the focuser. Then carefully lift the eyepiece out of the holder.
Date circle Ring with engraved time meridian indicator mark Azimuth fine adjustment knobs Polar scope alignment thumbscrew (3) Tripod attachment knob Figure 7. For polar alignment, position the tripod so that the “N” label at the base of the mount faces north. The two azimuth fine adjustment knobs above it are used to make small adjustments to the mount’s azimuth position. your latitude is 35° North, set the pointer to +35.
4. Loosen the R.A. lock lever and rotate the mount about the R.A. axis until the March 1 indicating mark (the long line between the “2” and the “3”) on the date circle lines up with the 4 PM mark (the long line above the “16”) on the R.A. setting circle. You may find it convenient to remove both the counterweights and the telescope optical tube to do this. 5.
Remember, accurate polar alignment is not needed for casual visual observing. Most of the time, approximate polar alignment, as outlined previously, will suffice. Calibrating the Right Ascension Setting Circle 1. Identify a bright star in the sky near the celestial equator (Dec. = 0°) and look up its coordinates in a star atlas. Tracking Celestial Objects When you observe a celestial object through the telescope, you’ll see it drift slowly across the field of view.
Figure 9a Figure 9b Figure 9a,b,c,d: This illustration shows the telescope pointed in the four cardinal directions: (a) North, (b) South, (c) East, (d) West. scope on the R.A. axis until the counterweight shaft is horizontal (parallel to the ground). Then loosen the Dec. lock lever and rotate the telescope until it is pointing straight overhead. The counterweight shaft is still horizontal. Then retighten both lock levers.
drawtube Reflection of primary mirror clip b. c. d. e. Figure 10. Collimating the optics. (a) When the mirrors are properly aligned, the view down a. the focuser drawtube should look like this (b) With the collimation cap in place, if the optics are out of alignment, the view might look something like this. (c) Here, the secondary mirror is centered under the focuser, but it needs to be adjusted (tilted) so that the entire primary mirror is visible.
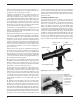
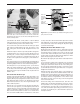
Figure 13: The three small thumbscrews that lock the primary mirror Figure 14: The tilt of the primary mirror is adjusted by turning one in place must first be loosened before any adjustments can be made. A flat head screwdriver may be used to loosen these screws. or more of the three larger thumbscrews. To start, turn the smaller thumbscrews that lock the primary mirror in place a few turns each (Figure 13). Use a screwdriver in the slots, if necessary.
Seeing and Transparency Atmospheric conditions play a huge part in quality of viewing. In conditions of good “seeing”, star twinkling is minimal and objects appear steady in the eyepiece. Seeing is best overhead, worst at the horizon. Also, seeing generally gets better after midnight, when much of the heat absorbed by the Earth during the day has radiated off into space. Typically, seeing conditions will be better at sites that have an altitude over about 3000 feet.
dreds of deep sky objects. Do not expect to see as much color as you in NASA photos, since those are taken with long-exposure cameras and have “false color” added. Our eyes are not sensitive enough to see color in deep-sky objects except in a few of the brightest ones. Ironically, Venus appears as a thin crescent, not a full disk, when at its peak brightness. Because it is so close to the Sun, it never wanders too far from the morning or evening horizon.
E. The Sun You can change your nighttime scope into a daytime Sun viewer by installing an optional full-aperture solar-filter over the front opening of a AstroView 6 EQ. The primary attraction is sunspots, which change in shape, appearance, and location daily. Sunspots are directly related to magnetic activity in the sun and follow an 11 year cycle. Many observers like to make drawings of sunspots to monitor how the sun is changing from day to day.
Turn the motor drive on. Adjust the telescope’s focuser so that the image appears sharp in the camera’s viewfinder. The camera’s shutter is now ready to be opened. A remote shutter release must be used or the image will be blurred beyond recognition. Try exposure times between 1 and 10 seconds, depending upon the brightness of the planet to be photographed and the ISO of the film being used.
rors, the better. Small specks of dust or flecks of paint have virtually no effect on the visual performance of the telescope. The large primary mirror and the elliptical secondary mirror of your telescope are front-surface aluminized and over-coated with hard silicon dioxide, which prevents the aluminum from oxidizing. These coatings normally last through many years of use before requiring re-coating (which is easily done). To clean the secondary mirror, first remove it from the telescope.