instruction Manual Orion AstroView 100 EQ™ ® #9862 100mm Equatorial Refracting Telescope Customer Support (800)‑676-1343 E-mail: support@telescope.com Corporate Offices (831)‑763-7000 Providing Exceptional Consumer Optical Products Since 1975 89 Hangar Way, Watsonville, CA 95076 IN 191 Rev.
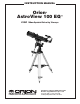
Finder scope Tube mounting rings Finder scope bracket Objective lens Eyepiece Star diagonal Tube ring attachment knobs Counterweight shaft Focus knob Declination slow-motion control cable Right Ascension (R.A.) slow-motion control cable Counterweight Polar axis finder scope Counterweight lock knob “Toe saver” Latitude scale Tripod leg Latitude adjustment T-bolts Accessory tray bracket Accessory tray Leg lock knob Figure 1. The AstroView 100 EQ Reflector.
Welcome to the exciting world of amateur astronomy! Your new AstroView 100 EQ Reflector is designed for high-resolution viewing of astronomical objects. With its precision optics and equatorial mount, you’ll be able to locate and enjoy hundreds of fascinating celestial denizens, including the planets, Moon, and a variety of deep-sky galaxies, nebulas, and star clusters. These instructions will help you set up, properly use, and care for your telescope. Please read them thoroughly before getting started.
Finder scope bracket Nylon thumbscrews Finder scope Tensioner Focusing lock ring Figure 2b. Pull‑back on the tensioner and slide the finder scope into its bracket until the O-ring is seated in the bracket ring Figure 2a. The 6x30 finder scope Focus lock thumbscrew 5. Orient the equatorial mount as it appears in Figure 1, at a latitude of about 40°, i.e., so the pointer next to the latitude scale is pointing to the line at “40”.
Figure 4a. Figure 4b. Proper operation of the equatorial mount requires that the telescope tube be balanced on the R.A. axis. (a) With the R.A. lock lever released, slide the counterweight along the counterweight shaft until it just counterbalances the tube. (b) When you let go with both hands, the tube should not drift up or down. The telescope should be balanced in the Dec. axis already if you have properly centered the 1/4"-20 mounting block on the optical tube relative to the tube rings.
cation and the 30 indicates a 30mm diameter front lens. The finder scope makes it easier to locate the subject you want to observe in the telescope, because the finder scope has a much wider field of view. View through finder scope View through the AstroView 100 EQ Figure 5. Images through the finder scope will appear upsidedown and backwards (rotated 180°). Images through the AstroView 100 EQ with its diagonal in place will be reversed from left-to right.
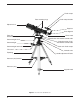
Right Ascension lock lever Declination setting circle Declination lock lever Front opening in R.A. axis tion Rig ht A lina Azimuth fine adjustment knobs Right Ascension setting circle lock thumbscrew sce nsio na D ec Latitude adjustment T-bolts axis Latitude scale xis Polar axis finder scope Right Ascension setting circle Figure 6. The equaltorial mount of the AstroView 100 EQ.
Date circle Azimuth fine adjustment knobs Ring with engraved time meridian indicator mark Tripod attachment knob Polar scope alignment thumbscrew (3) R.A. setting circle lock thumbscrew Pointer R.A. setting circle Meridian offset scale Polar scope housing Polar axis finder scope Figure 8. For polar alignment, position the tripod so that the “N” Figure 9. The polar axis finder scope installed in the right label at the base of the mount faces north.
7. Rotate the mount 180° about the R.A. axis. Again, it may be convenient to remove the counterweights and optical tube first. 8. Look through the polar finder again. Is the object being viewed still centered on the crosshairs? If it is, then no further adjustment is necessary. If not, then look through the polar finder while rotating the mount about the R.A. axis. You will notice that the object you have previously centered moves in a circular path.
Understanding the Setting Circles The setting circles on an equatorial mount enable you to locate celestial objects by their “celestial coordinates”. Every object resides in a specific location on the “celestial sphere”. That location is denoted by two numbers: its right ascension (R.A.) and declination (Dec.). In the same way, every location on Earth can be described by its longitude and latitude. R.A. is similar to longitude on Earth, and Dec. is similar to latitude. The R.A. and Dec.
a. b. c. d. Figure 10 This illustration shows the telescope pointed in the four cardinal directions (a) North, (b) South, (c) East, (d) West. Note that the tripod and mount have not been moved; only the telescope tube has moved on the R.A. and Dec. axes Depending on the altitude of the object you want to observe, the counterweight shaft will be oriented somewhere between vertical and horizontal.
Use of 2" Eyepieces A feature of the AstroView 100 EQ is its ability to use either 1.25" or 2" barrel-diameter eyepieces. At low magnifications, 2" eyepieces can give a wider field of view than standard 1.25" eyepieces. This is especially desirable for observing deep-sky objects, as many of them appear quite large, but faint. If you want to use 2" eyepieces, you will need to use a 2" star diagonal for refractors, or a 2" extension tube, so that the telescope will properly come to focus. Figure 11.
What to Expect So what will you see with your telescope? You should be able to see bands on Jupiter, the rings of Saturn, craters on the moon, the waxing and waning of Venus, and possibly hundreds of deep sky objects. Do not expect to see as much color as you in NASA photos, since those are taken with long-exposure cameras and have “false color” added. Our eyes are not sensitive enough to see color in deep-sky objects except in a few of the brightest ones.
as with any new task, that starhopping may seem challenging at first, but will become easier over time and with practice. To starhop, only a minimal amount of additional equipment is necessary. A star chart or atlas that shows stars to at least magnitude 5 is required. Select one that shows the positions of many deep-sky objects, so you will have lots of options to choose from. If you do not know the positions of the constellations in the night sky, you will need to get a planisphere to identify them.
Pair of collimating screws Reflective ring 1.25" adapter Viewing hole Figure 13. The collimating tool in the AstroView 100 focuser. 8. Collimation The AstroView 100 EQ telescope has objective lens cell which incorporates a collimation adjustment; this helps to ensure peak optical performance. Collimation is the process of aligning the telescope’s optics.
Before cleaning with fluid and tissue, blow any loose particles off the lens with a blower bulb or compressed air. Then apply some cleaning fluid to a tissue, never directly on the optics. Wipe the lens gently in a circular motion, then remove any excess fluid with a fresh lens tissue. Oily fingerprints and smudges may be removed using this method. Use caution; rubbing too hard may scratch the lens. On larger lenses, clean only a small area at a time, using a fresh lens tissue on each area.