HCCA 5.2 HCCA 6.
TABLE OF CONTENTS Introduction . . . . . . . . . . . . . . . . . . . . . . . . . . . . . . . . . . . . . . . . . . . . . . . . . . . . . . . 1 Practice Safe Sound™ . . . . . . . . . . . . . . . . . . . . . . . . . . . . . . . . . . . . . . . . . . . . . . . . 1 What's in the Box . . . . . . . . . . . . . . . . . . . . . . . . . . . . . . . . . . . . . . . . . . . . . . . . . . . . 2 Installation . . . . . . . . . . . . . . . . . . . . . . . . . . . . . . . . . . . . . . . . . . . . . . . . . . . . . . . . .
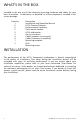
WHAT’S IN THE BOX Included in this box are all the necessary mounting hardware and cables for your basic installation. Listed below is a detailed list of the components included in this system package.
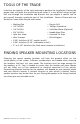
TOOLS OF THE TRADE Listed are the majority of the tools required to perform the installation. Having the proper tools will make the installation much easier. It is very difficult when you get half way through the installation and discover that you require a specific tool to get yourself through a particular part of the installation. Some of these tools are necessities. Some make the job much easier.
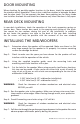
DOOR MOUNTING When checking for possible speaker locations in the doors, check the operation of the window and all assemblies. There is also a stabilizer stop bar in between the door and the door jamb. This bar prevents the door from opening too far. Many shade tree installers overlook this and check for clearance only when the door is fully open. REAR DECK MOUNTING In rear deck installations, check the operation of the trunk suspension springs or tension bars.
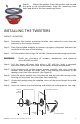
Step 8: Mount the speaker. Place the speaker and the and the grille in the installationhole. Align the mounting screw holes and drive in the four mounting screws. INSTALLING THE TWEETERS SURFACE MOUNTING Step 1: Determine the tweeter mounting location, then route the wires from the crossover to the tweeter location. Step 2: Place the provided template or tweeter cup against the panel and mark the two holes at the rear of the housing. Step 3: Drill the smaller holes using a 1/8" drill bit.
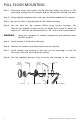
FULL FLUSH MOUNTING Step 1: Determine where the tweeter will be mounted. Make sure there is a flat area large enough for the tweeter and no obstructions behind the area. Step 2: Using supplied template mark with a pen the hole needed for the tweeter. Step 3: Be sure the hole is large enough for the tweeter housing. Step 4: Cut the hole for the tweeter. When using factory locations, this step can be skipped.
INSTALLING THE CROSSOVER Step 1: Find a location for the crossover away from any factory or after market electrical wires. It is recommended to mount the passive crossover close to the amplifier. In the event you decide to upgrade and bi-amplify the system, mounting the passive crossover close to the amplifier would simplify the installation upgrade. Step 2: Remove top cover of crossover housing. Don’t lose it. Step 3: Mark with a marking pen the two mounting holes.
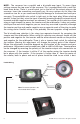
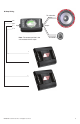
NOTE: The crossover has a parallel and a bi-wire/bi-amp input. To access these settings remove the top cover of the crossover. This is accomplished with a small flat head screw driver. There is a small notch just to the left of the output plug on the crossover. Insert the screwdriver and gently pry. Be very cautious not to insert the screwdriver too far or you could cause physical damage to the board and void your warranty. The parallel/bi-wire switch is right next to the input plug.
Bi-Amp Wiring To subwoofer _ + ww+ T- output input T+ _ Note: The tweeter positive is the wire marked with the stripe To tweeter + + _ + _ © 2007 directed electronics—all rights reserved
SPECIFICATIONS Part Number 37206 37207 Model HCCA 5.2 HCCA 6.2 Nominal Impedance 4 ohms 4 ohms Power Continuous/Maximum 50/100 60/120 Frequency Response 75Hz - 20kHz 55Hz - 20kHz Sensitivity 85 dB 86 dB Mounting Depth 1.9" (49 mm) 2.125" (54mm) Mounting Diameter 4.6" (116.5 mm) 5.
WARRANTY LIMITED ONE-YEAR CONSUMER WARRANTY/LIMITED TWO-YEAR CONSUMER WARRANTY FOR AUTHORIZED DIRECTED DEALER PURCHASE & INSTALLATION Directed Electronics (herein “Directed”) promises to the original purchaser, to repair or replace with a new or refurbished unit (at Directed’s sole and absolute discretion) this product should it prove to be defective in workmanship or material under normal use, for a period of *two-years from the date of purchase from the authorized Directed dealer PROVIDED the product was