
Operation Manual

www.orion.ua / support@orion.ua
3
7. If need to continue working, pull out the plug, and re-fill water into the Water Tank.
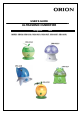
PARTS OF ULTRASONIC HUMIDIFIER
Central body. Fig. 1.
1. Central body.
2. On/Off Switch.
3. Power cord.
4. Mist adjustment button.
5. Humidity output indication.
6. Red/Green power light.
Attention: Shape of central body depends
on model.
Top of Water tank. Fig. 2.
7. Vapor outlet channel.
8. Water tank handle.
Water basin. Fig. 3.
9. Nebulizer.
10. Vaporization chamber.
11. Fan vent.
12. Water level float.
Bottom of Water tank. Fig. 4.
14. Water tank valve.
15. Water tank cap.
16. Vapor outlet channel.
Vapor Outlet Lid. Fig. 5.
17. Vapor outlet lid.
18. Vapor outlet slots.
Attention: Shape of vapor outlet lid
depends on model.
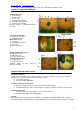
MAINTENANCE AND SAFETY NOTES
Clean the transducer
If hard water in somewhere is used in this machine, some waste or water scale will be left onside the
transducer, user need to clean the transducer with soft cloth:
1. Clean it with soft cloth.
2. Clean it two times with water.
Clean the inside part of water tank
1. Drop some detergent into water tank, and load a half of water tank.
2. Screw it with nut cap, shake it up and down several times, and then use water to wash it clean.
Clean the water flume
1. If there is waste left in water flume, use a soft cloth to clean it.
2. Clean the water flume with cleaning water.
Storage
If the machine has not been used for a long time, you should pour out all the remains which left in the
water flume and the water tank. Please, wash cleaning, mash it, leave it dry and pack it in box for storage.