
Telescopes & Binoculars Microscope & Magnifier User Manual


6
Assembling Your Microscope
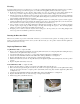
1. Take the Styrofoam container out of the cardboard box.
2. Remove the tape from the Styrofoam container holding the two sections together.
3. Carefully remove the microscope and other parts and set them on a table, desk, or other flat surface.
4. Remove the plastic bag covering the microscope.
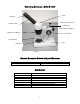
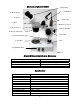
5. Install the frosted/opaque stage plate (7) by putting it in the circular opening in the base (8).
6. Make sure the head (3) is parallel to the base (8). If it is not, then hold the head (3) with one hand and with the
other hand loosen the pillar stand locking knob (13) by turning it counterclockwise, and then rotate the head until
it is perpendicular to the base.
7. The objective lens housing (5) should now be centered directly over the stage plate (7). If it is not, adjust it
carefully like number 6 above.
8. Remove the plastic plug from the bottom of the objective lens (5).
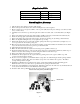
9. Install the rubber eyecups over the eyepieces which will help block out extraneously light to make your viewing
more enjoyable if you do not wear eyeglasses. Push the rubber eyecups over the eyepieces (1) making sure the
rubber lips are facing up. Then rotate the eyepieces so that the rubber lips are facing out to the sides.
You are now ready to use your microscope!
Microscope Operation
Viewing a Specimen
To view a slide specimen without using the electric illuminator:
1. Carefully place a specimen slide under the specimen slide holder clips (6) and center the slide directly in the middle of
the stage plate (7). For specimen slides you should use the black/white stage plate.
2. Illuminate the specimen slide by using a nearby desk lamp, table lamp, bright overhead light, or use natural light if
located near a window.
3. To focus on your specimen slide, turn the focus knob (12) until the specimen comes into focus. If there is not enough
travel in the focuser mechanism to reach focus, it may be necessary to loosen the pillar stand locking knob (13) and
raise or lower the entire head assembly (3) until the image comes into sharp focus.
Tip: Experiment with different lighting for different specimens. When using downward lighting, the white side of the
stage may wash out fine detail whereas the black side will increase contrast but may make the specimen less bright.
To view larger specimens without using the electric illuminator:
1. For larger specimens such as insects or insect parts, animal parts, rocks, fossils, PC boards, other materials, plant and
flower parts, and other larger items --- you will have to make adjustments to the working space to obtain focus.
2. Make sure the binocular head (3) is high enough for the specimen to fit on the stage plate. You may have to raise the
head (3) by loosening the pillar stand locking knob (13) move the head up the pillar stand (14) to the desired position
and then tighten the pillar stand locking knob (13).
3. Illuminate and focus the large specimen similar to items 2 and 3 in the section above.
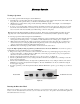
To provide higher quality viewing of specimens you will want to use the electric illuminator. Your microscope has a
built-in, three setting illuminator. To use the illuminator:
1. Plug the power cord (10) into a wall outlet. Make sure you have the proper model for your power requirement –
either the 115-volt model or the 230-volt model.
2. Turn the illuminator switch (9) to the “I” setting to turn on the bottom illuminator light.
3. Turn the illuminator switch (9) to the “II” setting to turn on the top illuminator light.
4. Turn the illuminator switch (9) to the “III” setting to turn on both the top and bottom illuminator lights at the same
time. Note that the bottom illuminator light is only beneficial when using the frosted/opaque stage plate.
5. For many specimens, you should experiment with the different illumination options to get one that gives you the best
results.