
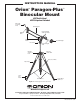
Telescopes & Binoculars Binoculars User Manual

2
Congratulations on your purchase of the Orion Paragon-Plus
Binocular Mount. This sturdy support apparatus is designed
to allow comfortable use of binoculars up to 80mm in aper-
ture for astronomical or terrestrial viewing. The mount greatly
reduces arm strain and positions the binocular away from
the tripod, allowing the viewer to stand or sit comfortably
under the binocular while aiming it overhead — even to the
zenith. The mount also enables the binocular to be raised and
lowered while still staying right on a given target, a wonder-
ful feature when two or more people of different heights are
observing together.
These instructions cover assembly and use of both the Paragon-
Plus Binocular Mount only (#5376, without tripod) and the
Paragon-Plus Binocular Mount & Tripod (#5379). Please read
them thoroughly.
Attaching the Paragon-Plus
Binocular Mount to a Tripod
The attachment instructions cover the attachment to either the
Paragon-Plus tripod (included with #5379), or any sturdy tripod
you might already have. You will need a flat-head screwdriver
and a 2mm hex wrench to attach the binocular mount to a tripod.
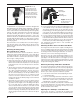
Refer to Figure 1 during assembly.
1) Remove the pan head of the tripod you plan to use. If you
purchased the Paragon-Plus binocular mount and tripod, you
will not need to do this as the tripod does not come with a pan
head. Note the size of the screw the tripod uses to attach the
pan head.
2) Turn the binocular mount upside down. On the bottom of the
pivot disk (Figure 1) there is a 3/8" threaded hole contain-
ing a brass 1/4"-20 threaded insert. This may need to be
removed, depending on the tripod you are using. Compare
the size of the threaded post on the tripod with the size of
the brass insert. If the brass insert is too small, then it will
need to be removed. It should be removed to use it with the
Paragon-Plus tripod in the #5379 package. Use the flat-head
screwdriver to do this.
3) Spread the legs of the tripod as far as they will go and lock
them in place with the brace lock knob (Figure 1). Keep the
legs at their shortest height, for now. The Paragon-Plus tripod
has a very wide stance for enhanced stability. The widest
stance is achieved when the tri-brace is as far down as it will
go on the elevator shaft housing. The brace lock knob should
be tightened to secure the stance. When using the binocular
mount, the tripod legs should always be fully extended, other-
wise the weight of the binocular mount could cause the tripod
to tip over.
4) For the Paragon-Plus tripod, attach the parallelogram mount
to the platform on top of the elevator shaft (Figure 2). For
other tripods, thread the mount onto the shaft where the pan
head normally goes. Do this by placing the hole on the bottom
of the mount onto the shaft while holding the mount with one
hand. With your other hand, turn the pivot disk until it is tight.
5) If you are using the Paragon tripod, you secure the pivot disk
to the platform on top of the elevator shaft with the setscrews
located underneath the platform. With the 2mm hex wrench,
thread the setscrews until they are secure. The mount should
now be able to pivot without unthreading from the tripod.
Your Paragon-Plus binocular mount is now assembled and
should resemble Figure 1.
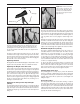
Attaching the Binocular to the Binocular Mount
The Paragon-Plus binocular mount is capable of holding binocu-
lars of up to 80mm aperture. The binocular must have a threaded
socket for mounting. Adjust the tripod height to the level you will
be viewing from before mounting the binoculars. See below for
instructions on how to raise the Paragon-Plus tripod.
Remove the cover cap from the threaded tripod adapter on your
binocular. Then thread the binocular mounting knob into the tri-
pod adapter on the binocular until it is secure (Figure 3). Please
note that if you are using a large binocular that employs a central
support shaft (such as the Orion MegaView), then you will need
an optional mounting plate (#7589).
Balancing the Paragon-Plus Binocular Mount
To assure smooth movement of the binocular mount, the binocu-
lar should be properly balanced on the mount by adjusting the
counterweight shaft. Note that a perfect balance is not necessary,
as the balance can be compensated by using the tension knobs.
However, try to achieve as precise a balance as possible.
1) Loosen all four tension knobs and carefully bring the mount
to a horizontal position.
2) Loosen the counterweight shaft knobs and slide the counter-
weight shaft out from the mount until it balances the binocular
on the other end. Note that a perfect balance may not be
achievable with a very light or very heavy binocular.
If the mount will not balance (very likely with a small binocular),
you can make adjustments to the tension knobs until the mount
remains in place when you stop moving it. If it does not, increase
the tension with the tension knobs.
Adjusting the “Tilt Angle” of the Binocular
The binocular “tilt angle” is controlled with the altitude knob
(Figure 4). You should set the knob tension such that the binocu-
Figure 2. Line up
the threaded pan head
attachment shaft of the
tripod with the threaded
hole on the bottom of the
pivot disk. Then hold the
binocular mount still while
turning the pivot disk to
thread it onto the shaft.
2
Figure 3. Attaching
the binocular to the
binocular mount
Binocular
mounting knob
L-bracket
Threaded
tripod adapter