instruction Manual Orion® SkyQuest™ XTg GoTo Dobsonians #8948 XT8g, #8949 XT10g, #8952 XT12g Providing Exceptional Consumer Optical Products Since 1975 OrionTelescopes.com Customer Support (800) 676-1343 • E-mail: support@telescope.com Corporate Offices (831) 763-7000 • 89 Hangar Way, Watsonville, CA 95076 © 2010 Orion Telescopes & Binoculars IN 388 Rev.
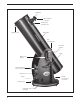
EZ Finder II 28mm DeepView 2" eyepiece 2" Dual-speed Crayford focuser Optical tube Navigation knob Tube connecting knob GoTo hand controller Handle Altitude motor housing 12.5mm Illuminated Plössl 1.25" eyepiece Eyepiece rack Handle Azimuth motor housing (not shown) Dobsonian base Polyethylene foam dust guard Figure 1.
Congratulations on your purchase of an Orion SkyQuest XTg GoTo Dobsonian. It is an observer’s dream telescope, offering quality diffraction-limited optics; a stylish, easy-to-setup base outfitted with automated, computerized GoTo technology; and a sturdy design. This high-performance astronomical instrument will provide dazzling views of celestial objects, yet be transportable and wonderfully easy to use.
Ground baseplate assembly (with azimuth motor) Front panel Left panel (with altitude motor) Base hardware and handle Hex keys Machine screws with washers Base assembly wood screws Right panel Screwdriver Cables Tube connecting knob Hand controller Figure 3. SkyQuest XTg base components. The XT12g base also Figure 4. Base hardware for SkyQuest XTg. Figure 5. Polyethylene foam dust guard between ground baseplates. DO NOT REMOVE! Figure 6. Starter holes for feet.
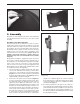
Figure 7. Attaching the base feet to the base. Figure 8. Secure the front panel to each side panel. 2. Assembly Now that you have unpacked the boxes and familiarized yourself with all the parts in front of you, it is time to begin assembly. Assembly of the Dobsonian Base The base need only be assembled once, unless you disassemble it for long-term storage. The assembly process should take about half an hour. All necessary tools are included in the packages.
Cutout holes Threaded inserts Figure 10. Align the holes on the side panels with the threaded inserts in the baseplate. Figure 12. To remove the rear end ring, unthread the six screws that connect it to the tube. not tighten completely yet. Place the eyepiece rack on those screws using the wide holes on the rack and slide it downward so the narrow portion is under the screws. Now tighten the screws to secure the rack in place. 6.
Spring Shaft Figure 13. Place the three springs on the exposed threaded shafts of the mirror cell. Figure 16. Locate the area of tube that is bulging out and preventing the end ring from fully seating. Warning: Once the rear end ring is removed from the tube, the raw edge of the tube itself will be exposed. Be careful not to cut or otherwise hurt yourself on the tubeís edge. Also, be careful not to pinch your fingers when reattaching the assembled mirror cell onto the tube. 2.
Threaded hole for tube connecting knob Figure 17. The cast-metal dovetail trunnion on the left side panel of the base mates with the left side bearing of the telescope tube. Before mounting the tube on the base, turn the trunnion by hand so that the hole for the tube connecting knob is facing up. Connecting the Optical Tube to the Dobsonian Base The telescope is now assembled and ready to be placed into the Dobsonian base.
1.25" adapter thumbscrew 1.25" adapter Power knob 2" adapter Azimuth adjustment knob Altitude adjustment knob Thumbscrews Battery casing Dovetail mounting bracket Focus lock thumbscrew 2" adapter thumbscrews Fine focus knob Coarse focus knob Coarse focus knob Drawtube tension setscrews Figure 20. The EZ Finder II reflex sight. Figure 21. Detail of the SkyQuest XTg 2" dual-speed focuser. the dot, which is purposefully quite dim. The intensity of the dot is adjusted by turning the power knob.
3. The GoTo Hand Controller a. The SkyQuest XTg features the SynScan AZ hand controller, which provides two different modes of operation: Display screen AutoTracking Mode The SkyQuest XTg base incorporates a quad-encoder design that records the position of the telescope relative to the sky.
scope. The left and right directional buttons can also be used to move the text cursor when entering data on the hand controller. Scroll Buttons The up and down scroll buttons allow you to move up and down within the menu tree or selections displayed on the hand controller LCD. Dual Purpose buttons These buttons serve two distinct purposes: for data entry and as quick reference keys. TOUR button: Takes you on a preset tour of the best night sky objects visible at the present time.
must convert into degrees and arcminutes. To do this simply multiply the decimal value by 60. If your viewing location is at latitude 36.95 N you would enter a latitude of 36°57’ N [.95 x 60 = 57]. 6. Enter the time zone in which you are observing in hours (see Appendix A), using the scroll keys and numeric keypad (+ for east of Prime Meridian, - for west of Prime Meridian). Press ENTER to confirm your choice. The format you enter should look like this if you are in Pacific Standard Time (PST): -08:00. 7.
eyepiece. Once again, use the directional keys to do this. You may change the slewing speed by pressing the RATE button, and then choose a number between 0 (slowest) and 9 (fastest). You may find that Rate 4 is best for centering the object in the EZ Finder, while Rate 3 or less is best for centering in the eyepiece view. When the star is centered in the eyepiece, press ENTER. N NW 270° – 360° W 315° – 45° 225° – 315° 180° – 270° SW NE 0° – 90° 5.
NOTE: When the power is on, you may choose to adjust the telescope electronically by using the hand control or manually by pushing the tube with your hand. The telescope will calculate the coordinates accordingly and display the information correctly on the hand controller. NOTE: The hand controlís backlit display will become dimmer and the button Illumination will turn off if left idle for 30 seconds. Pressing any button will re-illuminate the display.
object could be a bright named star, a planet, or an object from the Messier, NGC, or IC catalogs, but not a star from the SAO catalog. 2. Find the reference object in the hand controller database and command the telescope to “GoTo” the object. 3. Once the telescope has stopped slewing, press ESC to return to any submenu . 4. Press and hold down the ESC key for 2 seconds to enter the PAE mode.
b. c. d. e. a. Note: 10" model has 4 mirror clips Figure 25. Collimating the optics. (a) When the mirrors are properly aligned, the view down the focuser drawtube should look like this. (b) With the collimation cap in place, if the optics are out of alignment, the view might look something like this. (c) Here, the secondary mirror is centered under the focuser, but it needs to be adjusted (tilted) so that the entire primary mirror is visible.
Figure 26. The SkyQuest optical tube properly set up for collimation. Note the white paper placed across from the focuser, and the level angle of the optical tube. Ideally, the telescope should be pointing at a white wall. (IntelliScope model shown.) is pointed. You may press the scroll buttons to switch between the different coordinate options. Set Slew Limits: Allows you to set slewing limits of the GoTo base’s altitude axis, to prevent the optical tube from colliding with the base.
Figure 29. The three small thumbscrews that lock the primary Figure 30. The tilt of the primary mirror is adjusted by turning mirror in place must first be loosened before any adjustments can be made. one or more of the three larger thumbscrews. Using the User Defined Database The GoTo system allows you to save up to 25 objects in the User Defined Database.
Note: Do NOT disengage the SkyQuest XTg unit before you close the connection in the planetarium program. Doing so may cause some programs to freeze. Out of collimation Collimated Figure 31. A star test will determine if a telescope’s optics are properly collimated. An unfocused view of a bright star through the eyepiece should appear as illustrated on the right if the optics are perfectly collimated. If the circle is unsymmetrical, as in the illustration on the left, the scope needs collimation.
6. When the download is complete, the Firmware Loader will display “Update Complete”. The firmware in the computerized GoTo hand controller has now been updated. You can click on the “HC Version” button to confirm the new version number of the firmware (and possibly the database, but the hardware version will not change with internet updates). Note: If the error message “Can not connect to a SynScan hand control” appears on your computer, check all cable connections.
mirror and the tilt of the primary mirror are the two collimation adjustments that will be done most often. If the entire primary mirror reflection is not visible in the secondary mirror, as in Figure 25c, you will need to adjust the tilt of the secondary mirror. This is done by alternately loosening one of the three secondary mirror alignment set screws while tightening the other two, as depicted in Figure 28. Do not make excessive turns of these set screws or force them past their normal travel.
Viewing with Eyeglasses If you wear eyeglasses, you may be able to keep them on while you observe, if your eyepieces have enough eye relief to allow you to see the whole field of view. You can try this by looking through the eyepiece first with your glasses on and then with them off, and see if the glasses restrict the view to only a portion of the full field. If they do, you can easily observe with your glasses off by just refocusing the telescope as needed.
10. Astronomical Observing The SkyQuest XTg GoTo Dobsonian provides prodigious capability for observing the many wonders of the heavens, from the major planets to deep-space nebulas and galaxies. In this section we give you some astronomical observing tips and briefly summarize what you can expect to see. Selecting an Observing Site Since most astronomical objects are faint, observing them from dark skies will give you the best views.
you’ve centered the object in the eyepiece, you can switch to higher magnification (shorter focal length eyepiece), if you wish. This is especially recommended for small and bright objects like planets and double stars. The Moon also takes higher magnifications well. Deep sky objects, however, typically look better at medium or low magnifications. This is because many of them are quite faint, yet have some extent (apparent width).
that you find an observing site well away from light pollution. Take plenty of time to let your eyes adjust to the darkness. As you become more experienced and your observing skills get sharper, you will be able to ferret out more and more subtle details and structure from these fascinating objects. Beginners are often surprised to discover that the deep sky objects they see through the eyepiece of a telescope are mostly grayish, not colorful like those you see in long-exposure astro-images.
12. Specifications SkyQuest XT8g SkyQuest XT10g Primary mirror: 203mm diameter, parabolic, center-marked Primary mirror: 254mm diameter, parabolic, center-marked Focal length: 1200mm Focal length: 1200mm Focal ratio: f/5.9 Focal ratio: f/4.7 Focuser: Dual-speed Crayford (11:1), accepts 2" and 1.25" eyepieces with included adapter Focuser: Dual-speed Crayford (11:1), accepts 2" and 1.
SkyQuest XT12g Primary mirror: 305mm diameter, parabolic, center-marked Focal length: 1500mm Focal ratio: f/4.9 Focuser: Dual-speed Crayford (11:1), accepts 2" and 1.25" eyepieces Optical tube material: Rolled steel Azimuth bearing: Thrust needle bearing Altitude bearing: Ball bearing Eyepieces: 28mm DeepView, 2" barrel, 12.5mm Illuminated Plössl, 1.25" barrel Eyepiece magnifications: 53x and 120x Finder scope: EZ Finder II Reflex Sight Eyepiece rack: Holds three 1.
Menu Tree 28
Appendix A: Time Zones of the World
Appendix B: RS-232 Connection The SkyQuest XTg Mount is designed to receive commands sent from a computer’s RS-232 COM port (via the computer interface cable). The hand controller will communicate with the computer at 9600 bits/sec, no parity, no stop bit. All angles are communicated with 16 bits and communicated using ASCII hexadecimal. The chart below shows the ASCII commands from the PC, and what the hand controller’s response will be. a.
Star Charts 31
One-Year Limited Warranty The Orion XTg GoTo Dobsonians are warranted against defects in materials or workmanship for a period of one year from the date of purchase. This warranty is for the benefit of the original retail purchaser only. During this warranty period Orion Telescopes & Binoculars will repair or replace, at Orion’s option, any warranted instrument that proves to be defective, provided it is returned postage paid to: Orion Warranty Repair, 89 Hangar Way, Watsonville, CA 95076.