INSTRUCTION MANUAL Orion SkyQuest IntelliScope XT6, XT8, XT10 ® ™ ® #9985, #9986, #9987 Customer Support (800) 676-1343 E-mail: support@telescope.com Corporate Offices (831) 763-7000 Providing Exceptional Consumer Optical Products Since 1975 P.O. Box 1815, Santa Cruz, CA 95061 IN 226 Rev.
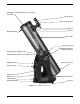
Secondary mirror holder with 4-vane spider (not visible) Finder scope Finder scope bracket Eyepiece Focuser Navigation knob Optical tube Tensioning knob IntelliScope Controller Port modular jack Retaining knob (opposite side) Computerized Object Locator (optional) Primary mirror cell Right side panel Eyepiece rack Front brace Left side panel Handle Top baseplate Foot (3) Ground baseplate Figure 1.
Congratulations on your purchase of an Orion SkyQuest XT IntelliScope Dobsonian. It is a high-performance astronomical instrument designed to provide dazzling views of celestial objects and unprecedented ease of use. With the addition of the optional IntelliScope Computerized Object Locator (Controller), you gain the ability to locate and view thousands of celestial objects with the push of a button.
3 Plastic feet 3 Feet attachment wood screws (length 1") 5 Encoder board mounting wood screws 1 Brass bushing 1 Azimuth axis hex-head screw (length 2.25") 2 Fender washers (diameter 1") 1 Hex lock nut 4 Altitude bearing cylinders 4 Altitude bearing cylinder screws (length 1.5", black) 1 Vertical stop knob 3 Flat washers (2x1/16" thick, 1x1/32" thick) (Please note: Unless otherwise specified, all images and pictures in this manual are of the SkyQuest XT8.
hole, and the large hole lines up with the central hole in the baseplate. Thread an encoder board mounting screw into the predrilled starter hole with a Phillips screwdriver and tighten until just tight. Correct Tension pads 6. Place one fender washer (H) onto the azimuth axis screw (I). Then push the screw up through the hole in the ground baseplate (A).Then slide the encoder disk (J), flat side down, onto the azimuth axis screw. 7.
Encoder connector board Screws Figure 6. Attaching the encoder connector board. (XT10 Shown) Installing the Eyepiece Rack The aluminum eyepiece rack is a standard accessory on SkyQuest IntelliScope Dobsonians. It holds three 1.25" eyepieces and one 2" eyepiece (three 1.25" eyepieces on the XT6) in a convenient place on the base, within easy reach while you’re observing. A 1.25" barlow lens also can be held in the rack.
SkyQuest Intelliscope Dobsonians employ a simple yet effective remedy for the friction problem that obviates the need for such cumbersome countermeasures. CorrecTension Friction Optimization utilizes a simple “disc brake” to apply the correct level of tension to the altitude bearings. With the XT system, you can change eyepieces or add a barlow lens without having to tediously adjust the telescope’s balance as you would with other Dobsonians.
O-ring 3. Using Your Telescope One of the great benefits of the SkyQuest XT IntelliScope Dobsonian is its ability to point to more than 14,000 celestial objects, when used with the optional IntelliScope Computerized Object Locator (Controller). Use of the Controller is completely optional, and your telescope will function perfectly well without it. However, the Controller will greatly enhance your observing experience by enabling you to quickly and precisely locate even very faint objects.
Setting the Altitude Tension Level The telescope should move smoothly with just gentle hand pressure. While azimuth friction is not adjustable, the altitude friction can be adjusted to the desired level by turning the altitude tension knob (Figure 10). Note that altitude tension knob is the knob just above the IntelliScope Controller Port. The knob on the opposite side of the base is merely a retaining knob; it does not affect altitude tension.
Check the alignment by moving the telescope to another object and fixing the finder scope’s crosshairs on the exact point you want to look at. Then look through the telescope’s eyepiece to see if that point is centered in the field of view. If it is, the job is done. If not, make the necessary adjustments until the two images match up. The finder scope alignment should be checked before every observing session. This can easily be done at night, before viewing through the telescope.
Keep in mind that as magnification is increased, the brightness of the object being viewed will decrease; this is an inherent principle of the physics of optics and cannot be avoided. If magnification is doubled, an image appears four times dimmer. If magnification is tripled, image brightness is reduced by a factor of nine! Use of 2-Inch Eyepieces (XT8 and XT10 only) All SkyQuest telescopes are designed to accept eyepieces with a barrel diameter of 1.25".
4. Alignment (Collimation) of the Optical System To get the sharpest images, your telescope’s optical system must be in precise alignment. The process of aligning the primary and secondary mirrors with each other and with the mechanical axis of the telescope is called collimation. Your telescope’s optical system was collimated at the factory and will probably not need any further adjustment.
Figure 19. The SkyQuest IntelliScope properly set up for collimation. Note the white paper placed across from the focuser, and the level angle of the optical tube. Ideally, the telescope should be pointing at a white wall. Aligning the Secondary Mirror With the collimation cap in place, look through the hole in the cap at the secondary (diagonal) mirror. Ignore the reflections for the time being.
To start, turn the smaller thumbscrews counterclockwise a few turns each (Figure 22). Use a screwdriver in the slots, if necessary. Now, try tightening or loosening one of the larger collimation thumbscrews with your fingers (Figure 23). Look into the focuser and see if the secondary mirror reflection has moved closer to the center of the primary.
A. Selecting an Observing Site Since most astronomical objects are faint, observing them from dark skies will give you the best views. While some objects, such as the planets and Moon, are bright enough to see clearly even from light-polluted city skies, for nebulas, galaxies, and most star clusters, the less ambient light there is to reduce contrast, the better.
lower powers. It is quite common for an observer to own five or more eyepieces to access a wide range of magnifications. This allows the observer to choose the best eyepiece to use depending on the object being viewed. At least to begin with, the two supplied eyepieces will suffice nicely. Whatever you choose to view, always start by inserting your lowest-power (longest focal length) eyepiece to locate and center the object.
for observing these usually faint celestial entities. For deepsky observing it is important that you find an observing site well away from light pollution. Take plenty of time to let your eyes adjust to the darkness. As you become more experienced and your observing skills get sharper, you will be able to ferret out more and more subtle details and structure from these fascinating objects.
Your SkyQuest IntelliScope requires very little mechanical maintenance. The optical tube is steel and has a smooth painted finish that is fairly scratch-resistant. If a scratch does appear on the tube, it will not harm the telescope. Smudges on the tube or base can be wiped off with a soft cloth and a household cleaner.
8. Specifications SkyQuest XT6 IntelliScope Primary mirror:150mm diameter, parabolic, center-marked Focal length: 1200mm SkyQuest XT10 IntelliScope Primary mirror: 254mm diameter, Pyrex, parabolic, centermarked Focal ratio: f/8.0 Focal length: 1200mm Focuser:Rack-and-pinion. 1.25" eyepieces Focal ratio: f/4.7 Altitude bearing diameter: 5.75" Focuser: Rack-and-pinion. Accepts 2" and 1.25" eyepieces with included adapter Optical tube material: Rolled steel Altitude bearing diameter: 5.
One-Year Limited Warranty This Orion SkyQuest IntelliScope Dobsonian Reflecting Telescope is warranted against defects in materials or workmanship for a period of one year from the date of purchase. This warranty is for the benefit of the original retail purchaser only.