
Instructions / Assembly


RUSTIC WOOD BEAM INSTALLATION INSTRUCTIONS
INSTR WD BM RUSTIC | 2
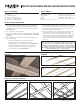
INSTRUCTIONS FOR ATTACHING MOUNTING PLATE TO CEILING JOISTS
(CEILING JOISTS PERPENDICULAR TO LAYOUT)
1. Pre-drill 3/16” holes in mounting plate only where
the screws will attach the mounting plate to the
ceiling joists. Use a minimum of one screw for every
24“ length of mounting plate.
2. Securely attach the mounting plate with the beveled
side down (widest side against ceiling) to the marked
ceiling joists using the #8x2-1/2” wood screws
included with this kit. (See Figure E)
FIGURE E
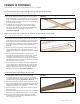
INSTRUCTIONS FOR ATTACHING MOUNTING PLATE TO CEILING DRYWALL
(CEILING JOISTS PARALLEL TO LAYOUT)
1. Pre-drill 1/4” diameter holes through the mounting
plate only where the toggle bolts will penetrate the
ceiling drywall. Use a minimum of one toggle bolt for
every 24“ length of mounting plate.
2. Position mounting plate to the ceiling and mark hole
locations on ceiling. Drill 1/2” holes through the
ceiling drywall at the marks.
3. Insert 3/16“x3” toggle bolts included with this kit
through the holes in the beveled side (wide side to
be against the ceiling) of mounting plate. Thread the
wing nuts onto the bolts sticking out of the other side
of the mounting plate for about 1/4”.
4. Securely attach the mounting plate with the beveled
side down (widest side against the ceiling) to the
ceiling drywall by pushing the toggle bolt wings
through the holes in the ceiling drywall. Tighten the
bolts until snug. (See Figure F)
FIGURE F
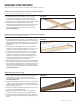
INSTRUCTIONS FOR INSTALLING BEAM
1. Attach beam to mounting plate using #6x1” wood
screws included in this kit at the pre-drilled hole
locations on both sides of the beam near the ceiling.
(See Figure G)
2. Firmly press the beam against the ceiling as you
secure the beam to the mounting plate to minimize
any gap between the beam and the ceiling. An 8-ft
beam will have 3 screws per side.
3. Install at least 2 screws per side if you cut the 8-ft
beam to a shorter length.
4. Fill the screws holes and joints with colored wood
filler or caulk as desired.
5. Optional decorative brackets may be purchased to
cover joints between beams or beam to wall.
FIGURE G