
User's Manual


Secured OrPT Single Box Installation Manual
15
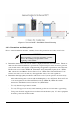
9. Take care that, as the concrete fills the hole, the Installation Plate is on a same level as the
ground (asphalt, pedestal) on which it is installed. Check repeatedly that the Installation
Plate is leveled otherwise make the necessary adjustments so the plate is perfectly leveled
10. Wait the necessary time for the concrete to harden and dry (as per local practice), Check
anew that the Installation Plate is leveled.
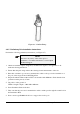
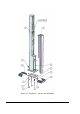
2-4.6. Pole Installation Instructions
Perform the following Pole installation instructions (see Figure 2-7):
1. Remove the four M10 nuts from the four ICU bolts attached to the Installation Plate
2. Insert Pole on top of the Installation Plate
3. Secure Pole on the Installation Plate to the Installation Plate to the four installation threads
in the inner ground area of the Pole
4. Secure the Installation Plate with four M10 spring washers, M10 washers and M10 nuts
5. Insert right and left Rozetas on the Installation Plate, and secure to Pole with two flathead
M3x10 screws
This completes the installation of the Pole for the Secured OrPT Single Box. Proceed with the
installation of the Secured OrPT Single Box.
2-4.7. Single Box Pole Installation Instructions
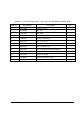
Perform the following Single Box Pole installation instructions (see Figure 2-7 and Table 2-5):
1. Pull out power and communication cable conduits from the Pole
2. Open Single Box door, use the dedicated key if it is locked
3. Insert the cables to be connected to the Single Box. All wiring to the device must be done in
UL listed rigid metal sealed conduit, at least 18'' higher than surface
4. Install the Single Box on the upper installation flange of the Pole
5. Secure the Secured OrPT Single Box to the Pole with four M6 flat plastic washers (for
waterproof purpose), four M6 flat washers, four M6 spring washers and four M6x16 screws
6. Connect the power and communication cables to the Single Box.
7. Lock the Secured OrPT Single Box door using the provided key