OWNER's INSTRUCTIONS MANUAL Gas Fire Table User's Guide and Instruction Manual
FOR OUTDOOR USE ONLY ! If you smell gas and/or hear a gas hissing sound: 1. Immediately, SHUT OFF gas to the appliance. 2. Extinguish ALL open flames. 3. If odor continues, keep away from the appliance and immediately call your Gas Supplier or Fire Department. DO NOT store or use gasoline or other flammable v apors and liquids in the v icinity of this unit and or any other appliance. An LP Gas tank not connected for use shall not be stored in the v icinity of this or any other appliance.
LIMITATION OF WARRANTY AND LIABILITY NOTICE: Read this Limitation of Warranty and Liability Before Using This Product. If the Terms Are Not Acceptable, Return the Product at Once, Unopened, and the Purchase Price Will Be Refunded. It is impossible to eliminate all risks associated with the use of this product. Such risks arise from weather conditions, the manner of use or application, or other unknown factors, all of which are beyond the control of the Seller and Manufacturer.
Part A. SAFETY INFORMATION Before you assemble or operate this unit, please read carefully this entire Owner's Manual. Failure to do so may result in a fire, explosion, injury or death. The installation of this unit must adhere to local codes or either the National Fuel Gas Code, ANSI Z223. 1/NFPA54, OR CAN/CGA-B149.1, National Gas and Propane Installation Code.
• DO NOT fill tank over 80% full. • The tank system must be set up for vapor withdrawal. • STOP using if any part of the Propane Gas Tank is damaged. Rust and dents in tank may be hazardous and should be inspected by a Gas Supplier. • DO NOT burn anything other than the provided materials for this Fire Table. • Keep away from the unit for the first 20 minutes after igniting your unit for the first time, as lava rocks could pop out and cause injury. Should any rocks pop out, discard them.
• Keep the appliance area clear and free from combustible material, gasoline and other flammable vapors and liquids. • If the flame goes out while burning, turn the gas valve off. Wait 5 minutes before repeating the initial lighting procedure. Once you have a flame started, hold down the control knob for 1 minute. • DO NOT add water into the unit. • DO NOT operate unit if any part has been under water. Immediately call for a Qualified Service Technician to inspect the appliance.
• Children and adults should be alerted to the hazards of high surface temperatures and should stay away to avoid burns or clothing ignition. • Young children MUST BE carefully supervised at all times when they are in the area of this appliance. • Clothing or other flammable materials shall NOT be hung from the appliance or placed on or near the appliance. • Any guard or other protective device removed for servicing the appliance shall be replaced prior to operating and use of this appliance.
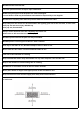
Part B IGNITOR CONTROL BOARD Herebelow is an exact visual display of the Operation Tablet as found on your Fire Table / Fire Column. Read carefully before using.
Part C User's Guide to Parts and Accessories of The Regulator, Charge Valve of the Cylinder and Stelps to Connecting the Gas Tank to the Fire Table /Column. This Safety Information passage holds information that : 1 ) shows you the Regulator ( pre-connected to the Fire Table / Column ) 2 ) the Charge Valve of the Gas Tank and its relevant Valves. There are Fire Table / Column that holds the Gas Tank INTERNALLY and EXTERNALLY.
Part D. User's Guide : Connecting the Fire Table / Column to the Gas Cylinder. This next step guides you to connect the Fire Table / Column Regulator to the Gas Cylinder. Step 1 : Plug the Black Coupling Nut on the Regulator to the Cylinder Valve. Step 2 : Turn the Black Coupling Nut, fully CLOCKWISE until fully locked into the position. Step 3 : Check for Leaks by : Brush some soap and water mixture on all connections.
Part E. FIRE TABLE / COLUMN PARTS INTRODUCTION Your Fire Table / Column is delivered pre-assembled whereby there is no assembly actions needed. Herebelow is an introduction to all the parts that forms your Fire Table / Column. Each part is different and holds its own function. DO NOT attempt to change and or remove any part(s) thereof. In the event of servicing and or operational issues, contact Qualified Services Technical Support and or seek Qualified Service Technician.
Tabulated here below are the description to all parts as shown in above Picture .
Part F. User's Guide Parts and Accessories of Fire Table / Column. Tabulated herebelow is the User's Guide to various Parts and Accessories to form your complete Fire Table /Column. Before you start to assemble this product, make sure all parts are present. Compare parts with package contents list. If any parts are missing or damaged, DO NOT attempt to assemble the product. Before Beginning Assembly: Part G.
Part H. USER'S INSTRUCTIONS Tabulated herebelow are the basic steps to help you light and use your Fire Table / Column. STEP1 1. Check that the Control Knob (15) for the gas supply system is turned to the “OFF” position before starting any assembly. STEP 2 2. Remove the Electronic Ignitor Cap (16) on the electronic Ignitor (16) by unscrewing and slide the Battery (B) into the battery slot (16). Make sure the positive side of the Battery( B ) faces outwards.
STEP 4 4. Place the 20lbs Propane Gas Tank (not included) into the Tank cover (09). Make sure the Propane Gas Tank is placed completely into the Tank cover (09 ). STEP 5 5.
To ensure proper function, the Guard (02) on the Burner (1) should never have lava rocks (A) covered over it.
Part I. SAFETY INFORMATION - OPERATIONS Before performing a leak test, be sure: 1. ) DO NOT press the Ignitor . 2. ) You are in a spacious outdoor area. Connect the Propane Gas tank to the Regulator (14/19 ) and turn the Valve (22) on the unit to the “OFF” position. Brush soap and water mixture onto all connections. Turn the gas supply on;if extra large bubbles form on any connection there may be a leak.
Part J. SAFETY INFORMATION USING YOUR FIRE TABLE / COLUMN Before each use, inspect the Gas Hose (14). Replace Gas Hose(14) if there are any signs of cutting, wear or abrasion. Before you light your Fire Table / Column, please proceed / adopt the following steps : 1. Make sure the Control Knob (15) is in the “OFF” position. 2. Slowly open the Valve ( 22) on the Propane Gas Tank by turning the Contol Knob (15) counterclockwise. 3.
Part K. SAFETY INFORMATION : TO SHUT DOWN YOUR FIRE TABLE / COLUMN To Shut Down your Fire Table / Column, please proceed / adopt the following steps : 1. Turn Control Knob (15) clockwise to the “OFF” position. 2. Close the Cylinder Valve ( 21) on the Propane Gas tank if you DO NOT intend to use it for a long time. Part L. MAINTENANCE - FIRE TABLE / COLUMN • Before performing any maintenance work, ensure the Control Knob (15) is in the "OFF" position and always disconnect Propane Gas tank.
Part M. MAINTENANCE : FIRE TABLE / COLUMN SURFACE CARE • Our Table / Column Fire Table material has been sealed with a treatment that prevents staining and moisture absorption, and for product longevity this Fire Table / Column would still require proper care and maintenance to ensure the integrity of the surface.
Part N. TROUBLE SHOOTING Herebelow is a simple guide on frequently asked questions / frequently occurring issues. Read through carefully and execute accordinlgy and adequately. Whenever you are uncertain, please contact Qualified Technician Services and/or Fire Department. Problem Fire Pit / Fire Table / Column DOES NOT light up.
Part O. WARRANTY The manufacturer warranty shall be voided, and manufacturer disclaims any responsibility for the following actions whereby the Customer / Consumer / Owner has : • Made modification(s) to the unit and / or components including the Gas Valve assembly. The Owner shall contact the Local Supplier and Quaified Service Person to repair these parts.