
Assembly Instructions


48 | iASSIST 2-Pod Version Surgical Technique
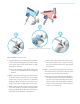
1. Before starting the installation process, ensure
that the USB key is connected to the system and
that its icon is displayed on the top right corner of
the computer screen; also ensure that the system
is connected to an AC outlet. To connect a USB key,
open the hatch on the left side of the iASSIST V2
Tablet (See gure 2.1) to connect it to one of the
two USB slots.
2. Click the “Gear” icon to open the System Utilities
menu and click the “Update Manager” icon.
Available operating system updates are installed
automatically and a reboot might be required to
complete the installation. The release reports for
available application updates are then displayed
for review.
4.3 Updating the System
System updates must be performed by sales
representatives.
4.3.1 Update via Internet Connection
1. Before starting the installation process, ensure
that the system has an active Internet connection,
and that the system is connected to an AC outlet.
Note: Public networks using captive portals to
enable Internet connection are not supported.
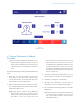
2. Click the “Gear” icon to open the System Utilities
menu and click the “Update Manager” icon.
4.3.2 Update via USB Key
If no Internet connection is available, contact customer
support to obtain a USB key containing the installation
les and an installation license key.
Figure 4.3
Updating the System