
User Manual

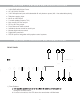
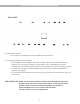

2) Volume Level Indicator:
a. This display will indicate the level of volume of the amplier.
b. Volume can be changed either using the Master Volume Knob (#9) or by using the IR
remote control
3) IR receiver:
a. Aim your IR remote control at this window to control the amplier.
b. Range of the IR remote can be extended by using an optional IR repeater.
4) Microphone Volume Control Knobs:
a. Turn the knob left to decrease the microphone volume relative to other inputs.
b. Turn the knob right to increase the microphone volume relative to other inputs.
5) Auxiliary Input Volume Control Knobs:
a. Turn the knob left to decrease the AUX input volume relative to other inputs.
b. Turn the knob right to increase the AUX input volume relative to other inputs.
6) Tone Controls:
a. Turning the Bass knob left or right will increase or decrease the bass of all inputs.
b. Turning the Treble knob left or right will increase or decrease the treble of all inputs.
7) Master Volume Knob:
a. Turn the knob to the left to decrease the volume of all inputs and sources.
b. Turn the knob to the right to increase the volume of all inputs and sources.
8) System Lock Indicator:
a. This amplier comes complete with a feature that will lock the functions of the front panel
so that only the IR remote can control the amplier.
b. This is useful for when the amplier is installed in a public area and unauthorized
personnel or customers might have access to the volume, source, etc.
9) Standby Power Button:
a. This button will enable the amplier to enter and exit standby mode.
b. When in standby mode, the LED light above the button will illuminate.
SECTION 2: CONTROLS AND CONNECTIONS
5