User Manual Digital Countertop Oven Manual de Instrucciones Horno Digital para Mostrador MODEL/MODELO TSSTTVDFL1 It’s what we’re made of. For over 100 years, the Oster® brand has been defining innovation, power and durability. Some say our line of uniquely designed and built appliances last forever. The Oster® Designed for Life Series is the next generation of innovative products that are professionally designed, timelessly styled and backed by legendary performance. Visit us at www.oster.com P.
IMPORTANT SAFEGUARDS When using electrical appliances, basic safety precautions should always be followed, including the following: READ AND SAVE THESE INSTRUCTIONS • READ ALL INSTRUCTIONS, PRODUCT LABELS AND WARNINGS BEFORE USING THE COUNTERTOP OVEN. • Do not touch hot surfaces. Always use oven mitts when handling hot materials and allow metal parts to cool before cleaning. Always use the oven handles when moving the unit.
• Do not store any materials, other than manufacturer’s recommended accessories, in this unit when not in use. • Do not place any flammable materials in oven, such as paper, cardboard, plastic or any materials that may catch fire or melt. • Do not cover the oven tray or rack with metal foil. This will cause overheating of the appliance. • Oversized foods or metal utensils must not be inserted in the appliance as they may create a fire or risk of electrical shock. • Do not clean with metal scouring pads.
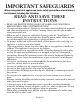
Product Diagram 12 1 2 3 4 5 11 6 7 8 9 10 1. LCD Display 2. Function Selector Knob – Select cooking function by turning knob to desired setting. 3. Start/Cancel Button – Press this button to turn the appliance off. 4. Turbo Convection Heat Button – Use to activate or cancel turbo convection heat. 5. Time Control Knob – Adjust the dial to the desired time 6. Temperature Control Knob – Adjust the dial thermostat to desired temperature. 7. Removable Wire Rack – See “Positioning Rack” section. 8.
a c b d e f LCD Display a. Functions Indicator – Toast, Bagel, Pizza, Bake, Broil, Cookies, Roast, Warm, Defrost, Reheat b. Function Indicator Arrow c. 1-7 color shade setting indicator d. Time Indicator e. Turbo Convection Heat Icon f. Temperature Indicator Preparing Your Toaster Oven If you are using your toaster oven for the first time, please: • Remove any stickers from the surface of the oven. • Open oven door and remove all printed documents and paper from inside the toaster oven.
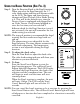
Using Your Toaster Oven (See Fig. 1) Plug the unit in. The unit will emit two long “beeps” and the LCD screen will illuminate. The function option will appear with an indicator on the preset TOAST function. The LCD and the Start/Cancel button light will be illuminated for 30 seconds and then go out if no other buttons or knobs are pressed or moved. PLEASE NOTE: once the blue LCD display goes out – you can press or move any button or knob to “wake up” the display and operate as normal. Step 1.
Using the Toast Function (See Fig. 2) Step 1. Turn the Function Knob to the Toast function. When you select the Toast function, the 1-7 color shade setting indicator will become visible on the LCD. Both upper and lower heating elements will heat. Default Color Shade Setting is 4. This will be the default every time the Toaster Oven is unplugged and plugged back in.
Using the Bagel Function (See Fig. 3) Step 1. Turn the Function Knob to the Bagel function. When you select the Bagel function, the 1-7 color shade setting indicator will become visible on the LCD. The upper and lower heating elements will heat. Default Color Shade Setting is 4. This will be the default every time the Toaster Oven is unplugged and plugged back on.
Using the Pizza/ Turbo Convection Heat Function (See Fig. 4) Step 1. Turn the Function Knob to the Pizza function. When you select the Pizza function, the Turbo Convection Heat will automatically activate. Step 2. If you wish to switch to the regular Pizza function, press the Turbo button once to turn off the Turbo Convection Heat default selection. The blue light of the Turbo Convection Heat button will turn off.
When the Pizza function cycle is complete, the unit will emit 3 beeps. The LCD and the Start/Cancel Button Light will turn off after 30 seconds. NOTE: You can cancel the cooking cycle at any time by pressing the Start/Cancel Button once. The red Start/Cancel Button light will turn off whenever a function has been completed or a function is manually cancelled. Using the Bake/ Turbo Convection Heat Function (See Fig. 5) Step 1. Turn the Function Knob to the Bake function.
Step 4. To set the time: Turn the Time Knob if you wish to increase or decrease the cooking time. The maximum time setting for Bake is 60 minutes (1 hour). Once you have selected the desired cooking time, press the Start button to initiate the cooking process. Step 5. To Start: Press the Start/Cancel Button to start the cooking process. The red Start/Cancel Button light will illuminate. The LCD Display will show the Bake Function, the countdown time and the selected temperature.
Using the Broil Function (See Fig. 6) Step 1. Turn the Function Knob to the Broil function. When you select the Broil function, the upper heating elements will heat. Default Temperature: 450ºF. Default Time: 10 minutes. Step 2. To set the temperature: Turn the Temperature Knob if you wish to increase or decrease the temperature setting. For the Broil Function, the temperature can be set from 400 to 450ºF in 25-degree increments. Step 3.
Using the Cookies/Turbo Convection Heat Function (See Fig. 7) Step 1. Turn the Function Knob to the Cookies function. When you select the Cookies function, the Turbo Convection Heat will automatically activate. Step 2. If you wish to use the regular Cookies function, press Turbo button once to turn off the Turbo Convection Heat. The blue light of the Turbo Convection Heat button will turn off.
Step 5. To Start: Press the Start/Cancel Button to start the cooking process. The red Start/Cancel Button light will illuminate. The LCD Display will show the Cookies Function, the countdown time and the selected temperature. The unit will begin to work and the timer will start counting down. When the Cookies function cycle is complete, the unit will emit 3 beeps. The LCD and the Start/Cancel Button Light will turn off after 30 seconds.
Step 3. To set the temperature: Turn the Temperature Knob if you wish to increase or decrease the temperature setting. For the Roast Function, the temperature can be set from 150 to 450ºF in 5-degree increments. Step 4. To set the time: Turn the Time Knob if you wish to increase or decrease the cooking time. The maximum time setting for Roast is 60 minutes (1 hour). Once you have selected the desired cooking time, press the Start button to initiate the cooking process. Step 5.
Using the Warm Function (See Fig. 9) Step 1. Turn the Function Knob to the Warm function. When you select the Warm function, the lower heating element will heat. Default Temperature: 150ºF. Default Time: 60 minutes. You may manually activate the Turbo Convection Heat by pressing the Turbo button once to turn it on. The blue light of the Turbo button will turn on. Step 2. To set the temperature: Turn the Temperature Knob if you wish to increase or decrease the temperature setting.
Using the Defrost Function (See Fig. 10) Step 1. Turn the Function Knob to the Defrost function. Default Temperature: 450ºF. Default Time: 16 minutes. You may manually activate the Turbo Convection Heat by pressing the Turbo button once to turn it on. The blue light of the Turbo button will turn on. Step 2. To set the temperature: Turn the Temperature Knob if you wish to increase or decrease the temperature setting.
Using the Reheat Function (See Fig. 11) Step 1. Turn the Function Knob to the Reheat function. Default Temperature: 325ºF. Default Time: 15 minutes. You may manually activate the Turbo Convection Heat by pressing the Turbo button once to turn it on. The blue light of the Turbo button will turn on. Step 2. To set the temperature: Turn the Temperature Knob if you wish to increase or decrease the temperature setting. For the Reheat function, the temperature can be set from 150 to 450ºF in 5-degree increments.
Positioning Pan • To accommodate a wide variety of foods the oven has two rack positions. The rack can be inserted in the oven in the upper or lower rack guides. The rack will fit into either of the rack guides inside of the Countertop Oven. (See Figure Below) • Before removing the rack allow the unit to cool. • To remove the rack, open the oven door and pull the rack towards the front of the oven. The rack will slide on the rack guides on the inside of the oven.
Cleaning Your Countertop Oven DO NOT IMMERSE IN LIQUIDS. Step 1. Press the Start/Cancel Button OFF and remove plug from electrical outlet. Allow to cool. Step 2. Wipe unit down with damp cloth. DO NOT IMMERSE IN WATER. Make sure to only use mild, soapy water. Abrasive cleaners, scrubbing brushes and chemical cleaners will damage the coating on this unit. Step 3. Remove crumb tray by pulling out of Countertop Oven. Step 4. Shake off crumbs from crumb tray.
5 Year Satisfaction Guarantee Sunbeam Products, Inc. doing business as Jarden Consumer Solutions or if in Canada, Sunbeam Corporation (Canada) Limited doing business as Jarden Consumer Solutions (collectively “JCS”) warrants that for a period of five years from the date of purchase, this product will be free from defects in material and workmanship. JCS, at its option, will repair or replace this product or any component of the product found to be defective during the guarantee period.
Some provinces, states or jurisdictions do not allow the exclusion or limitation of incidental or consequential damages or limitations on how long an implied guarantee lasts, so the above limitations or exclusion may not apply to you. This guarantee gives you specific legal rights, and you may also have other rights that vary from province to province, state to state or jurisdiction to jurisdiction. How to Obtain Satisfaction Guarantee Service In the U.S.A.
PRECAUCIONES IMPORTANTES Cuando se utilicen artefactos eléctricos deben seguirse siempre las precauciones básicas de seguridad incluyendo las siguientes: LEA Y GUARDE ESTAS INSTRUCCIONES • LEA TODAS LAS INSTRUCCIONES, ETIQUETAS DEL PRODUCTO • • • • • • • • • • • • Y ADVERTENCIAS ANTES DE UTILIZAR EL HORNO PARA MOSTRADOR. No toque las superficies calientes. Utilice siempre guantes para hornos cuando manipule materiales calientes y deje que las piezas metálicas se enfríen antes de limpiarlas.
• Al utilizar el horno de mesa, colóquelo a una distancia mínima de 15 cm (6 pulgadas) de la pared o de otros cables. • No almacene dentro de la unidad ningún material, distinto a los accesorios recomendados por el fabricante, cuando no esté en uso. • No introduzca materiales inflamables en el horno, tales como papel, cartón, plástico, o cualquier otro material que pueda incendiarse o derretirse. • No forre la bandeja o la parrilla del horno con papel de aluminio.
Diagrama del Producto 12 1 2 3 4 5 11 6 7 8 9 10 1. Pantalla LCD 2. Perilla selectora de función: seleccione la función de cocción girando la perilla al ajuste deseado. 3. Botón para iniciar/cancelar: Presione este botón para apagar el producto. 4. Botón de calentamiento por convección turbo: Úselo para activar o cancelar el calentamiento por convección turbo. 5. Perilla de control de tiempo: Ajuste la rueda a la temperatura deseada. 6.
a c b d e f 11. Paredes interiores fáciles de limpiar: Permiten la limpieza rápida. Pantalla de LCD a. Indicador de función: Tostar, Bagel, Pizza, Hornear, Dorar, Galletas, Asado, Calentar, Descongelar, Recalentar b. Flecha indicadora de función c. Indicador de temperatura d. Indicador de tiempo e. Icono de calentamiento por convección turbo f.
Uso Del Horno Tostador (Fig. 1) Enchufe la unidad; ésta emitirá dos pitidos largos y la pantalla LCD se iluminará. La opción de función aparecerá con un indicador en la función predeterminada de TOSTAR. La pantalla LCD y el botón de inicio/cancelar permanecerán iluminados durante 30 segundos y posteriormente se apagarán si no se oprimen botones o se mueven perillas.
Uso De La Función De Tostar (Fig. 2) Paso 1. Gire la perilla de función a Tostar. Cuando seleccione la función de Tostar, el ajuste de intensidad de tostado del 1 al 7 aparecerá en la pantalla LCD. Tanto el elemento térmico superior como el inferior se calentarán. El ajuste de intensidad de tostado predeterminado es 4. Cada vez que se desenchufe y vuelva a enchufarse el horno tostador, el ajuste predeterminado será 4.
Uso De La Función De Bagel (Rosquilla De Pan) (Fig. 3) Paso 1. Gire la perilla de función a Bagel. Cuando seleccione la función de Bagel, el ajuste de intensidad de tostado del 1 al 7 aparecerá en la pantalla LCD. Los elementos térmicos superior e inferior se calentarán. El ajuste de intensidad de tostado predeterminado es 4. Cada vez que se desenchufe y vuelva a enchufarse el horno tostador, el ajuste predeterminado será 4.
Uso De La Función De Pizza/ Calentamiento Por Convección Turbo (Fig. 4) Paso 1. Gire la perilla de función a Pizza. Al seleccionar la función de Pizza, el calentamiento por convección turbo se activará automáticamente. Paso 2. Si desea cambiar a la función normal de Pizza, oprima el botón Turbo una vez para apagar la selección predeterminada de calentamiento por convección turbo. La luz azul del botón de calentamiento por convección turbo se apagará.
Uso De La Función De Hornear/ Calentamiento Por Convección Turbo (Fig. 5) Paso 1. Gire la perilla de función a Hornear. Al seleccionar la función de Hornear, el calentamiento por convección turbo se activará automáticamente. Paso 2. Si desea cambiar a la función normal de Hornear, oprima el botón Turbo una vez para apagar la función de calentamiento por convección turbo. La luz azul del botón de calentamiento por convección turbo se apagará.
Cuando termine el ciclo de Hornear, la unidad emitirá tres pitidos. La pantalla LCD y el botón de iniciar/cancelar se apagarán después de 30 segundos. NOTA: Puede cancelar el ciclo de cocción en cualquier momento oprimiendo una vez el botón de iniciar/cancelar. La luz roja del botón para iniciar/cancelar se apagará cada vez que una función haya sido completada o si la función es manualmente cancelada. Uso De La Función De Dorar (Fig. 6) Paso 1. Gire la perilla de función a Dorar.
NOTA: Puede cancelar el ciclo de dorado en cualquier momento oprimiendo una vez el botón de iniciar/cancelar. La luz roja del botón para iniciar/cancelar se apagará cada vez que una función haya sido completada o si la función es manualmente cancelada. Uso De La Función De Galletas/ Calentamiento Por Convección Turbo (Fig. 7) Paso 1. Gire la perilla de función a Galletas. Al seleccionar la función de Galletas, el calentamiento por convección turbo se activará automáticamente. Paso 2.
Paso 5. Para comenzar: Oprima el botón de iniciar/cancelar para comenzar el proceso de cocción. La luz roja del botón de iniciar/cancelar se iluminará. La pantalla LCD mostrará la función de Galletas, el tiempo del cronómetro de cuenta regresiva y la temperatura seleccionada. La unidad comenzará a funcionar y el temporizador empezará la cuenta regresiva. Cuando termine el ciclo de la función de Galletas, la unidad emitirá tres pitidos.
Uso De La Función De Asar/ Convección Turbo (Fig. 8) Paso 1. Gire la perilla de función a Asar. Al seleccionar la función de Asar, el calentamiento por convección turbo se activará automáticamente. Paso 2. Si desea cambiar a la función normal de Asar, oprima el botón Turbo una vez (Paso 2) para apagar la función de calentamiento por convección turbo. La luz azul del botón de calentamiento por convección turbo se apagará.
Uso De La Función De Calentar (Fig. 9) Paso 1. Gire la perilla de función a Calentar. Cuando seleccione la función de Calentar, el elemento térmico inferior se calentará. Temperatura predeterminada: 150 grados F. Tiempo predeterminado: 60 minutes. Puede activar manualmente la función de calentamiento por convección turbo oprimiendo una vez el botón Turbo para encenderla. La luz azul del botón Turbo se encenderá. Paso 2.
Uso De La Función De Descongelar (Fig. 10) Paso 1. Gire la perilla de función a Descongelar. Temperatura predeterminada: 450 grados F. Tiempo predeterminado 16 minutos. Puede activar manualmente la función de calentamiento por convección turbo oprimiendo una vez el botón Turbo para encenderla. La luz azul del botón Turbo se encenderá. Paso 2. Para fijar la temperatura: Gire la perilla de temperatura si desea aumentar o disminuir la graduación de temperatura.
Uso De La Función De Recalentar (Fig. 11) Paso 1. Gire la perilla de función a Recalentar. . Temperatura predeterminada: 325 grados F. Tiempo predeterminado: 15 minutos. Puede activar manualmente la función de calentamiento por convección turbo oprimiendo una vez el botón Turbo para encenderla. La luz azul del botón Turbo se encenderá Paso 2. Para fijar la temperatura: Gire la perilla de temperatura si desea aumentar o disminuir la graduación de temperatura.
Posicionamiento De La Rejilla • El horno posee dos posiciones para colocar la rejilla lo que le permite adaptarse a una amplia variedad de alimentos. La rejilla puede introducirse en el horno en las guías superiores o en las inferiores. La rejilla encajará en cualquiera de las guías que se encuentran en el interior del horno para mostrador. (Ver la figura abajo) • Deje que la unidad se enfríe antes de sacar la rejilla. • Para sacarla, abra la puerta del horno y hale la rejilla hacia adelante.
Limpieza Del Horno Para Mostrador NO SUMERJA EN LÍQUIDOS. Paso 1. Oprima el botón de iniciar/cancelar para apagarlo y saque el enchufe del tomacorriente. Deje que se enfríe. Paso 2. Limpie la unidad con un paño húmedo. NO SUMERJA EN AGUA. Asegúrese de usar únicamente agua y un jabón suave. Los limpiadores abrasivos, cepillos para frotar y limpiadores químicos dañarán el recubrimiento de la unidad. Paso 3. Saque la bandeja recolectora del horno para mostrador. Paso 4.
5 años de Garantía Satisfactoria Sunbeam Products, Inc. operando bajo el nombre de Jarden Consumer Solutions, o en Canadá, Sunbeam Corporation (Canada) Limited operando bajo el nombre de Jarden Consumer Solutions, (en forma conjunta, “JCS”), garantiza que por un período de cinco años a partir de la fecha de compra, este producto estará libre de defectos de materiales y mano de obra.
JCS no será responsable de ningún tipo de daño que resulte de la compra, uso o mal uso del producto, o por la imposibilidad de usar el producto, incluidos los daños incidentales, especiales, emergentes o similares, o la pérdida de ganancias, ni de ningún incumplimiento contractual, sea de una obligación esencial o de otra naturaleza, ni de ningún reclamo iniciado contra el comprador por un tercero.
For product questions contact: Jarden Consumer Service USA: 1.800.334.0759 Canada: 1.800.667.8623 www.oster.com © 2011 Sunbeam Products, Inc. doing business as Jarden Consumer Solutions. All rights reserved. Distributed by Sunbeam Products, Inc. doing business as Jarden Consumer Solutions, Boca Raton, Florida 33431. Jarden Consumer Solutions is a subsidiary of Jarden Coporation (NYSE : JAH) Para preguntas sobre los productos llame: Jarden Consumer Service EE.UU.: 1.800.334.0759 Canadá: 1.800.667.8623 www.