
User Manual


Page 4
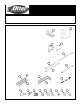
8. Attach Front main frame assembly (Assembled in Step 7) onto frame brackets (Item 3 and 4). Secure with 1/4
nylon hex lock nut (Item 20). Ref. Diagram 6.
4
3
3
Front Main Frame Assembly
Diagram 6
20
7. Assemble Front Main Frame Bar: Insert the outer main frame bar (Item 12) into the middle main frame bar
(Item 14). Fasten with self-tapping screw (Item 16), plastic protector (Item 22) and star washer (Item 23). Slide
the sleeve (Item 15) over the main frame extension bar (Item 10). (Line up holes with button lock, press lock
in as you slide over the bar). Insert the black plug (Item 17) into the main frame extension bar (Item 10). Insert
outer main frame bar (Item 12) into sleeve (Item 15). Cover end of main frame extension bar (Item 10) with black
end cap (Item 18). Ref. Diagram 5.
Diagram 5
17
12
15
Button lock
should face
inward
10
18
12
10
14
22
23
22
23
16
22
23
16
Important: Do
not overtighten to
prevent stripping
of threads.
16
Note: Use a light oil
such as WD-40 to
lubricate the poles to help
them slide easier. Wipe
off any excess. Silicone
may be substituted but is
not as effective.