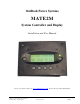
OutBack Power Systems MATE2M System Controller and Display Installation and User Manual Please check our website at www.outbackpower.com for the latest product information Copyright 2003 © OutBack Power Systems, Inc. 19009 62nd Ave NE, Arlington WA 98223 USA Tel 360 435 6030 Fax 360 435 6019 User Manual Rev 1.
MATE2M System Controller and Display Page 2 User Manual Rev 1.00 03/31/04 Copyright 2003 © OutBack Power Systems, Inc.
1.0 INTRODUCTION__________________________________4 1.1 FEATURES ________________________________4 1.2 INSTALLATION _____________________________5 2.0 BASIC OPERATION _______________________________5 2.1 POWER UP ________________________________5 2.2 NAVIGATION ______________________________6 2.2.1 Menu Structure _______________________6 2.2.2 MATE2M Buttons ____________________6 2.2.3 ‘SOFT’ Keys ________________________7 2.2.4 The ‘INV’ Hot Key ___________________8 2.2.
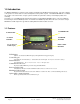
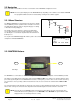
1.0 Introduction The OutBack MATE2M is a complete system controller and display for the OutBack FX inverter/charger. It provides a display of the operation as well as allows for control and adjustment of the product setpoints. The OutBack MATE2M also coordinates the operation of the entire inverter / charger system to maximize the performance and to prevent multiple products from conflicting.
1.2 Installation The OutBack MATE2M is designed for recessed panel or wall mounting in an indoor location. Keep the MATE2M out of direct sunlight to make the display easier to view. The cabling from the MATE2M to the FX inverter/charger or HUB is standard CAT5 type computer cable. Standard Ethernet CAT5 cable, can be found at any home improvement or computer store. Consult your local inspector for specific installation requirements.
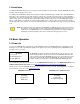
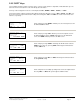
2.2 Navigation This section of the manual will cover how to use the buttons on the MATE2M to navigate the menus. NOTE: The menu system displayed on the MATE2M will vary depending on the software version that the MATE2M was programmed with at the time of manufacturing or during its last software upgrade. 2.2.1 Menu Structure MAIN MENU STATUS MX The OutBack MATE2M uses a branching menu structure to display various OutBack products operation modes and status.
2.2.3 ‘SOFT’ Keys The four buttons under the LCD are referred to as the ‘soft’ keys. Their operation is dependent on what their label says. The label is the word on the bottom line of the LCD directly above the button. Soft keys used to navigate the menus are commonly labeled , , , , or .
2.2.4 The ‘INV’ Hot Key The OutBack MATE2M includes an INV “hot” key to allow direct control of the inverter from anywhere in the menu system. The INV key is located on the right side of the MATE2M LCD display. Pressing the INV key will take you to the INVERTER CONTROL menu section as shown below. A green LED indicator is located above the INV key which flashes when the inverter is either in the search or power save modes, and is on continuously when full AC output voltage is available from the inverter.
Pressing the at the AC INPUT CONTROLS screen brings up the GEN START CONTROL screen. This screen allows the user to change the Advanced Generator Start (AGS) mode. Modes can only be changed when Advanced Generator Start is enabled (See section 5.0 Advanced Generator Start for more information). When an OutBack HUB is employed, the GEN START CONTROL only effects the FX that has been programmed as the AGS PORT in the AGS menu.
2.3 Common Screens 2.3.1 The Main Screen AC POWER SYSTEM MENU SUM- STATUS SET DIS MARY METERS UP PLAY After the power-up screens is the Main screen. It is the root, or home screen to the entire menu structure. If you get lost exploring the MATE2M’s many screens, press the two left soft keys simultaneously to return to the Main Screen from anywhere in the menu system. Additionally, most menu branches end with a soft key labeled ; pressing this button will return you to the Main screen. 2.3.
2.3.3 Status Screens AC POWER SYSTEM MENU The Status menu that can be accessed by pressing on the Main screen contains all the meters and mode displays for OutBack products that are connected to the MATE2M. SUM- STATUS SET DISMARY METERS UP PLAY (See section 6.0 Menu Map for locations of all of the status screens available.) Consult your specific OutBack product owner manual for an explanation of all the operating modes and meters.
2.5 Display Menu The Display menu contains settings concerning the MATE2M. In the Display menu, the user can adjust the LCD display backlight options, set time and date, and adjust communications setpoints. AC POWER SYSTEM MENU From the Main screen press to enter the Display menu SUM- STATUS SET DISMARY METERS UP PLAY The Setup Display screen displays the MATE2M code revision; in the example to the right it is 3.30.
2.5.3 Communications Options deals with MATE2M communication options. Pressing brings up several options that can be changed. SETUP/MATE/COMM------Choose category: forces the MATE2M to ‘rediscover’ all the OutBack devices it is connected to. This is used any time an OutBack devices is moved or added to a HUB. REPOLL PC DEBUG OK will enable or disable the RS232 communications port of the MATE2M.
3.0 Advanced Menu The Advanced menu system is where most of the initial system settings are programmed. Because changing these settings could adversely effect how the system operates, the user must input a password to enter the advanced menus. The settings under the Advanced menu should only be changed by someone that has read and understands the specific products users manual. NOTE: Not all Advanced menu screens are applicable to every model FX.
4.0 Using the MATE2M with a HUB A HUB-4 or HUB-10 can be used to connect multiple OutBack products to the MATE2M. A HUB-10 communication manager allows a single MATE2M to control and monitor a maximum of ten OutBack products, while a HUB-4 is limited to four OutBack products. A HUB has 4 to 10 ports labeled 1-10 for various OutBack products to be plugged into.
5.0 MATE2M Advanced Generator Start Mode The settings for all of the MATE2M Advanced Generator Start are under the ADVANCED menu. The Advanced menu is hidden and can only be accessed from the Setup menu. From the Main menu press . When the SETUP INV / CHGR MENU screen appears, press the middle two buttons simultaneously (The middle two buttons are labeled and respectively) At the resulting warning screen, press any of the four soft keys to continue on to the password screen.
5.1.1 AGS Setup The AGS Setup menu contains the following general settings that define how the rest of the AGS routines will work: AGS Port: MATE/AGS/SETUP----------Ags port: 0 The MATE2M can use any AUX output of an FX that is connected to it either directly or via an OutBack HUB-4 or HUB-10. If a HUB is used, the MATE2M must be told what Port that the desired FX resides on. If no HUB is used and the MATE2M is directly plugged into an FX, then the AGS Port needs to be set to 0 (zero).
5.1.2 Quiet Time Quiet Time is a time period during which the MATE2M will not allow most AGS settings to start the generator. This is usually set-up as night time when a running generator would be an annoyance. Quiet Times can be set individually for weekday and weekend, and consist of a Quiet Time Start and a Quiet Time Stop. WEEKDAY START: Weekday Quiet Time start is the beginning of the quiet time period for Mon Fri, most AGS start conditions will be stopped at this time.
5.1.4 Load Start Load Start will start a generator whenever the total system AC Load exceeds the setpoint for the programmed amount of time. The generator will then be stopped when the AC load has dropped below a Load Stop setpoint for a programmed amount of time. Load Start KW: An AGS genstart will be issued when the total AC load of all the FXs connected to the MATE2M exceeds this setting for the amount of time set with Load Start Delay. A zero disables any load start function.
5.1.6 Exercise An Exercise time can be set by choosing a day of the week (Sun – Sat), a start time of day (12AM – 11:59PM), and a exercise period (1 – 240 minutes). On the first occurrence of the chosen day of the week each month, at the programmed start time, the generator will start and run for the programmed period. EXERCISE START DAY (exstartday): This is the day of the week that the generator will start on.
6.0 Menu Map Inverter LED Indicator (green) AC Input LED Indicator (yellow) Dedicated Inverter Control “HOT” Key Dedicated Inverter Control “HOT” Key Variable “Soft” Keys each one of the soft keys corresponds to a word on the bottom line of the LCD display The menu system displayed on the MATE will vary depending on the software version that the MATE was programmed with at the time of manufacturing or during its last software upgrade.
CONTROL KEYS STATUS MENU METERS Inv Hot Key INV INVERTER CONTROL currently: ON OFF SRCH ON AC INPUT CONTROL GEN AC AC START INPUT AMPS OK GEN START CONTROL currently: MAN-OFF ON OK AC INPUT SOURCE currently: Cord GEN CORD OK AC CORD AMPS-----P00 Currently: 30.0 amps MORE LESS MAIN---------------6:54:42P SUM- STATUS SET DIS MARY METERS UP PLAY ↓ STATUS/FX/PAGE1----choose category: METER BATT ERROR PG2 ↓ INVERT P00 inv 0.0kw chg 0.0kw buy 0.
ERRORS WARNINGS WARNINGS cont MAIN---------------6:54:42P SUM- STATUS SET DIS MARY METERS UP PLAY ↓ STATUS/FX/PAGE1----choose category: MAIN---------------6:54:42P SUM- STATUS SET DIS MARY METERS UP PLAY ↓ STATUS/FX/PAGE1----choose category: STATUS/FX/WARN---P00 Cap temp 204 METER BATT ERROR PG2 ↓ STATUS/FX/ERROR—-P00 low ac output NO voltage DOWN STATUS PORT ↓ STATUS/FX/ERROR—-P00 stacking NO error detected DOWN UP TOP PORT ↓ STATUS/FX/ERROR—-P00 inverter NO overtemp DOWN UP TOP PORT ↓ STATUS/FX/ERRO
STATUS MENU DESCONNECT REASONS MAIN---------------6:54:42P SUM- STATUS SET DIS MARY METERS UP PLAY ↓ STATUS/FX/PAGE1----choose category: METER BATT ERROR PG2 ↓ STATUS/FX/PAGE2----choose category: PG1 WARN DISCON OK ↓ STATUS/FX/DISCON-P00 ac in freq NO to high DOWN STATUS PORT ↓ STATUS/FX/DISCON-P00 ac in freq NO to low DOWN STATUS PORT ↓ STATUS/FX/DISCON-P00 ac in voltage NO > max DOWN UP TOP PORT ↓ STATUS/FX/DISCON-P00 ac in voltage NO < min UP TOP PORT ↓ STATUS/FX/ERROR—---end of error menu UP TOP STATUS
SETUP MENU SEARCH AC IN LIMIT EQ MAIN---------------6:54:42P SUM- STATUS SET DIS MARY METERS UP PLAY ↓ SETUP INV/CHGR MENU choose category: AC IN SEARCH LBCO LIMT PG2 ↓ SETUP INV/CHGR---P01 Search 6 sensitivity INC DEC PORT OK MAIN---------------6:54:42P SUM- STATUS SET DIS MARY METERS UP PLAY ↓ SETUP INV/CHGR MENU choose category: AC IN SEARCH LBCO LIMT PG2 ↓ SETUP AC IN LIMITS Select category: MAIN---------------6:54:42P SUM- STATUS SET DIS MARY METERS UP PLAY ↓ SETUP INV/CHGR MENU choose category: A
DISPLAY MENU DATE / TIME BACKLIGHT MAIN---------------6:54:42P SUM- STATUS SET DIS MARY METERS UP PLAY ↓ SETUP DISPLAY------MATE CODE REV: 330 CHOOSE CATEGORY: BLITE TIME COMM OK ↓ SETUP BLITE--------Backlight controls LEVEL MODE TIME MAIN---------------6:54:42P SUM- STATUS SET DIS MARY METERS UP PLAY ↓ SETUP DISPLAY------MATE CODE REV: 330 CHOOSE CATEGORY: BLITE TIME COMM OK ↓ SETUP/MATE/CLOCK---Tu 12/10/02 4:00:22P DATE TIME OK OK COMM SET MAIN---------------6:54:42P SUM- STATUS SET DIS MARY METERS U
ADVANCED MENU--FX INVERTER INVERTER cont MAIN---------------6:54:42P SUM- STATUS SET DIS MARY METERS UP PLAY ↓ SETUP INV/CHGR MENU choose category: AC IN SEARCH LBCO LIMT PG2 ↓ ↓ ADV/SETTINGS/WARNING changes made could adversely effect system performance ↓ ↓ ↓ ↓ ADV/PASSWORD-------enter the password: 132 ENTER INC DEC EXIT ↓ ADV----------------choose product: FX MX MATE MAIN ↓ ADV/FX/PAGE1-------choose category: ADV INV CHGR PG2 ↓ ADV/FX/INVERTER—-P00 search 6 sensitivity DOWN INC DEC PORT ↓ ADV/FX/INVER
ADVANCED MENU—FX CORD GEN MAIN---------------6:54:42P SUM- STATUS SET DIS MARY METERS UP PLAY ↓ SETUP INV/CHGR MENU choose category: AC IN SEARCH LBCO LIMT PG2 ↓ ↓ ADV/SETTINGS/WARNING changes made could adversely effect system performance ↓ ↓ ↓ ↓ ADV/PASSWORD-------enter the password: 132 ENTER INC DEC EXIT ↓ ADV----------------choose product: MAIN---------------6:54:42P SUM- STATUS SET DIS MARY METERS UP PLAY ↓ SETUP INV/CHGR MENU choose category: AC IN SEARCH LBCO LIMT PG2 ↓ ↓ ADV/SETTINGS/WARNING cha
AUX OUTPUT cont ADV/FX/AUX-------P00 aux output OFF control DOWN INC DEC PORT ↓ ADV/FX/AUX-------P00 aux output AUTO control DOWN INC DEC PORT ↓ ADV/FX/AUX-------P00 aux output ON control DOWN INC DEC PORT ↓ ADV/FX/AUX-------P00 aux output Remote function DOWN INC DEC PORT ↓ ADV/FX/AUX-------P00 aux output Loadshed function DOWN INC DEC PORT ↓ ADV/FX/AUX-------P00 aux output GenAlert function DOWN INC DEC PORT ↓ ADV/FX/AUX-------P00 aux output Fault function DOWN INC DEC PORT ↓ ADV/FX/AUX-------P00 aux outp
ADVANCED MENU--FX CAL MAIN---------------6:54:42P SUM- STATUS SET DIS MARY METERS UP PLAY ↓ SETUP INV/CHGR MENU choose category: AC IN SEARCH LBCO LIMT PG2 ↓ ↓ ADV/SETTINGS/WARNING changes made could adversely effect system performance ↓ ↓ ↓ ↓ ADV/PASSWORD-------enter the password: 132 ENTER INC DEC EXIT ↓ ADV----------------choose product: FX MX MATE MAIN ↓ADV/FX/PAGE1------choose category: ADV INV CHGR PG2 ↓ ADV/FX/PAGE2-------choose category: PG1 GRID GEN PG3 ↓ ADV/FX/PAGE3-------choose category: P
ADVANCED MENU--MX AUX MAIN---------------6:54:42P SUM- STATUS SET DIS MARY METERS UP PLAY ↓ SETUP INV/CHGR MENU choose category: AC IN SEARCH LBCO LIMT PG2 ↓ ↓ ADV/SETTINGS/WARNING changes made could adversely effect system performance ↓ ↓ ↓ ↓ ADV/PASSWORD-------enter the password: 132 ENTER INC DEC EXIT ↓ ADV----------------choose product: FX MX MATE MAIN ↓ ADV/MX---------------choose category: MAIN MENU SHORTCUT Pressing the left two keys on the MATE at the same time from anywhere in the menu system tak
ADVANCED MENU--MATE QUIET TIME AGS SETUP VOLTAGE START MAIN---------------6:54:42P SUM- STATUS SET DIS MARY METERS UP PLAY ↓ SETUP INV/CHGR MENU choose category: AC IN SEARCH LBCO LIMT PG2 ↓ ↓ ADV/SETTINGS/WARNING changes made could adversely effect system performance ↓ ↓ ↓ ↓ ADV/PASSWORD-------enter the password: 132 ENTER INC DEC EXIT ↓ ADV----------------choose product: MAIN---------------6:54:42P SUM- STATUS SET DIS MARY METERS UP PLAY ↓ SETUP INV/CHGR MENU choose category: AC IN SEARCH LBCO LIMT PG
LOAD START MUST RUN MAIN---------------6:54:42P SUM- STATUS SET DIS MARY METERS UP PLAY ↓ SETUP INV/CHGR MENU choose category: AC IN SEARCH LBCO LIMT PG2 ↓ ↓ ADV/SETTINGS/WARNING changes made could adversely effect system performance ↓ ↓ ↓ ↓ ADV/PASSWORD-------enter the password: 132 ENTER INC DEC EXIT ↓ ADV----------------choose product: MAIN---------------6:54:42P SUM- STATUS SET DIS MARY METERS UP PLAY ↓ SETUP INV/CHGR MENU choose category: AC IN SEARCH LBCO LIMT PG2 ↓ ↓ ADV/SETTINGS/WARNING changes m
MAIN---------------6:54:42P SUM- STATUS SET DIS MARY METERS UP PLAY ↓ SETUP INV/CHGR MENU choose category: AC IN SEARCH LBCO LIMT PG2 ↓ ↓ ADV/SETTINGS/WARNING changes made could adversely effect system performance ↓ ↓ ↓ ↓ ADV/PASSWORD-------enter the password: 132 ENTER INC DEC EXIT ↓ ADV----------------choose product: FX MX MATE MAIN ↓ ADV/MATE-----------Choose category: AGS TIMERS cont.
7.0 Menu Map Overview Copyright 2003 © OutBack Power Systems, Inc. 19009 62nd Ave NE, Arlington WA 98223 USA Tel 360 435 6030 Fax 360 435 6019 User Manual Rev 1.
MATE2M System Controller and Display Page 36 User Manual Rev 1.00 03/31/04 Copyright 2003 © OutBack Power Systems, Inc.
8.0 Troubleshooting MATE2M does not power-up The OutBack MATE2M is powered by the OutBack product that it is connected to. Make sure that all OutBack Products are powered-up and operating correctly before connecting the MATE2M. Check or replace the CAT5 cables running from the MATE2M to the OutBack product. MATE2M does not find a Device Make sure that all OutBack Products are powered-up and operating correctly before connecting the MATE2M.
OutBack Power Systems Two Year Limited Warranty OutBack Power Systems Inc. warrants that the products it manufacturers will be free from defects in materials and workmanship for a period of two (2) years subject to the conditions set forth below. The limited warranty is extended to the original user and is transferable. The limited warranty term begins on the date of invoice to the original user of the product.
REGISTER YOUR PRODUCTS! Your purchase of an OutBack Power Systems product is an important investment. Registering your products will help us maintain the standard of excellence you expect from us in terms of performance, quality and reliability. Please take a moment to register and provide us with some important information.