
OutBack Power Programming Guide


Page 44
900-0125-12-01 Rev A
©2017 OutBack Power Technologies. All Rights Reserved.
Page 45
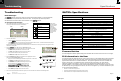
Device Data Logs (D)
Users can create Device Data Logs for the FLEXmax (FM) Charge Controller and the FLEXnet (FN) DC
Battery Monitor. The data logs can then be uploaded and saved to an SD card, or erased. Data logs can be
converted to spreadsheets and graphs. They can be used to evaluate performance and trends.
o Saving Data Logs for the FLEXmax Charge Controller (D-1)
o Saving Data Logs for the FLEXnet DC Battery Monitor (D-2)
o Erasing Data Logs (D-3)
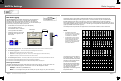
D-1. Saving Data Logs for the
FLEXmax Charge Controller
To create a data log for the FLEXmax Charge Controller:
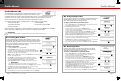
1. From the DEVICE DATA LOGS menu, select FLEXmax Charge Controller.
2. From the FM Charge Controller Data Log menu, select Upload and Save Data Log.
3. If other data logs have been saved on the SD card, a list will be displayed.
To save over a current log, choose option A. To save the log as new, choose B.
A. Select a name on the list with the control wheel. Press <Save> to save the
new data over the selected data log. Saving to SD Card will be displayed.
Proceed to C.
NOTE: If the SD card is empty, pressing the <Save> soft key will
automatically default to Option B.
OR
B. Press <New> to create a unique name for the new data log.
(8 characters maximum)
Use the control wheel to scroll through the available characters.
Use <> or <> to move to the desired character location.
Use <Delete> to erase characters when highlighted.
Press <Save> to save the new data log name. Saving to SD Card will
be displayed.
In either case:
C. Wait for the confirmation screen to appear. After the screen appears, press
<Continue> to return to Upload and Save Data Log.
B
A
C
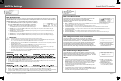
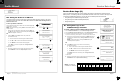
Date AH
0
38
kWh
Max
Amps
0 38
0.9 36
Max
Watts
52
48
32 0.8 1 hour 1 hour
FLEXmax Data Log
6/13/15
6/12/15
6/11/15
Absorb
Time
0:00
0:00
0:00
Float
Time
0:00
0:00
0:00
Min
Battery V
24.1
24.1
24.1
Max
Battery V
29.1
29.0
28.7
Max
Voc
122
122
120
NOTE: This header line
is included in the download.
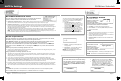
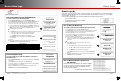
To save a profile to an SD card:
If other profiles have been saved on the SD card, a list will be displayed (L).
Choose Option 1 or 2 below.
NOTE: If the SD card is empty, pressing <Save> will automatically default
to Option 2 below.
1. Select a name on the list with the control wheel. Press the <Save> soft
key (N) to save the new settings over the selected profile. Saving to SD
Card will be displayed. Proceed to 3.
OR
2. Press the <New> soft key (M) to create a new profile name.
(8 characters maximum)
Use the control wheel to scroll through the available characters.
Use <> or <> to move to the desired character location.
Use <Delete> to erase characters when highlighted.
Press <Save> to save the new profile name. Saving to SD Card
will be displayed.
In either case:
3. Wait for the confirmation screen to appear. After the screen appears,
press <Continue> to return to the Setup Complete screen J.
W-5. Saving the Profile to an SD card
This section shows the process of saving the profile and creating names for each file. The screen
progression shown here is the same whether A is selected in the New Profile, Existing Profile, or
Restore Profile menus.
L
M N
M
N
O
P
J
J
Device Data LogsProfile Wizard