
Installation Manual

900-0122-01-00 REV A www.outbackpower.com OutBack Power Technologies, Inc.
© 2011 OutBack Power Technologies 19009 62
nd
Ave NE
Arlington, WA 98223 USA
+1.360.435.6030
T M
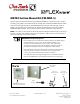
MATE3 Surface Mount Kit (FW-MB3-S)
This document contains instructions for installing the MATE3 on a bracket for wall or surface
mounting. The surface-mount bracket allows enough space behind the MATE3 that the CAT5
cable can be brought directly into the MATE3 without routing the cable through a wall. In
addition, the bracket can be attached to an existing mounting plate, such as the OutBack
FLEXPower ONE assembly. This is usually only done when a bracket is being replaced.
NOTE:
The cable can be routed into the back of the mounting bracket through an opening in
the wall or surface. This cabling method can be used if the cable must be concealed inside a
wall or brought from one room to another.
IMPORTANT: Hardware Required
¾
Because this bracket is intended for mounting against many different types
of walls (wallboard, masonry, etc.), the attachment hardware is not
included. The user must provide screws, anchors, and anything else
appropriate for that particular mounting material. (Machine screws are
provided for attaching the bracket to a FLEXpower ONE assembly.)
¾
If the cable will be routed through the wall into the back of the mounting
bracket, it may be necessary to cut or drill a hole in the appropriate
location. This step should be performed before mounting.
¾
The CAT5 cable must be brought through the hole and made available to
plug into the MATE3 before performing this installation (see next page).
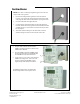
6-32 x 3/8”
Machine Screws,
qty 4
Parts
Surface-Mount
Wall Plate
MATE3 System Display and
Controller (sold separately)
8-32 x 1¼”
Machine Screws,
qty 4
Shutter
Bushing