
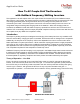
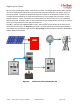
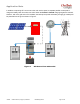
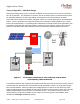
Outback Radian AC Coupling Note
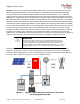
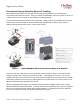

Application Note
©2019OutBackPower,Arlington,WA98223FB‐MM‐2/22/2019Page8of12
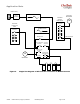
Procedure
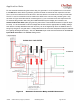
Programming the MATE3s and Radian Inverter
1. Download the MATE3s and Radian AC Coupling firmware from the OutBack Power website.
2. Copy the firmware files to the SD card and install from the MATE3s Main Menu.
3. Enter the Installer password.
4. Select Settings from the MATE3s Main Menu.
5. Select Inverter menu and scroll down to the AC Coupling settings.
6. Change AC Coupling from N to Y, and change the Freq Shift Response Time (0.02 to 5.0
seconds) if desired. This setting adds/subtracts delay in the frequency steps between 60.0
and 64.5 Hz.
7. Press the UP key to move back to the Inverter menu and program the Absorb and Float charger
settings according to the battery manufacturer’s specifications.
8. Move to the Grid Tied settings in the Inverter menu if the SellRE setting is to be changed from
its default setting of 52.0 volts. NOTE: the SellRE setting does not affect the exporting of GTI
current back to the main service panel. The GTI current moves from the AC output to the AC
input through a relay so the SellRE setting has no affect. However, the SellRE setting becomes
the active voltage target during frequency shift operation when the Absorb and Float timers have
been zeroed. A higher setting from 52.0 to equal the Float setting may allow the GTI to operate
over a wider battery voltage range when the Backup Load panel is lightly loaded. If using
lead-acid batteries, most can operate safely at Float voltages for extended periods.