
Installation Manual

Assembly
900-0123-01-00 Rev C 27
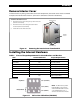
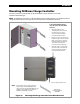
Mounting FLEXmax Charge Controller
The GSLC enclosure accommodates up to two FLEXmax charge controllers and a HUB
Communications Manager.
NOTE
: The following instructions are for the FLEXmax 60 or FLEXmax 80 only. The FLEXmax Extreme
charge controller connects directly to the wall and does not need additional brackets.
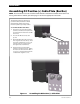
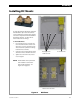
Figure 24 Mounting the Charge Controller to the GSLC Enclosure
To mount the FLEXmax Charge
controller to the side of the GSLC
enclosure:
1. Align the brackets to the
mounting holes and secure the
brackets to the sides of the
enclosure with the hardware
provided with the brackets.
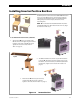
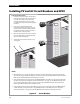
2. Note the location of knockouts on
both the charge controller and the
GSLC. (See page 16.) The holes
will align when the brackets are
used. Remove knockouts if
necessary and insert bushings.
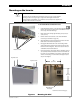
3. Align the charge controller with
the center hole on each bracket
and secure with the hardware
provided with the brackets.
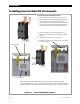
Dual Charge
Controller Bracket
(FW-CCB2)
4. Secure to the bottom bracket.
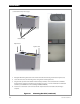
NOTE: This illustration shows only brackets for a
single charge controller (FW-CCB). Dual
charge controller brackets (FW-CCB2) are also
available. The installation instructions for
FW-CCB and FW-CCB2 are similar.