
Instructions / Assembly


¹⁄16
"
¹⁄16
"
12"
12"
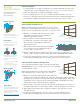
Frame
Construction
Please read through
ALL instructions
before starting.
FRAME MATERIALS
• For existing walls, fences, gates, garage doors, pergolas, balustrades, bench seats,
or planter boxes, create a light frame using 1" x 2", 2" x 2", or 2" x 4" wood. Select
lumber size appropriate for number and weight of panels.
• For free-standing structures, use 4" x 4" timber or metal posts with 2" x 4" rails.
• For heavy or large gates and other moving structural or more substantial applications,
use aluminum or RHS (rectangular hollow steel) for frame posts and cross rails.
All panels have a 1w"
nominal border that will
conceal most frames.
Border Spacing
Pre-Drilling
Measure, draw-up, and
pre-drill screw holes in
the panel border.
Measure, draw-up, and
pre-drill screw holes
halfway into the panel
border:
• every 12" on all 4 sides
of each panel
• ⁷/₈" from panel edge
Drilling Guide
outdecousa.com page 3 of 4
BASIC FRAME CONSTRUCTION
Build your frame laying on a flat surface so you can check
dimensions, square alignment, and panel joint spacing. This
allows you to easily raise/lower, reposition, or level your frame.
1. Measure so your frame will match the exact width
and height of your panel area, including a z"
expansion gap between panels.
2. Create a frame of vertical and horizontal studs,
positioning the center lines of the interior studs
where the panel edges will meet, with the z"
gaps between them.
3. With a helper, lift your frame into place and adjust
so the entire piece is level. Attach the frame to
the fence, wall, or other surface.
4. Measure, draw-up, and pre-drill the panels with screw holes z" larger than your
screws or nails, every 12" on all four sides. (See border and drilling guides at left.)
5. Position your panels using z" spacers to create consistent expansion joints
between panels. Clamp panels to your frame and attach them. (See page 4.)
FREE-STANDING FRAME CONSTRUCTION
A free-standing installation requires a strong structural frame.
OUTDECO panels are not intended for use as a free-standing
structure without a frame.
Build a frame laying down on a flat surface using lumber
that's minimum 4" x 4" for posts and 2" x 4" for rails.
1. Measure so your frame will match the exact width and
height of your panel area, including a z" expansion gap between panels, and add
the length of post extensions for legs and footings. (Post height, weight, and footing
requirements vary, so measure and consider load weight carefully. Check for any
underground services and features before digging.)
2. Create a frame of vertical posts and horizontal studs, positioning the center lines of
the interior studs where the panel edges will meet, with the z" gaps between them.
3. With a helper, lift your frame into footing holes, adjust so the entire piece is level,
and add concrete.
4. Position your panels using z" spacers to create consistent expansion joints
between panels. Clamp panels to your frame and attach them. (See page 4.)
¹⁄₁₆" Gap between Panel Edges
2" x 2" or
2" x 4" Posts
1" x 2", 2" x 2" or
2" x 4" Cross Rails
4" x 4"
Posts
2" x 4"
Cross Rails
Panel Specs
Find panel weights, sizes,
and other details on our
website’s Patterns page
and click on your panel's
pattern name.
outdecousa.com/patterns