
Use and Care Guide


Quesons? Contact your local Outdoor Disncons Dealer or visit www.outdoordisncons.com
Outdoor Disncons representaves are available M-F 8:00 a.m. to 5:00 p.m. EST. at 844.345.2424.
ODPB_v1_01_18
2
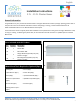
Installaon Instrucons
2 Ft. - 15 Ft. Planter Boxes
English
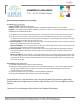
Read each step thoroughly prior to installing:
First Step: Determine locaon
Ground or Ledge - Place where appropriate.
*Railing - Requires oponal railing hanger brackets, visit www.outdoordisncons.com for brackets.
Hanging - Use included hanger brackets and bolts for wall mount. Note: It is recommend a licensed contractor or
qualied person install the Bloomz Box.
1) Using a Stud Finder locate and mark the wall studs. If installing into masonry, studs may be hard to locate.
2) Using a level, mark each hole 2 1/4 inches below the top of the planter box on the studs. Try to posion
mounng brackets evenly to spread out the planter box weight on corresponding studs. Example: 3 . length
would be posioned roughly 12 inches from each end.
3) Wood Installaon - To insure proper depth, mark a 1/4” wood drill bit with tape 3 inches from the end of the
drill. Using a power drill, drill hole to proper depth.
Masonry Installaon - To insure proper depth, mark a 3/8” masonry drill bit with tape 3 inches from the end
of the drill. Using a power drill, drill hole to proper depth.
4) Wood Installaon - Using a wrench or 9/16 socket wrench insert Lag Screw (D) through Hanger Bracket (C)
hole. Secure bracket to wall with outward bend at the top and boom poron of bracket with the hole is
ush to the wall.
Masonry Installaon - Insert 3/8 inch 2 1/2” Lag Shield into holes (not included), slight tap with hammer may
be required. Using a wrench or 9/16 socket wrench insert Lag Screw (D) through Hanger Bracket (C) hole and
into Lag Shield. Secure bracket to wall with outward bend at the top and boom poron of bracket with the
hole is ush to the wall.
Second Step: Prepare Bloomz Box
1) Place Micro-Mesh Mat (B) in boom of Planter Box (A).
2) Select your favorite pong soil and ll the inside of the planter box 3/4 full. Note: Insert or ller material is
not required as the Micro-mesh mat retains soil and as excess water passes through it the convex base
channels water to the side drain holes.
3) Insert desired plants and cover exposed roots with addional pong soil.
4) Hang or place the Bloomz Box into posion and water accordingly.
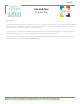
Congratulaons on a job well done! Over the next few weeks the container garden will
ourish and with the right amount of water, light, ferlizer, and TLC your neighbors will be
envious.
Thank you for purchasing the Bloomz Box from Outdoor Disncons.