
Installation Guide


ODFSPH10_2018
5
Installaon Instrucons
Free-Standing Harmony Pergola
English
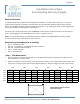
Quesons? Contact your local Outdoor Disncons Dealer or visit www.outdoordisncons.com
Outdoor Disncons representaves are available M-F 8:00 a.m. to 5:00 p.m. EST. at 844.345.2424.
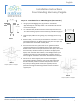
Step 2.B. - High Wind Load Installaon
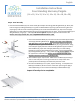
1. Using a post hole digging tool, dig a hole 12" in diameter
approximately 24"- 36" deep. Place a 12" sonatube into the
hole.
2. For a nished look, build a frame around the top of the hole
12” - 19”+ wide creang a pad to set the Column (I) and Base
Cap (L) on.
12”
24” - 36”
4”
12”- 19”+
12”- 19”+
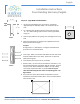
3. Level the pier plaorms using string line, wood pegs and a string
level.
4. Select the appropriate 4 x 4 length (not supplied) for the hole
depth plus the column length.
Example:
8’ High Column + 3’ Hole Depth = 11’ High 4 x 4 Wooden Post
(Purchase 12’ 4 x 4 Wooden Post)
5. Insert 3 qty. 16D 3 1/2” Stainless Steel Nails into each side of the
4x4 post boom about 1 1/2” deep. Space nails 3” apart and
oset the facing side.
6. Insert boom of 4 x 4 post into 12” sonatube.
7. Mix the ready - mix concrete per manufacture instrucons. You
will need approximately 2 qty. 80 lb. bags for each pier. Center 4
x 4 post in hole, ll pier halfway and adjust 4 x 4 post making
sure to keep square with other 4 x 4 posts. Note: 4 x 4 post
sides should be facing the two other corresponding posts. See
gure below.
8. Once posts are square, ll the holes and pads with concrete.
Smooth the surface with trowel / oat. Secure 4 x 4 with stakes
unl concrete cures.
Item 1
Item 2
Item 3