
Installation Guide


ODFSPH10_2018
6
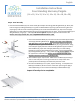
Step 3 - Column Assembly
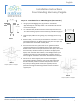
1. With the 4 x 4 post secured to the foundaon, measure Column (I). Add 1/8” to 1/4” to
column measurement and mark a line on the 4 x 4 post. Remove excess 4 x 4 length at the
top with a saw.
2. Carefully slide Column Spacer (M) over 4 x 4 post and posion at the base of the 4 x 4.
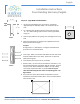
3. Align the groves on the Cover Plate (B) with the Wing Bracket (A) arm
extensions that t over the 4 x 4 post. Slide the two brackets together
and place on top of the 4 x 4 post. Note: Wing Bracket (A) must
face the same way as the other side so the Notched Beam (G)
can be secured. Use 8 qty. - 2.5” Screws (C) to aach Wing Bracket to 4 x
4 post through 4 predrilled holes. Note: Cover Plate should move freely.
4. Remove Cover Plate (B).
5. At the top of the 4 x 4 post, measure down 1” from the top and mark. Add 2 wood spacer
blocks from excess 4 x 4 material measuring 3 1/2” wide by 1 1/2” high by 1 3/4” deep or
use a pressure treated 2 x 4 and cut accordingly. Place wood spacers on the same side as
the Notched Beam (G) opposite the metal Wing Bracket (A) and use 2 qty. 2.5” Stainless
Steel Screws (C ) to secure each block.
6. Squeeze the Wing Bracket (A) wings and tape together.
7. Slide the Tuscan Base (L) onto the boom of the Harmony Square Column (I). The quick t
pressure tabs keep it secure.
8. Using 2 people, carefully slide the Harmony Square Column (I) and Tuscan Base (L) over the
4 x 4 post. Posion accordingly. Note: Do not force.
9. Apply Adhesive (F) to the top side of the wooden spacers. Then carefully slide Column
Spacer (M) over Wing Bracket (A) and 4 x 4 post and rest on top of wooden spacers.
Remove tape from Wing Bracket (A).
10. Slide the Decorave Neck (K) over the top of the Harmony Square Column
(I) and posion accordingly. The quick t pressure tabs keep it secure.
11. Slide the Tuscan Cap (J) over the top of the Harmony Square Column (I)
and posion so the top is even with the top of Harmony Square Column (I).
The quick t pressure tabs keep it secure.
12. Slide Cover Plate (B) into Wing Bracket (A). Align hole in Wing Bracket (A) and hole in
Cover Plate (B) and secure with 2” Hex Bolt (E).
13. Repeat process for each post.
Installaon Instrucons
Free-Standing Harmony Pergola
English
Quesons? Contact your local Outdoor Disncons Dealer or visit www.outdoordisncons.com
Outdoor Disncons representaves are available M-F 8:00 a.m. to 5:00 p.m. EST. at 844.345.2424.
I.
K.
L.
.
1”
M.
B.
A.
C.
M.
A.
J.
Item 2
E.
Item 3
M.