
Installation Guide


ODFSPH10_2018
7
Installaon Instrucons
Free-Standing Harmony Pergola
(16 x 10, 16 x 12, 16 x 14, 16 x 16, 16 x 18, 16 x 20)
English
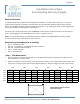
Quesons? Contact your local Outdoor Disncons Dealer or visit www.outdoordisncons.com
Outdoor Disncons representaves are available M-F 8:00 a.m. to 5:00 p.m. EST. at 844.345.2424.
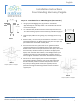
G.
A.
B.
D.
F.
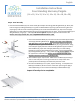
Step 4 - Roof Assembly
1. Place rst Notched Beam (G) onto Cover Plates (B) and adjust accordingly with Wing Brackets (A). Drill 2 pilot
holes through top of Wing Bracket (A) as a guide into Notched Beam (G) using 3/16 drill bit. Using ne sand
paper lightly scu the inside of the Wing Bracket (A) and inside of Notched Beam (G), wipe clean and apply
Adhesive (F) to inside of Wing Bracket (A) and press Notched Beam (G) into place. Secure Notched Beam (G) to
Wing Bracket (A) using 4 qty. - 1” Bolt (D). Do not over ghten. Repeat for opposite end and other side.
Notches must align on both sides. Check alignment with Cross Beam width.
2. Place second Notched Beam (G) onto other side of Cover Plates (B) and adjust
accordingly with Wing Brackets (A). Notches must align, check alignment
with short 2x4 or use Cross Beam width. Drill 2 pilot holes through top of
Wing Bracket (A) as a guide into Notched Beam (G) using 3/16 drill bit. Using
ne sand paper lightly scu the inside of the Wing Bracket (A) and inside of
Notched Beam (G), wipe clean and apply Adhesive (F) to inside of Wing
Bracket (A) and press Notched Beam (G) into place. Secure Notched Beam
(G) to Wing Bracket (A) 4 qty. - using 1” Bolt (D). Do not over ghten. Repeat
for opposite end and other side. Notches must align for each side, check
alignment with Cross Beam prior to drilling holes.
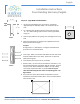
3. Set Cross Beam (H) on top of notch. Make sure Cross Beam (H) overhang is
even on each side prior to securing into the notch. If Step 2 was done
perfectly each Cross Beam (H) should t easily into each notch.
4. Once all Cross Beams (H) are in place, inspect overhang. To complete Cross
Beam (H) installaon, li each end out of the notch just enough to apply a
dab of Adhesive (F) to secure the Cross Beam (H) to Notched Beam (G).
Inspect all work prior to compleon.
G.
H.