
Installation Guide
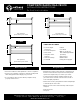


30"– 45"
deep
6" minimum
12"-18" hole
diameter
6" of
gravel
COMPOSITE RANCH RAIL FENCE – INSTALLATION INSTRUCTIONS COMPOSITE RANCH RAIL FENCE – INSTALLATION INSTRUCTIONS
Pg. 3
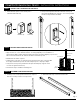
STEP 3 INSTALL THE L-BRACKETS TO THE POSTS
STEP 4 DIG POST HOLES AND SET POSTS
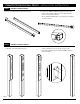
STEP 5A ASSEMBLE THE FENCE SECTION
1. Pull the brackets apart so there are two parts –
L-bracket and bracket cap.
• Note – we recommend you dig and set posts one at a time as you’re building down the fence line.
• Dig post holes 18" – 24" in diameter and 30" – 45" deep (depending on local ordinance or
expected frost depth in winter). Keep the height of the rails in mind when digging your post holes.
We recommend a minimum of 6” between the bottom rail and the ground.
• Backfill the holes with 6" of gravel.
• Starting in the corner, mix concrete in the first hole per the instructions on the bag. Mix
thoroughly and install the post into the hole and tap the post to the proper depth.
• Using a level, ensure post is plumb. Brace the post with temporary supports as the
concrete sets (per the instructions).
• Follow these steps to install the remaining posts
1. Set first post in concrete per the instructions in step four.
Place the second post in the second post hole.
2. Slide the bracket caps on both ends of the rails.
2. Using a T-25 torque bit, attach the L-brackets to the posts
through the predrilled holes using the 1-3/4" screws provided.
Do this on all posts before assembly.
Bracket cap L-bracket