
Burner Manual


17
www.outdoorrooms.com
42508 REV G CFP : 12-01-2020
6
BURNER INSTALLATION
A. SELF-CONTAINED PROPANE
CYLINDER INSTALLATIONS
A YouTube tutorial on self-contained propane cylinder
setups is available at this web address:
https://www.youtube.com/watch?v=h2wGK6RdY&feature=youtu.be
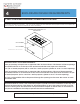
Secure supplied control panel to enclosure with
suitable fasteners. See Image 6.1. If installing into
an Outdoor GreatRoom Company
TM
re
table, a control panel will already be installed and
the supplied control panel can be discarded. A
control panel for use in landscape block
applications is available. See Reference Materials
for information.
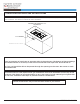
Remove cap and hex nut from sparker box. Put
threaded section of sparker box through control
panel and secure in place with hex nut. Install one
(1) AAA battery in the sparker box and
secure cap onto sparker as shown in Image 6.2.
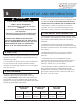
Using adjustable wrenches, tighten all
connections shown in Image 6.3. This step serves
as a nal safety measure as all ttings come
tightened from the factory.
1.
2.
3.
(Img. 6.1)
WARNING
!
!
Installation and repair should be performed
only by a qualied service technician.
+
-
(Img. 6.2)
FLEX-LINE AND BURNER
ORIFICE CONNECTION
FLEX-LINE AND VALVE
CONNECTION
REGULATOR HOSE AND
VALVE CONNECTION
(Img. 6.3)
FLEX-LINE AND BURNER
ORIFICE CONNECTION
FLEX-LINE AND VALVE
CONNECTION
REGULATOR HOSE AND
VALVE CONNECTION
IMPORTANT
Other media options apart from the supplied
clear glass gems can be used in Crystal Fire®
Plus burners, but they should be supplied
by the Outdoor GreatRoom Company
TM
. This
ensures that the proper amount of media is
used and that the media is approved for use in
gas appliances.
MEDIA MUST BE IN PLACE DURING
OPERATION. Operation of appliance without
media will damage the burner.
Overfilling of the burner with media can cause
adverse operational issues.
Use of burner media other than that supplied
by The Outdoor GreatRoom Company
TM
is not
recommended and could lead to operational
issues.