
Installation Guide


Facia Board
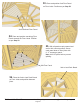
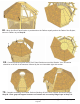
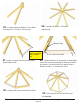
73. With the Facia Board
positioned correctly on Rafter
ends, secure with 4 - 2” screws
per side.
Drill 1/8” pilot holes to prevent
splitting.
Note- Align screws so Facia
Detail Plate will cover. See
Step 119 for details.
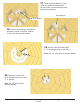
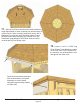
74. At Mid Rafter, secure Facia
with 1 - 2” stainless screw as shown
to the right. Position and secure the
2nd Facia Board to end of Rafters
as per Step 73 -74.
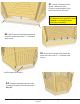
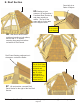
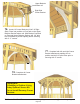
75. Complete positioning and securing Facia Boards to Rafter ends. Use the same
pattern as for the Roof Panel Sections. Secure as per Step 73-74.
Important - It is normal for gaps to occur between Facia
Boards. Later, Corner Facia Detail Plates will be added to
cover any gaps / exposed screws.
Toll Free 1-888-658-1658 www.outdoorlivingtoday.com sales@outdoorlivingtoday.com
Page 27