
Instructions / Assembly


Toll Free 1-888-658-1658 www.outdoorlivingtoday.com sales@outdoorlivingtoday.com
Page 5
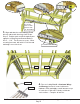
3 Cleats
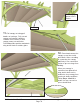
1. With a Step Ladder, install Part A - Canopy Lowering Cleats - 3 pcs Total. (2 pcs. @ 1 1/2” x
2 1/2” x 34”) & (1 pc. @ 1 1/2” x 2 1/2” x 8 1/2”). Attach with 2-3 - 4” Torx Screws. Cleats will lower
the canopy on one side and drain water off the fabric so it doesn’t collect excessively. Decide best side
for water to drain for your situation. Position cleats underneath pergola joists or blocking as shown
above and attach. Cleats are pre-drilled for Torx Screws.
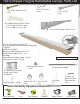
2. With Step Ladders and assistance, lift up Part B - 115 1/2” long Canopy Track and position
against post and tight to the underside of pergola joist on side (use side without lowering cleats first).
Align track against post. Attach track to post with 1 - 1 1/2” Torx Screw. Drill hole in track with 1/4”
drill provided. On opposite end of track, screw 1 - 1 1/2” Torx Screw up through the track into bottom
of wood joist. Attach 4 more 1 1/2” Torx Screws evenly spaced along the the track into the bottom of
joist.
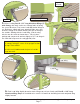
Gap for Aluminum
Wing Stop is generally
the anchor end of
canopy and where the
fabric will bunch up.
Gap
Flush
Part B
4 - 1 1/2” Torx
Screws per
track. Pre-drill
track first with
1/4” bit included.
4 - 1 1/2” Torx
Screws per
track. Pre-drill
track first with
1/4” bit included.