
Warranty


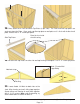


27. Position Side Top Plates
(one side only) on top of wall
studs so they are flush on the
inside with 2x3 wall stud. There
are 3 pieces of Side Top Plates
(2 angle cut on one end and one
straight cut - both ends).
Together, the plates should be
centered evenly on the wall left to
right. Attach by screwing down
into top wall framing with
4 - 2” screws per plate.
Angle cut
on ends.
Top Plates should be flush
with inside of wall framing.
Toll Free 1-888-658-1658 www.outdoorlivingtoday.com sales@outdoorlivingtoday.com
Page 12
26. When all walls are attached
together, check alignment with the floor.
Bottom wall framing should sit flush with
outside of floor joists and plywood floor.
Confirm 32” wide door opening at
bottom. When positioned correctly,
fasten bottom wall plates to floor using
4 - 2 1/2” screws per wall panel.
Bottom Wall
Framing
Confirm 32” Wide Door Opening at Bottom
Caulking
Optional - Caulking
seams will help prevent
moisture from entering
at seam. Caulking not
included in kit.
Floor