
Instructions / Assembly
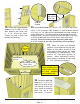
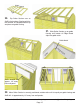
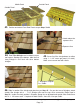


24. Place Side Gable Wall so 1x3 framing sits flush with the
inside of the top plate. It should also be centered sideways on
the top plate. Adjust gable accordingly. Temporarily attach to
walls and top plate with 2 - 2” screws. Gables may need slight
adjustment in Step 35 when attachment will be completed with
an additional 6 - 2” screws. Screw from the bottom of gable
framing down into Top Plate and Wall. Hint: Use a straight edge
to check the angle of the gable framing and top plate. Both
angles should line up (see diagram below).
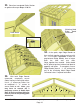
Use a straight edge
to check that angle
of gable lines up
with top plate angle.
Adjust gable for
best fit.
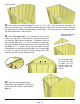
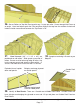
23. Next, attach the Front Top Plates (2), (3/4” x 2 1/2” x 50”). The front and rear top plates are
angle cut down the length. Once again, position top plates on wall frame so they are flush. Front and
rear top plates will fit between side top plates. Attach with 4 - 2” screws per plate. Complete all other
Top Plate attachments - side and rear.
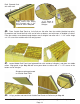
25. Align and attach opposite Side
Gable Wall as per Step 24. Flashing will
overhang wall on outside. (See Diagram
Step 53)
1-888-658-1658 www.outdoorlivingtoday.com sales@outdoorlivingtoday.com
Page 12
Front Top Plate
Flashing overhangs
wall on outside.